Changing the Machine Settings
1. Turn on the machine.
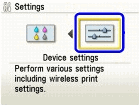
2. Display the Device settings screen.
a) Select 'Settings' on the HOME screen.
b) Select 'Device settings', then press the <OK> button.
The Device settings screen is displayed.
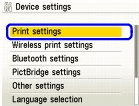
3. Select the menu.
a) Select the setting item, then press the <OK> button.
Example: select Print settings.
The setting screen for the selected item is displayed.
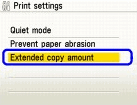
b) Select the menu, then press the <OK> button.
Example: select Extended copy amount.
4. Change the settings.
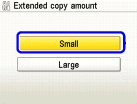
a) Select the setting item, then press the <OK> button.
Example: select Small.
Print Settings
Quiet Mode
Use this function if you want to reduce the operation noise, such as when printing at night.
Note: Printing speed may be reduced compared to when this setting is set to OFF. This function may not be so effective depending on the print quality setting. Furthermore, certain noise, such as when the machine is preparing for printing, is not reduced.
Prevent Paper Abrasion
Use this setting only if the print surface becomes smudged.
Note: Be sure to set this back to OFF after printing since it may result in lower print quality.
Extended Copy Amount
Selects the amount of image that extends off the paper when printing in Borderless (full).
Note: This setting can be applied only when Copy or Easy photo reprint mode is selected. If printouts contain margins even though you are printing in Borderless, specifying Large for this setting may help solve the problem.
Film print cutting range
Use this setting to specify the cutting range of the 35 mm film.
Note: Select Undersize cut when the frame of film is scanned. Select Oversize cut when the edge of image is not scanned.
Wireless Print Settings
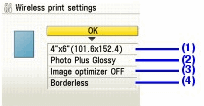
(1) Select the page size for printing photos saved on a mobile phone.
(2) Select the media type for printing photos saved on a mobile phone.
(3) Select Image optimizer ON to correct and smooth out the jagged contours when printing.
(4) Select the layout of the photos as below.
Sticker print:
Stickers x 16
Printing on paper other than sticker:
Bordered x 1, x 2, x 4, x 8
Borderless x 1, x 2, x 4, x 8
Mixed 1, 2, 3
Note: Mixed 1, Mixed 2, or Mixed 3 can be selected only when the page size is set to A4 or 8.5" x 11" (215 x 279).
Bluetooth Settings
Device name: Specifies the name of this machine that is displayed on a Bluetooth compatible device. For example, if you set it to MP960-2, the machine will be displayed as "Canon MP960-2" on the Bluetooth device. The default value is MP960-1.
Access refusal: Selecting 'ON' will disable searching of this machine by Bluetooth compatible device.
Security: Selecting 'Enable' will enable the passkey specified in Passkey. Setting a passkey will prevent unwanted access from other Bluetooth devices.
Passkey: Changes the passkey. The passkey is a four-digit number used to prevent unwanted access from other Bluetooth devices. The default value is 0000. After you change the passkey, you may be required to enter the new passkey on a Bluetooth device, even though it had previous access to the machine. In this case, enter the new passkey on the device.
PictBridge Settings
For details, refer to "Printing Photographs Directly from a Compliant Device" in the Quick Start Guide.
Other Settings
Date Display
Changes the display format of shooting dates when printed.
When 'Date ON' is selected on the Advanced Print Settings screen in Memory card mode, the shooting date is printed in the date display format you selected. The shooting date format is as specified in the DPOF setting from DPOF printing.
Read/write Attribute
Selects whether to allow data to be written onto memory cards from a computer.
Note: Remove the memory card before changing this setting. If you set this setting to Read/write mode, card direct printing cannot be done. After you finish operation of the memory card dedicated drive, be sure to set it back to Read-only mode.
Power Save Setting
Specifies the time until Power saving is enabled.
You can select from 5 minutes, 15 minutes, 1 hour or 4 hours. The default value is 1 hour.
Slide Show Setting
Specifies the image display quality of the slide show.
Note: When Image quality: Standard is selected, images are displayed at 5-second intervals. When Image quality: High is selected, images are displayed at different time intervals according to their resolutions.
Language Selection
Changes the language for LCD messages and menus.
Reset Settings
You can change the settings back to the default, except for the LCD language and the position of the Print Head.
Save Settings
Saves the settings for the Settings screen.
Load Settings
Loads the settings for the Settings screen that were saved.
