How to connect the EOS 1Ds Mark II to the computer.
| Article ID: ART155438 |
| |
Date published: 06/09/2015 |
| |
Date last updated: 08/17/2015 |
Description
How to connect the EOS 1Ds Mark II to the computer.
Solution
|
|
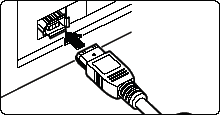
1. Plug the dedicated cable into the computer.
- Plug the cable into the IEEE1394 port.
- Refer to the computer User' s Manual for information on the terminal areas.
- With the EOS-1Ds and EOS-1D, you can connect either plug (6-pin IEEE1394 port).
|
|
|
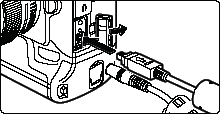
2. Plug the dedicated cable into your camera.
- Open the cover and plug the cable into the < > terminal.
- With the EOS-1Ds and EOS-1D, you can connect either plug (6-pin IEEE1394 port).
|
|


|
3. Set the camera's power switch to <ON>. |
- When the pop-up menu appears and then disappears automatically, the installation is complete.
- For Windows 2000, Me, 98 SE, nothing appears when the installation is complete. However, if the [Found New Hardware] or [Building driver information database] dialog box appears, when the dialog box disappears automatically, the installation is complete.
- When the installation is complete, the camera is ready to communicate with your computer.
- The pop-up menu and dialog boxes shown in step 3 do not appear when you connect the camera to your computer the second time or later.
|
