
Replace ink tank(s) MP620 / MP620B
| Article ID: ART103554 | | | Date published: 05/11/2015 | | | Date last updated: 08/15/2015 |
Description
Solution
 Installing / Replacing Procedure
When the ink tanks run out of ink, follow the procedure below to replace them.
|
Handling ink
|
|
Every ink is also consumed in the standard cleaning and deep cleaning of the Print Head, which may be necessary to maintain the machine's performance. When an ink tank is out of ink, replace it immediately with a new one. |
-
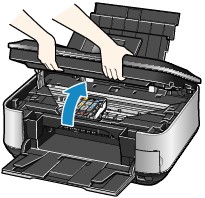
Make sure that the power is turned on, and open the Paper Output Tray gently.
-
Lift the Scanning Unit (Cover) until it stops.
The Print Head Holder moves to the replacement position.
|
|
|
|
|
|
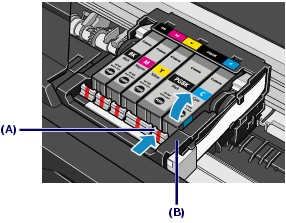
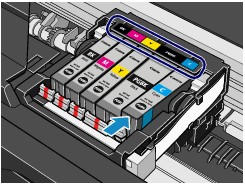
-
Replace the ink tank with the lamp flashing fast.
Push the tab (A) and lift the ink tank to remove.
Do not touch the Print Head Lock Lever (B).
|
|
|
|
-
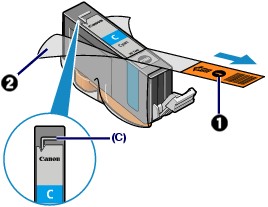
Prepare the new ink tank.
(1) Take the new ink tank out of its package, pull the orange tape
 in the direction of the arrow to peel it off, then remove the film
  .
.
|
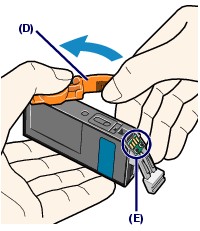
(2) Hold the orange protective cap (D) as indicated in the figure below, then twist and remove it from the bottom of the ink tank.
Remove the protective cap while holding it to prevent the ink from staining your fingers.
Discard the protective cap once it is removed.
|
|
-
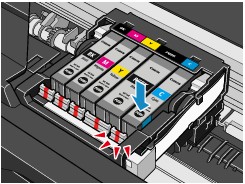
Install the new ink tank.
(1) Insert the front end of ink tank into the Print Head at a slant.
Make sure that the position of the ink tank matches the label.
(2) Press the mark
 (Push) on the ink tank until the ink tank snaps firmly into place.
Make sure that the ink lamp lights up red.
|
-
Close the Scanning Unit (Cover) gently.
|
|