TS8020 Setup Using Canon PRINT Inkjet/SELPHY - Android (Video)
Article ID: ART167446
|
Date published: 03/07/2017
|
Date last updated: 04/08/2019
Description
Mobile app setup wireless connection
Solution
This article discusses how to use Canon PRINT Inkjet/SELPHY to set up your PIXMA TS8020 using an Android device. This video shows how to connect the printer to a wireless network using the app as explained below.
To download the application, you must register for a Google account.
The application can be downloaded for free; however, transmission fees for connecting to Google Play apply.
Download is not possible if your operating system environment does not support the application. The application download page may not appear.
Application Setup
Once you have installed the application, follow the steps below to register the printer.
Important
If you have a wireless router, connect the smartphone to the wireless router.
If you do not have a wireless router, enable Wi-Fi in the Wi-Fi settings screen on the smartphone.
For the operation procedure, see the manual supplied with the smartphone or wireless router, or contact the manufacturer of the smartphone or wireless router.
Note
Screens displayed may vary depending on your smartphone.
Make sure printer is turned on.
Start application and tap (Register Printer) at upper left of screen.
Note
License screen appears upon initial startup.
If following screen appears, tap Yes, and then follow on-screen instructions to registerprinter.
If the following screen does not appear, proceed to Step 5.
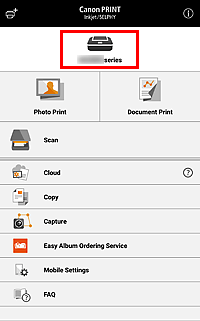
Check if your printer appears at top of screen.
When the registered printer appears at the top of the screen, setup is complete.
If your printer is not detected, proceed to the next step to continue with the setup.
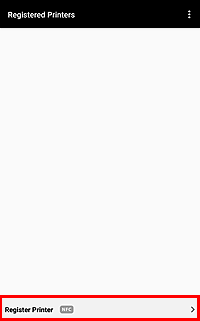
Tap Register Printer.
Printer detection starts.
When the printer detection is complete, tap your printer name that appears in the screen > OK.
Note
Change the printer name as needed.
Check if your printer appears at top of screen.
When the registered printer appears at the top of the screen, setup is complete.
If your printer is not detected, proceed to the next step to continue with the setup.
Note
Detection may take time.
If the printer is not detected even though its network connection is already complete, make sure the printer is connected to the same wireless router as your smartphone.
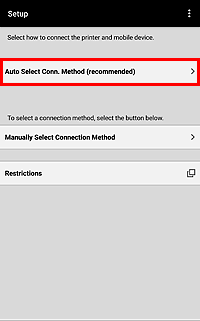
Once connection preparation is complete on printer, return to application screen and tap Auto Select Conn. Method (recommended).
Follow the on-screen instructions to complete network setup.
Check if your printer appears at top of screen.
When the registered printer appears at the top of the screen, setup is complete.
If it does not appear, perform the setup again from Step 7.
Note
In Auto Select Conn. Method (recommended), setup is performed by letting an application automatically determine which connection method is preferred in your smartphone environment: Connect via wireless router or Direct Connection.
For restrictions on Direct Connection, see "Restrictions."
Printing Using Application
Start application.
Tap Select Images.
Note
Select Images appears only when registering a printer. If Select Images does not appear, tap Photo Print.
Select image you want to print, and then tap Print.
Specify printer to use, paper size, and other settings.


 Important
 Note
Note (Register Printer) at upper left of screen.
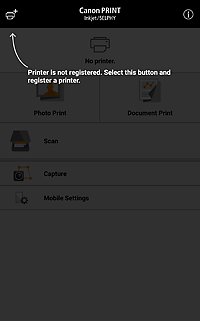


.gif)