
Scanning Documents and Saving Them in a Computer (USB & Network Connection)
| Article ID: ART166426 | | | Date published: 09/09/2016 | | | Date last updated: 02/20/2024 |
Description
Scanning Documents and Saving Them in a Computer (USB & Network Connection)
Solution
| Solution |
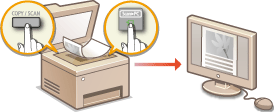
Using the Machine as a Scanner
You can scan original documents by using the operation panel of the machine or an application on a computer. Whichever way you use, the scanned documents are converted into electronic file formats such as PDFs. Use the scan function to convert large-volume paper documents into files so that you can organize them easily.
 Scanning from the Machine Scanning from the MachineYou can scan and save documents to your computer by using the operation panel of the machine.
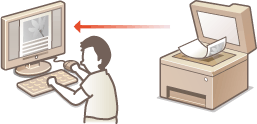
Scanning from a ComputerYou can scan documents placed on the machine from a computer. The scanned documents are saved to the computer. You can scan using MF Scan Utility (included with the machine), or with other applications such as an image-processing or word-processing application.
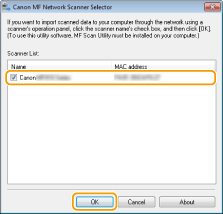
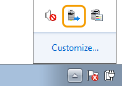
Preparing to Use the Machine as a Scanner Make sure that the machine and your computer are connected and all software is installed. For how to check, see the "MF Driver Installation Guide" from the Canon website (canon.com/oip-manual). To connect via a wireless or wired LAN, you must register this machine in MF Network Scanner Selector. Register by following the procedure below. This procedure is not required if the machine and your computer are connected via USB.
1. Click
 in the system tray. in the system tray.
2. Select the check box for the machine, and click [OK].
Scanning from the Machine The sequence of "scanning a document and saving it to a computer" can be done entirely from the machine. Scan while specifying what computer documents will be saved to; whether to scan documents in color or black and white; whether to save documents as PDFs or JPEGs; and other settings.
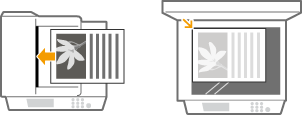
1. Place the document(s). [ Placing Documents ]
2. Press
 (COPY/SCAN) to switch to the Scan mode screen. (COPY/SCAN) to switch to the Scan mode screen.
3. Use
 / /  to select <Computer>, and press to select <Computer>, and press  . .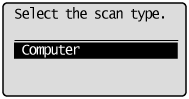
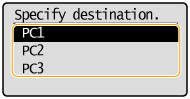
4. Select the destination computer, and press
.

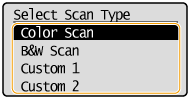
5. Select the scan type.
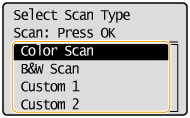
*1 Documents are scanned in black and white only, with no intermediate shades of gray.
*2 A PDF format where characters on the document are scanned as text data and the text can be searched using a computer.
 To change settings
6. Press
.
 You cannot scan while the ScanGear MF is displayed. Close the screen before scanning.

When placing documents in the feeder in step 1 (MF244dw)When scanning is complete, the save destination folder is displayed on the computer.
When placing documents on the platen glass in step 1When scanning is complete, follow the procedure below (when file format is PDF).
6-B-1. If there are additional pages of documents to be scanned, place the next document on the platen glass, and press
 . .
6-B-2. Use
/ to select <Finish Scanning>, and press .
Scanning Using the [Scan -> PC] Key
Place a document on the machine, and press
 (for MF232w, (for MF232w,  or or  , and scanning starts immediately. The type of scan (color or black and white), the save destination for the document, and other settings can be registered to a button, and documents can be scanned using those settings. This section describes how to register settings in a button and scan with it. , and scanning starts immediately. The type of scan (color or black and white), the save destination for the document, and other settings can be registered to a button, and documents can be scanned using those settings. This section describes how to register settings in a button and scan with it.
 Registering Your Settings in the [Scan -> PC] Key Registering Your Settings in the [Scan -> PC] Key
Register the computer that scanned images are saved in and the type of scan to
(for MF232w, or ).
1. Press
 . .
2. Use
/ to select <Scan Settings>, and press .
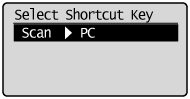
3. Select <Shortcut Key Settings>
  <Register>. <Register>.
4. Press
.
5. Select the type of connection that is used between the machine and computer, and press
.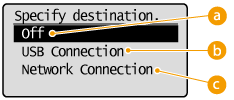
 <Off> <Off>Select this setting to erase registered settings.
 <USB Connection> <USB Connection>Select this setting if the machine and computer are connected via USB.
 <Network Connection> <Network Connection>Select this setting if the machine and computer are connected via a network.
6. Select the destination computer, and press
.
7. Select the scan type, and press
.
*1 Documents are scanned in black and white only, with no intermediate shades of gray.
*2 A PDF format where characters on the document are scanned as text data and the text can be searched using a computer.
To change settings
Checking the Registered Settings
<Scan Settings> <Shortcut Key Settings> <Confirm Destination> Select shortcut key 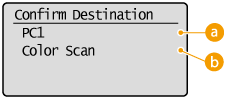
Name of destination computerShows the name of the computer registered as the save destination.
Scan typeShows the type of scan that has been set.
Using the [Scan -> PC] Key
1. Place the document(s). [ Placing Documents ]
2. Press
(for MF232w, or ).
You cannot scan while the ScanGear MF is displayed. Close the screen before scanning.
When placing documents in the feeder in step 1 (MF244dw)When scanning is complete, the save destination folder is displayed on the computer.
When placing documents on the platen glass in step 1When scanning is complete, follow the procedure below (when file format is PDF).
2-1. If there are additional pages of documents to be scanned, place the next document on the platen glass, and press
.
2-2. Use
/ to select <Finish Scanning>, and press .
Scanning Using Scan Utility
MF Scan Utility is an application included with the machine that enables you to scan documents or images to a computer. You can forward the scanned data to a specified application, or attach it to an e-mail message. After installing it from the supplied DVD-ROM, click [MF Scan Utility] displayed in the Windows start menu to start MF Scan Utility. For details on using this utility, click [Instructions] on MF Scan Utility.
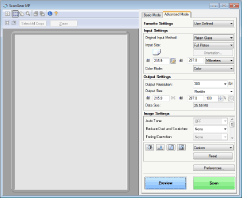
Configuring Scan Settings in ScanGear MF ScanGear MF is a scanner driver included with the machine. You can use ScanGear MF to configure advanced scan settings when you scan. The way of starting ScanGear MF differs depending of the way of scanning from the computer.
Starting from MF Scan UtilityWhen scanning from MF Scan Utility, click [ScanGear] to start ScanGear MF. For instructions on how to use ScanGear MF, click [Instructions] on MF Scan Utility.
Starting from an Application

Scanning Using an Application You can scan documents from applications such as image-processing or word-processing software. The scanned image is directly loaded in the application, allowing you to edit or process the image immediately. The following procedure varies depending on the application.
1. Place the document(s). [ Placing Documents ]
2. From the application, select the start scan command.
3. Select the scanner driver for the machine.
4. Configure the scan settings as necessary.
5. Click [Scan].
|
||||||||||||||||||||||||||||||||||||||||
| Related Info | Installing the Driver/Software Via USB for Windows | ||||||||||||||||||||||||||||||||||||||||
|
ID: 8203146600_EN_1
|
|||||||||||||||||||||||||||||||||||||||||

 icon and see the Help.
 (COPY/SCAN)
 SIMS Doc Id
8203146600