Learn the Main Parts of the Printer - MX490 Series
| Article ID: ART166994 |
| |
Date published: 12/26/2016 |
| |
Date last updated: 02/19/2020 |
Description
This article shows the main parts of the PIXMA MX490 and PIXMA MX492 printer.
Solution
Select which part of the printer you want to view:
Front View
Rear View
Inside View
Operation Panel
Front View
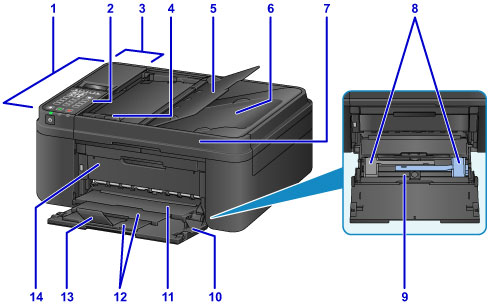
(1) ADF (Auto Document Feeder)
Ddocuments loaded in the tray scan automatically, one sheet at a time.
Learn how to load a document.
(2) Operation panel
From here, you can operate the printer or change the settings.
About the operation panel.
(3) Document feeder cover
Open this cover to clear paper jams.
(4) Document guide
Adjust this guide to match the width of a document in the tray.
(5) Document tray
Open this to load a document in the tray.
- (6) Document output slot
Documents scanned from the tray come out here.
(7) Document cover
Open this to load an original document on the glass surface.
(8) Paper guides
Align these on both sides of the paper stack.
(9) Cassette
Load plain / photo paper or envelopes here.
Two or more sheets of the same size and type of paper can be loaded, and will feed one sheet at a time.
(10) Front cover
Open this to load paper in the cassette.
(11) Paper output tray
This is where the printed paper comes out.
(12) Paper output support
Pull this out to support paper after it's been printed.
(13) Output tray extension
Open this to support paper after it's been printed.
(14) Paper output cover
Open this to replace an ink cartridge or remove a paper jam inside the machine.
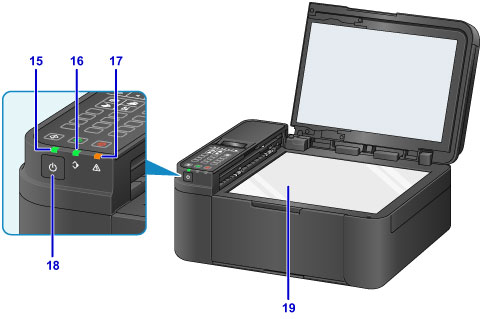
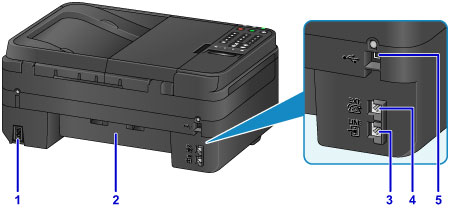
- (15) Power lamp
This lights after flashing when the power is turned ON.
(16) FAX memory lamp
This lights up when a FAX is received or when unsent documents are stored in the machine's memory.
(17) Alarm lamp
This lamp lights or flashes when an error occurs.
(18) ON button
This button turns the power ON or OFF.
 Before turning the machine ON, make sure the document cover is closed.
- (19) Platen glass
This is where you load an original document.
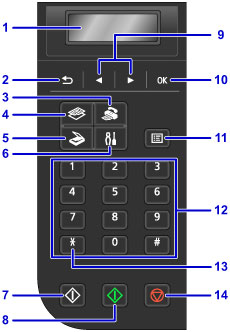
(1) LCD (Liquid Crystal Display)
This is where you will see messages, menu items, and printer status.
(2) Back button
Press this to return to the previous screen.
(3) FAX button
Press this to switch the printer to fax mode.
(4) COPY button
Press this to switch the printer to copy mode.
(5) SCAN button
Press this to switch the printer to scan mode.
(6) Setup button
This displays the Setup menu screen where you can perform maintenance and change printer settings.
(7) Black button
Press this to start black & white copies, scans, faxes, etc.
(8) Color button
Press this to start color copies, scans, faxes, etc.
(9) Left / Right Arrow buttons 

Use these buttons to select a menu or setting item. The arrow buttons are also used to enter characters.
(10) OK button
Use this to select a menu or setting item. This button also helps to resolve an error or eject a document from the ADF (Auto Document Feeder).
(11) Menu button
This displays the Copy, Scan, or FAX menu screen.
(12) Numeric buttons
Use these keys to enter numbers / characters, for instance the number of copies or fax/telephone numbers.
(13) Tone button 
This lets you switch to tone dialing temporarily if your machine is connected to a rotary pulse line.
(14) Stop button
Use this button to cancel a job in progress (a print, copy, scan, or fax send / receive).