How to automatically correct / enhance photos using Easy-PhotoPrint EX
| Article ID: ART135842 |
| |
Date published: 05/13/2015 |
| |
Date last updated: 08/15/2015 |
Solution
Using the Auto Photo Fix Function
This function will automatically analyze the captured scene and apply suitable corrections.
Note: Although the illustration below shows a Windows screen, the steps are the same on a Macintosh computer.
Important
The Auto Photo Fix function is not available for Photo Print. Photo Print allows you to automatically apply suitable corrections to all photos when printing by selecting Enable Auto Photo Fix in Color Correction for printing on the Advanced tab of the Preferences dialog box.
To display the Preferences dialog box, click  (Settings) in the Layout/Print screen or select Preferences... from the File menu.
Once image is corrected with Auto Photo Fix and saved, it cannot be corrected again with Auto Photo Fix.
Also, Auto Photo Fix may not be available for images edited using an application, digital camera, etc. manufactured by other companies.
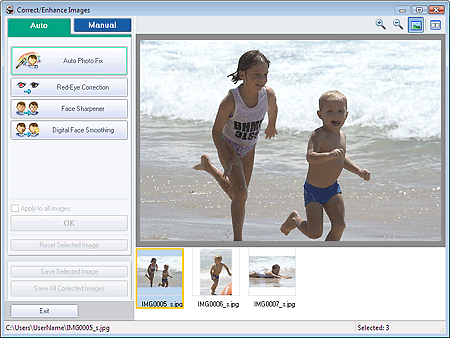
Select photos in the Select Images screen, then click  (Correct/Enhance Images).
The Correct/Enhance Images window appears.
Note: You can also display the Correct/Enhance Images window by clicking (Correct/Enhance Images) in the Layout/Print or Edit screen. In that case, only the image displayed in Preview can be corrected/enhanced.
Select the image you want to correct from the thumbnail list in the Correct/Enhance Images window.
The image appears in Preview.
Note: If only one image is selected, the thumbnail does not appear below Preview.
Make sure that Auto is selected.
Click Auto Photo Fix, then click OK.
The entire photo is corrected automatically and the (Correction/Enhancement) mark appears on the upper left of the image.
Note
Click  (Compare) to display the images before and after the correction side by side so that you can compare and check the result.
Click Reset Selected Image to undo the correction operation.
If you want to apply the correction to all the selected images at once, select the Apply to all images checkbox.
Select the Prioritize Exif Info checkbox to apply corrections primarily based on the settings made at the time of shooting.
Deselect this checkbox to apply corrections based on the image analysis results. It is recommended that you normally select this setting.
Click Save Selected Image or Save All Corrected Images.
You can save corrected images as new files.
Note
To save only the image you like, click Save Selected Image. To save all images, click Save All Corrected Images.
Only JPEG/Exif file format is available for corrected images.
Click Exit.
Note: The corrections will be lost if you exit before saving corrected images.
