➤
Home
Articles
FAQs
Ask a Question
Search
Models related to this article
i900D
Home
Articles
Articles Detail
Perform a Manual Print Head Alignment i900D
Article ID: ART156324
|
Date published: 06/09/2015
|
Date last updated: 08/17/2015
Description
Perform a Manual Print Head Alignment iP900D
Solution
Perform a Manual Print Head Alignment
The print head alignment is performed to resolve printing problems such as vertical mis-alignment or poor print quality.
If the automatic print head adjustment does not work or if you wish to adjust the print head manually, perform the manual print head alignment.
Confirm that the printer is powered on.
Set a sheet of letter-sized plain paper in the sheet feeder or cassette, and open the paper output tray.
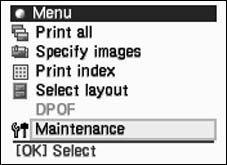
Press the <Menu> button, and use the up and down cursor
buttons to select
Tool Box
on the right and then press the <OK> button.
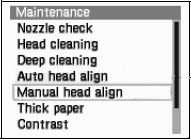
Use the up and down cursor buttons to select
Manual head align
and then press the <OK> button.
Use the up and down cursor buttons to select
Yes
and then press the <OK> button. (The Power lamp blinks and the alignment pattern printing starts.)
Confirm that the alignment pattern is properly printed, and use the up and down cursor button to select
Yes
and press the <OK> button.
Alignment pattern printed properly
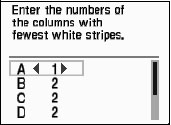
Examine the printed pattern, and, using the left and right cursor buttons, enter the pattern number in column
A
that has the fewest visible stripes.
Move the cursor buttons to column
B
through
G
by using the up and down cursor buttons, and enter the pattern numbers.
After entering the pattern numbers in all the columns, press the <OK> button.
SIMS Doc Id
0
Rate this Article
Was this article helpful?
Yes, This document is helpful
No, This document needs a clearer explanation
Please provide your comments
Rate Article