Sending images from a camera to an Android smartphone
| Article ID: ART161978 | | | Date published: 09/17/2015 | | | Date last updated: 03/12/2019 |
Description
Solution
| Sending images from a camera to an Android smartphone
ID : 8202522800 _ EN _ 1
|
|
| Solution |
If a Wi-Fi connection to the camera cannot be made using Camera Connect, please refer to The camera cannot be connected via Wi-Fi using Camera Connect.
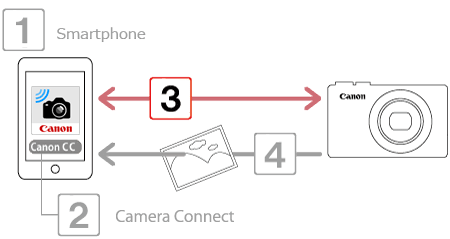
Getting Started The procedure for using the Wi-Fi function to send images from a camera to an smartphone is explained in the following four steps. Proceed in order from Step 1.
 Step 1: Confirming the smartphone's OS version Step 1: Confirming the smartphone's OS version Step 2: Installing Camera Connect on the smartphone Step 2: Installing Camera Connect on the smartphone Step 3: Connecting the camera to the smartphone Step 3: Connecting the camera to the smartphone Step 4: Sending images to the smartphone. Step 4: Sending images to the smartphone.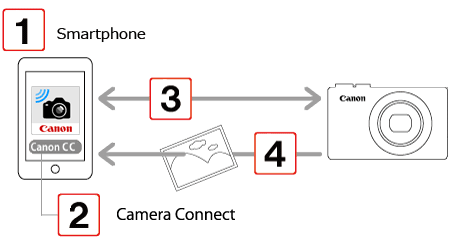
Step 1: Confirming the smartphone's OS version
 1. Check the smartphones specifications. 1. Check the smartphones specifications.The camera can connect via Wi-Fi to smartphones running the following operating systems:
Smartphone: Android OS 2.3 / 4.0 / 4.1 / 4.2 / 4.3 / 4.4 / 5.0 (as of February 2015)
Tablet: Android OS 4.0 / 4.1 / 4.2 / 4.3 / 4.4 / 5.0 (as of February 2015)
To confirm the Android OS version information, check the [Settings] menu (
 ) )  [About device]. [About device].
Step 2: Installing Camera Connect on the smartphone
Download Camera Connect from Google Play and install it on the smartphone.
If Camera Connect is already installed on the smartphone, please proceed toStep 3: Connecting the camera to the smartphone.
1. Touch the [Play Store] application on your smartphone to access Google Play.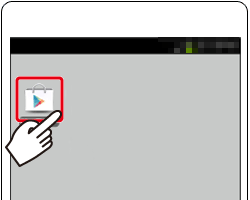
2. Touch the search icon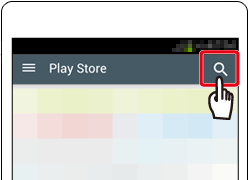
3.  Enter [Camera Connect] in the search field, and then Enter [Camera Connect] in the search field, and then  touch [Search]. touch [Search].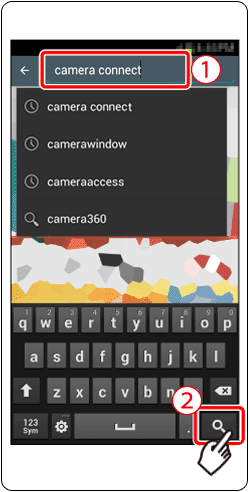
4. Choose [Camera Connect] from the displayed search results, and install it on the smartphone.After installation has been completed, tap the [Home] button to return to the Home Screen.
5. Touch the menu key, and then touch [Settings] ().
6. Confirm that the smartphone is not set to [Airplane mode].
7. Set the [Wi-Fi] switch to [ON], and then touch [Wi-Fi].
Step 3: Connecting the camera to the smartphone
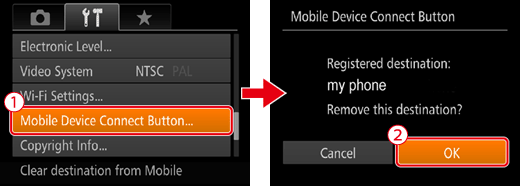
A : Registering the smartphone to the [
[  ] button and connecting. ] Pressing the Mobile Device Connect button to connect with the smartphone, and saving images from the camera to the smartphone. ] button and connecting. ] Pressing the Mobile Device Connect button to connect with the smartphone, and saving images from the camera to the smartphone.
B : Connecting via Wi-Fi.
[  ] Pressing the Wi-Fi button to connect with the smartphone, and saving images from the camera to the smartphone. ] Pressing the Wi-Fi button to connect with the smartphone, and saving images from the camera to the smartphone.
 A-1. Press the cameras < Mobile device connect > ( ) button. A-1. Press the cameras < Mobile device connect > ( ) button.(Hereafter referred to as the [
] button.)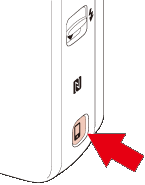
A-2. Press the [  ], [ ], [  ] buttons to choose [ ] buttons to choose [  ], and then press the [ FUNC./SET ] ( ], and then press the [ FUNC./SET ] (  ) button. ) button.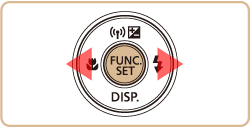 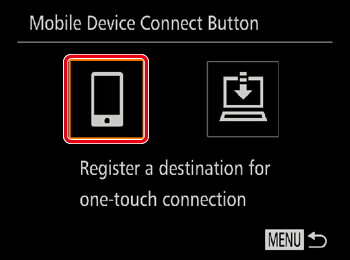
A-3. The cameras SSID is displayed on the screen.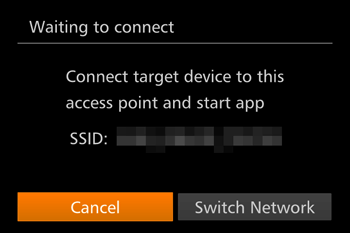
 A-4. Choose the SSID (network name) displayed on the cameras screen from the list of access points displayed on the smartphone. A-4. Choose the SSID (network name) displayed on the cameras screen from the list of access points displayed on the smartphone.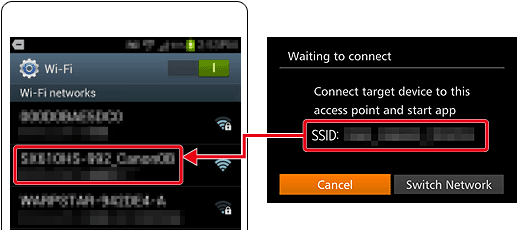
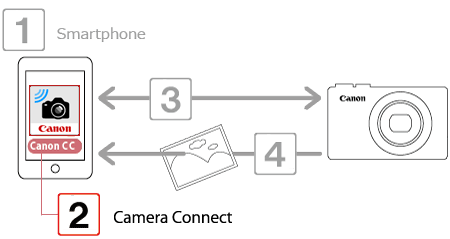
A-5. Tap the [Canon CC] ( ) application icon on the smartphone to start [Camera Connect]. ) application icon on the smartphone to start [Camera Connect].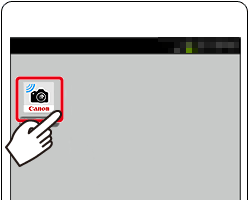
A-6. Press the [  ], [ ], [  ] buttons to choose the smartphone you want to connect with, and then press the [ FUNC./SET ] ( ) button. ] buttons to choose the smartphone you want to connect with, and then press the [ FUNC./SET ] ( ) button.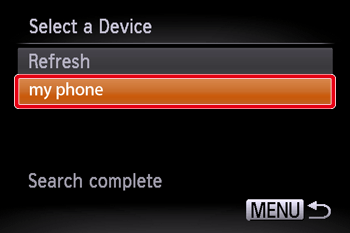
A-7. After a connection is established with the smartphone, the smartphones name is displayed on the camera. (This screen will close in about one minute.)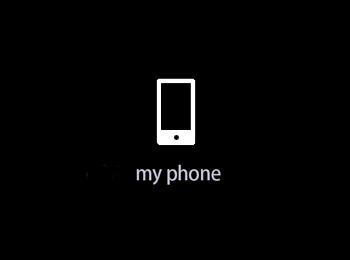
Please proceed to Step 4: Sending images to the smartphone.
B-1. Press the < Playback > (  ) button to turn the camera on. ) button to turn the camera on.
B-2. Press the < Wi-Fi > ( ) button.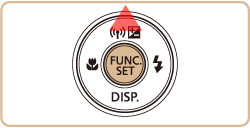
B-3. Press the [ ], [ ], [ ], [ ] buttons to choose [ ], and then press the [ FUNC./SET ] ( ) button.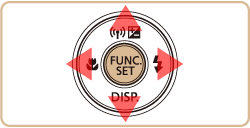 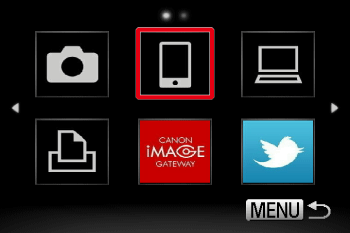
B-4. Press the [ ], [ ] buttons to choose [Add a Device], and then press the [ FUNC./SET ] ( ) button.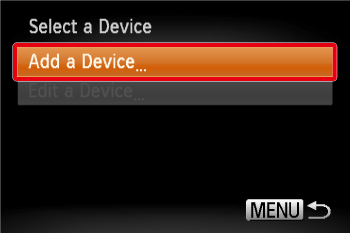
B-5. The cameras SSID is displayed on the screen.
B-6. Choose the SSID (network name) displayed on the cameras screen from the list of access points displayed on the smartphone.
B-7. Tap the [Canon CC] ( ) application icon on the smartphone to start [Camera Connect].
B-8. Press the [ ], [ ] buttons to choose the smartphone 's nickname, and then press the [ ] button.
B-9. Press the [ ], [ ] buttons to choose [Yes], and then press the [ FUNC./SET ] ( ) button.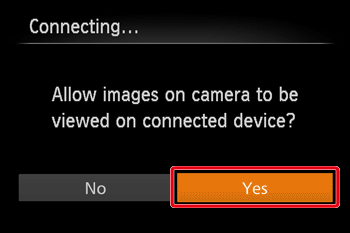 You can now use the smartphone to browse, import, or geotag images on the camera or shoot remotely.
B-10. The following screen appears.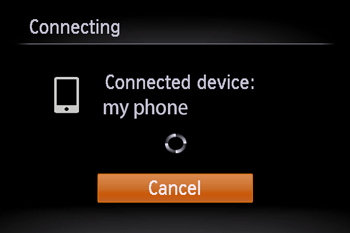
B-11. Once you have connected to the smartphone, a screen like the one below will appear.
B-12. Touch [Images on camera ] in Camera Connect.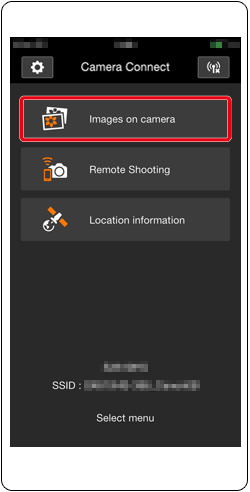
Please proceed to Step 4: Sending images to the smartphone. Step 4: Sending images to the smartphone
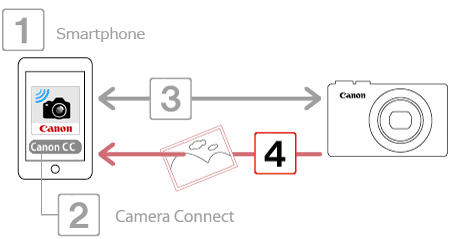
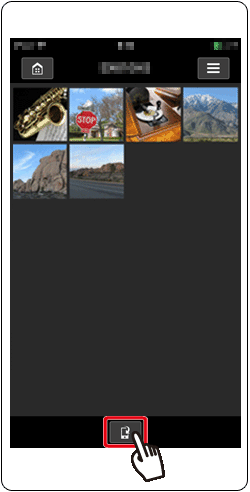
1. Use the smartphone to import images from the camera to the smartphone.When the camera is connected to the smartphone, a list of the images on the camera will appear in [Camera Connect].
2. After the screen refreshes, choose the desired images, and then touch [Save] on the bottom right of the screen. The selected images will be saved to the smartphone.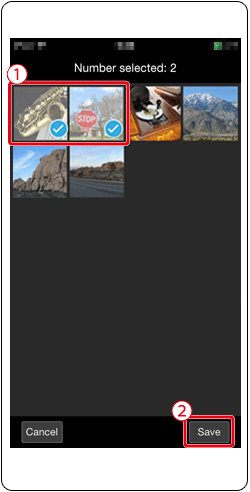
3. After the images have been saved, touch the [Home] button to return to the menu screen.
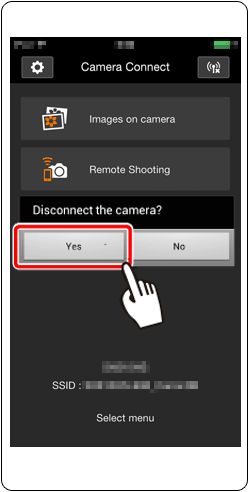
4. To end the connection, touch the [  ] icon displayed in the upper right of the screen, and then touch [Yes]. ] icon displayed in the upper right of the screen, and then touch [Yes].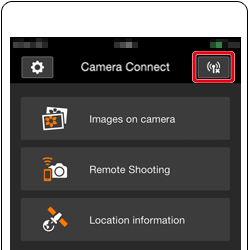
 When the connection is ended, the camera will automatically turn off.
The camera cannot be connected via Wi-Fi using Camera Connect The information registered to the smartphone for CameraWindow cannot be used for Camera Connect. Therefore, it will be necessary to re-register connection information for Camera Connect.
The procedures for making connections with Camera Connect are explained below.
1. Press the [Playback] ( ) button.
2. Press the [Wi-Fi] ( ) button.
3. A list of settings registered to the camera will be displayed. Press the [ ], [ ] buttons to display the [Select a Device] screen.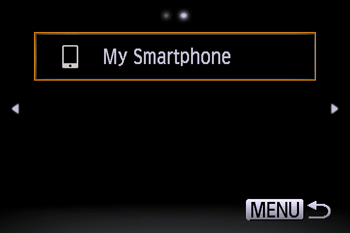
4. Press the[ ] [ ] [ ] [ ] buttons to choose [ ], and then press the [ FUNC./SET ] () button.
5. Press the [ ], [ ] buttons to choose [Edit a Device], and then press the [ FUNC./SET ] ( ) button.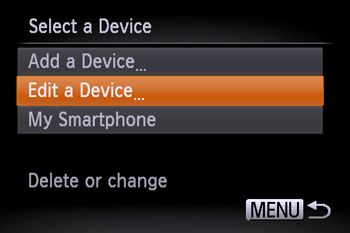
6. Choose the name of the smartphone you installed the Camera Window app on, and then press the [FUNC./SET] ()button.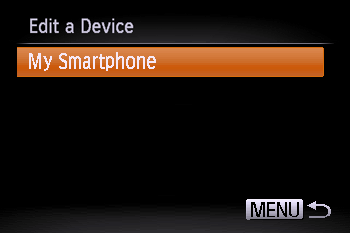
7. Choose [Erase Connection Info], and then press the [FUNC./SET] ()button.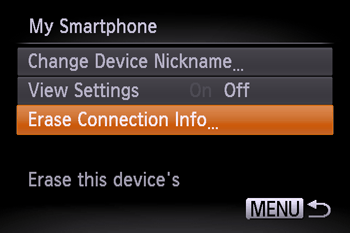
8. Choose [OK], and then press the [FUNC./SET] ()button.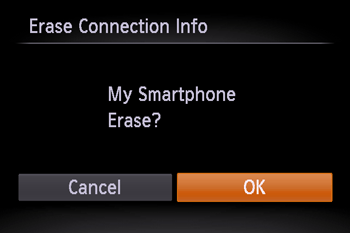
*Android, and Google Play are trademarks of Google Inc.
|
 icon, and camera setting procedures are indicated by the
  icon.
icon. ] high, [
  ] medium, [
  ] low, [
  ] weak
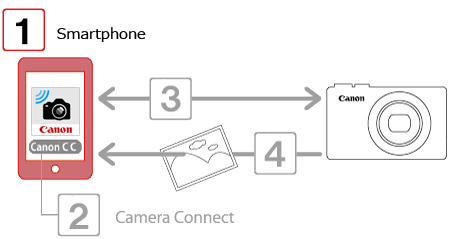
 ] tab
] tab