Printing the Nozzle Check Pattern MP160
| Article ID: ART153399 |
| |
Date published: 06/02/2015 |
| |
Date last updated: 08/17/2015 |
Description
Instructions for printing the Nozzle Check Pattern.
Solution
Printing the Nozzle Check Pattern
The nozzle check pattern shows if each print head nozzle is operating properly.
- Ensure that the printer is powered on and the LED displays a number.
- Open the paper output tray <1>.
- Confirm that the paper thickness lever <3> is set to the left.

The above illustration shows the PIXMA MP150
- Load a sheet of A4 or Letter-sized plain paper in the Auto Sheet Feeder (ASF).
- Press the <Maintenance> button once to display [A].

- Press the Black or Color button. The machine prints a nozzle check pattern.
- Confirm the nozzle check pattern.
|
|
|
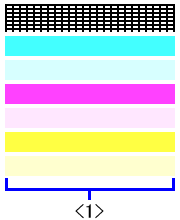
| < 1 > The normal nozzle check pattern |
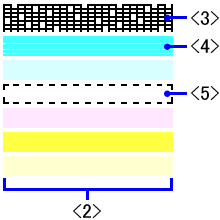
< 2 > The abnormal nozzle check pattern
< 3 > Some black ink lines are broken.
< 4 > White lines are present in the color ink pattern.
< 5 > black and color inks are not present.
|
Note:
- If the ink level is low, the nozzle check pattern is not printed correctly. If the ink level is low, replace the relevant FINE Cartridge.
- If the lines are broken (as indicated in item <3>) or white lines are present in the pattern (as indicated in item <4>), clean the FINE Cartridge.
