
Setup the MP800R for use over a wireless LAN - Windows
| Article ID: ART125935 | | | Date published: 05/12/2015 | | | Date last updated: 08/14/2015 |
Description
Solution
How to install the printer driver and connect the printer with a wireless LAN (Windows)
Note: An access point is needed to connect the printer to the computer with a wireless LAN. The printer cannot be connected to the computer wirelessly without using an access point. Please prepare an access point. When connecting the printer to a computer with a wireless LAN, the computer must be connected to an access point. If you connect the printer to a network that is not protected with security measures, there is a risk of disclosing data such as your personal information to a third party.
Note: A wireless LAN card or adapter must be installed in your computer to connect your computer to the wireless LAN. Wireless LAN access point with router function may be needed to connect the computer to the Internet in the wireless LAN environment. Device configuration and the necessity of a router function depend on the environment. Refer to the manual of your device or contact its manufacturer for details.
Procedures
Note: When installing the printer driver in Windows XP, login as the administrator. When installing the printer driver in Windows 2000, login as a member of the administrator group. Close any open software applications including anti-virus software.
1. Turn off the printer, then remove the cable which connects the printer to the computer.
2. Set the prepackaged CD-ROM in the computer. The CD-ROM starts automatically and the following window will be displayed on the screen.
Note: The following window will not be displayed in some areas. In such a case, skip to procedure 4.

3. Select your place of residence and click 'Next'.
4. The window to select the installation method will be displayed.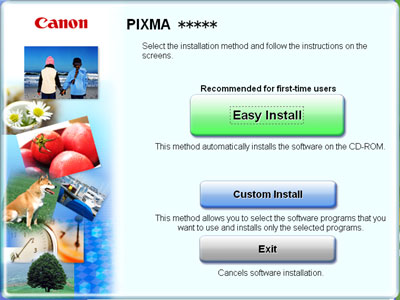
Note: drivers can be installed using Easy Install or Custom Install. Easy Install automatically installs the software which is in the CD-ROM. This method is recommended for first-time users. Custom Install allows you to select software programs from MP Drivers, Application Software, and On-screen Manual.
3. Click 'Easy Install' or 'Custom Install'.
When selecting Easy Install:
a. Click 'Easy Install'
b. Click 'Install' in the following window.

When selecting Custom Install:
a. Click 'Custom Install'
b. When the following window is displayed, check Printer Driver, Canon IJ Network Tool, and any application software to be installed, then click 'Next'.

4. When the License Agreement window is displayed, read the content carefully and click 'Yes'.
5. The installation will start.
Note: Messages may be displayed during the installation if the application software is already installed.
Follow the instructions on the window and continue the installation.
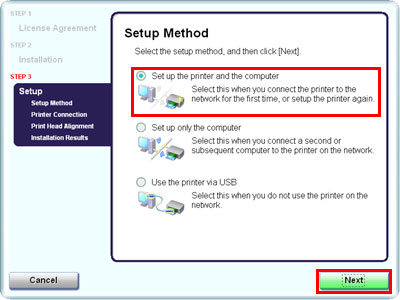
6. Select 'Set up the printer and the computer' in the Setup Method window, then click 'Next'.
7. When the Printer Connection window is displayed, connect the printer to the computer with a USB cable and turn the printer ON.
Note: The window to restart the computer will be displayed to complete the installation.
Follow the instructions on the window, then restart the computer.
8. When the Setup Preparations window is displayed, confirm the following, then click 'Next'.
- The printer is turned ON.
- The network communication for the computer is enabled.
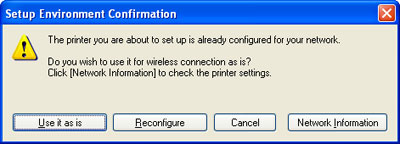
- The printer is connected to the printer with a USB cable.Note: If the printer's network settings are already configured, the Setup Environment Confirmation window will be displayed for your confirmation to use the printer with the current settings. To reconfigure the network settings, click 'Reconfigure'. To use the printer with the current settings, click 'Use it as is,' then skip to procedure 12.
9. Select Wireless LAN, then click 'Next'.

Note: If settings for wireless LAN are already set, the Note on Network Settings window will be displayed.
Click the 'Wireless connection only' button to enable wireless LAN in a normal situation. If network settings for the printer are already set, the Printer Network Setup window will be displayed
10. Access points will be detected automatically.
Depending on the results, your next step varies accordingly.
When an access point is detected automatically: Go to procedure 11.
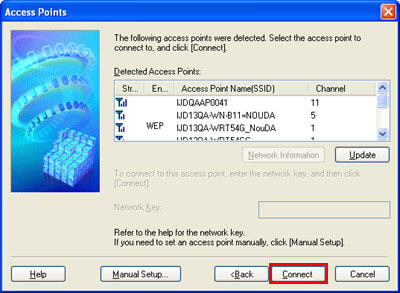
When the Access Points window is displayed:
a. Select an access point to be used in the Access Points window.
b. Identify the Encryption column of the selected access point. If the Encryption column is blank, click 'Connect'. If WEP or WPA is displayed in the Encryption column, the access point is configured to use the encryption. Enter the network key (WEP Key or WPA Key), then click 'Connect'.
When 'An access point could not be detected' is displayed:
Click 'OK' to display the Access Points window. Click 'Manual Setup' to set the setting manually.
11. The printer will be detected automatically. The printer with a USB cable will be detected automatically through the access point.
When the printer is detected automatically: Go to procedure step 12.
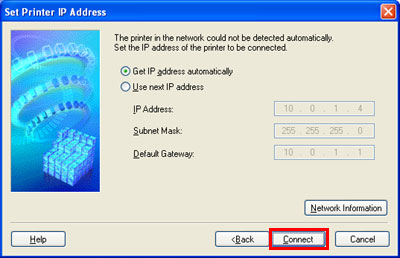
When the Set Printer IP Address window is displayed: If the printer could not be detected automatically, the Set Printer IP Address window will be displayed. Click 'Connect' to check if the printer can be connected. If the printer still cannot be detected, select 'Use next IP address'; enter the IP address, the subnet mask, and default gateway for the printer, then click 'Connect'.
12. When the Network Setup of the Card Slot dialog box is displayed, specify the drive letter, then click 'Next'.

Note: If "Cannot map any more drives, because all the drive letters are assigned" is displayed, make an available drive letter manually, and try the network setup of the Card Slot again. If "The Card Slot is already mapped as Network Drive to this computer" is displayed, the Card Slot is already setup. Click 'Next'.
13. The Setup Completion window will be displayed. Turn off the printer, remove the USB cable which connects the printer to the computer, then place the printer in the location where you will use it. Turn on the printer, then click 'Next'.
14. In the Connection Performance Measurement window, click 'Next'. Connection performance will be measured, then its progress will be displayed.
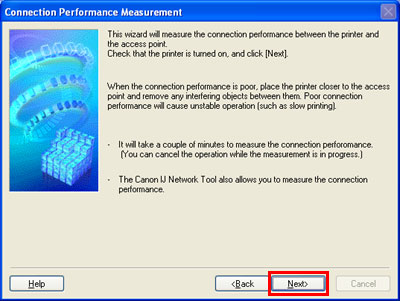
Note: It will take a couple of minutes to measure the connection performance. You can cancel the operation while the measurement is in progress by clicking 'Cancel'. The Canon IJ Network Tool also allows you to measure the connection performance after the setup.
15. Check the measurement results, then click 'Finish'.

Note: If any symbol other than
is displayed, refer to displayed comments and Help for improving the status of communication link. To check whether the new location is better, click 'Remeasurement' after moving the machine. Measurement of the communication status is performed again. When any message on Overall network performance appears in the measurement results, rearrange the machine and other network devices following the instructions on the screen.
16. When the screen shown on the right appears, click 'Exit'.

Note: If the screen shows a check box for restarting system, you can restart the system instead of the program. To restart the system, ensure that box is selected, and then click 'Restart'. To view the On-screen Manual, double-click the 'MP800R On-screen Manual' shortcut icon on the desktop, or click 'Start' and select 'All Programs' (or 'Programs'), 'Canon MP800R Manual' and 'MP800R On-screen Manual'. Microsoft Internet Explorer? 5.0 or later must be installed to view the On-screen Manuals.