Clean the fixing roller
Cleaning the Fixing Roller (Cleaning 1)
If the printed paper has smudge marks, clean the fixing roller using the following procedure.
important:
Have Letter size plain paper ready.
- The fixing roller cannot be cleaned with any plain paper other than Letter. Be sure to load Letter size plain paper when cleaning the fixing roller.
1. Load Letter-size plain paper in the multi-purpose tray or paper cassette.
For details on the procedures for loading paper, see "User's Guide" (HTML manual) in the CD-ROM supplied with the printer.
2. Display the Printer Status Window.
Click [  ] in the Windows taskbar, and then select the printer name.

note:
When displaying the Printer Status Window from the printer driver
- Click [
 ] (Display Printer Status Window) in locations such as in the [Page Setup] sheet.
3. From the [Options] menu, select [Utility] m² [Cleaning 1].
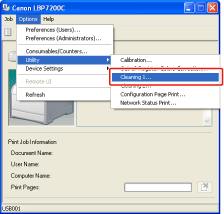
4. Click [OK].

m² The paper is fed into the printer, and the printer starts cleaning the fixing roller.
The cleaning is finished when the paper is output completely.
* Cleaning the fixing roller cannot be canceled. Please wait until it is completed.
important:
Do not touch the paper until it is output completely while cleaning the fixing roller.
- The paper is once output partially after the front side is printed, and then it is fed again to clean the fixing roller.
note:
Cleaning time for the fixing roller
- It takes approximately 70 seconds.
