Follow this procedure to load paper / envelope in the Auto Sheet Feeder (ASF):
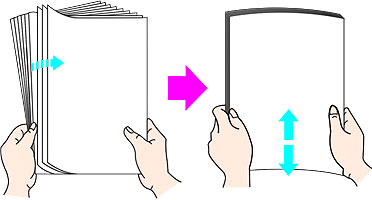
- Fan out the sheets of paper so that they do not stick together.
- Open the paper feed slot cover and pull out the paper support <1>.

Note: You do not need to pull out the paper support when printing on envelopes.
- Load paper with the paper's print side facing up, aligning its right edge to the cover guide < 2 >.
Note: Make sure to set paper with the short-side down. Setting Credit Card-sized paper with the long-side down will cause a paper jam.
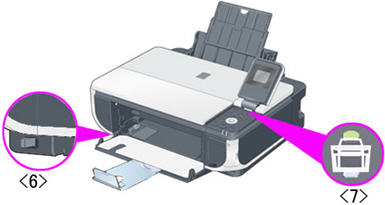
- Pinch and slide the paper guide < 3 > to the paper's left side.
- Open the front feeder < 4 >.
- Extend the output paper support < 5 >.
Note: When loading Legal sized paper, make sure to close the stopper of the output paper support.
- Switch the paper thickness lever according to the type of paper you use.
Left: When printing on the paper other than envelopes or T-shirt transfers.
Right: When printing on envelopes or T-shirt transfers.
- Ensure that the Auto Sheet Feeder lamp lights < 7 >.
Note:
* If the Cassette light is on, press the <Feed Switch> button so the ASF light comes on.
* If ASF light does not come on even after pressing the Feed Switch button, Paper Source in the printer driver may be set to a setting other than Feed Switch.
Envelope:
- Press down firmly on the edges of the envelopes to make the folds crisp. Also, press firmly on the area that corresponds to the edges of the back flap.
- Remove any curling by holding the edges diagonally and bending them gently.
- If the edges of the envelope are inflated or are curling, place the envelope on a flat surface. With a pen, press down while moving it from the center toward the edges of the envelope.
- Ensure that no curl or puff exceeds 1/8 in. (3 mm).
- Open the paper feed slot cover and pull out the paper support <1>. Note: You do not need to pull out the paper support when printing on envelopes.
- Load envelopes into the ASF as indicated below with the flap on the left-side (*2), facing the back of the printer and the print side facing up (2).

- Pinch and slide the paper guide (3) to the envelope's left side.
- Open the front feeder.
- Extend the output paper support.
- Switch the paper thickness lever (5) according to the type of paper you use.Left: When printing on the paper other than envelopes or T-shirt transfers.Right: When printing on envelopes or T-shirt transfers.
- Ensure that the Auto Sheet Feeder lamp lights (4).
Note:
* If the Front Feeder lamp lights, press the Paper Feed Switch button to light the Auto Sheet Feeder lamp.
* If the Auto Sheet Feeder lamp does not light even after pressing the Paper Feed Switch button, Paper Source in the printer driver may be set to a setting other than Paper Feed Switch.
