Paper Jams

Article ID: ART117462 | Date published: 05/12/2015 | Date last updated: 04/30/2019
 

Description

This article describes how to remove paper jams from the printer.  Links to videos showing how to remove paper jams from the Front and Rear Covers are included in this article.

Solution

If the paper is jammed, remove it following the procedure appropriate for each case.

Paper Is Jammed inside the Front Cover

If the paper is jammed inside the front cover, remove the paper following the procedure below.

IMPORTANT
  • The power cannot be turned off while the machine is sending or receiving a fax, or when the received fax or the unsent fax are stored in the machine's memory.Make sure that the machine has completed sending or receiving all the faxes before unplugging the power cord.If you unplug the power cord, all the faxes stored in the machine's memory are deleted.
REFERENCE
  • If you need to turn off the machine to remove jammed paper during printing, press the Stop button to cancel print jobs before turning off the machine.


1. Open the front cover.

IMPORTANT
  • Do not touch the clear film (A) or the white belt (B).


If the paper or your hands touch these parts and blot or scratch them, the machine can be damaged.


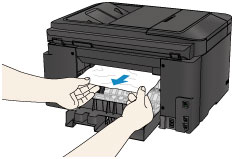
2. Make sure that the jammed paper is not under the print head holder.

If the jammed paper is under the print head holder, move the print head holder to the right edge or the left edge whichever is easier to remove the paper.

When you move the print head holder, press either the right side or the left side of the print head holder with your fingertips and slide the print head holder slowly to the right edge or the left edge.


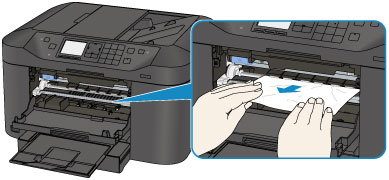
3. Hold the jammed paper with your hands.


If the paper is rolled up, pull it out.


4. Pull the paper slowly not to tear it, then pull the paper out.


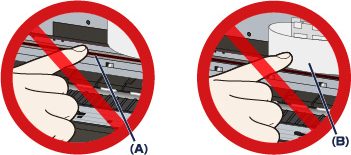
5. Make sure that all the jammed paper is removed.
If the paper is torn, a piece of paper may remain inside the machine. Check the following and remove the piece of paper if it remains.
  • Does the piece of paper remain under the print head holder?
  • Does the little piece of paper remain inside the machine?
  • Does the piece of paper remain in the right side or the left side space (C) inside the machine?


6. Close the front cover.
7. Press the machine's OK button.
If you turned off the machine, all print jobs in the queue are canceled. Reprint if necessary.
REFERENCE
  • When reloading the paper, confirm that you are using the paper suited for printing and are loading it correctly.Align the paper guides with the edges of the paper when you load paper.
  • If the message about paper jam is displayed on the LCD of the machine or on the computer screen when you resume printing after removing all the jammed paper, a piece of paper may remain inside the machine. In this case, confirm that no piece of paper remains inside the machine.
  • We recommend you use paper other than A5 sized one to print documents with photos or graphics; otherwise, the printout may curl and cause paper exit jams.


If you cannot remove the paper or the paper tears inside the machine, or if the paper jam error continues after removing the paper, service is required.

For support and service options, sign into (or create) your Canon Account from the link below.
My Canon Account

 Note

  • A video showing how to remove jammed paper inside the Front Cover can be found here.
 

Paper Is Jammed inside the Rear Cover

If the paper is jammed inside the rear cover, remove the paper following the procedure below.

IMPORTANT
  • The power cannot be turned off while the machine is sending or receiving a fax, or when the received fax or the unsent fax are stored in the machine's memory.Make sure that the machine has completed sending or receiving all the faxes before unplugging the power cord.If you unplug the power cord, all the faxes stored in the machine's memory are deleted.
REFERENCE
  • If you need to turn off the machine to remove jammed paper during printing, press the Stop button to cancel print jobs before turning off the machine.


1. Rotate the machine so that the rear side of the machine faces toward you.


2. If the protective material for the rear cover remains attached, remove it.


3. Open the rear cover.
Slide the rear cover to the left then open it.


4. Pull out the paper slowly.


REFERENCE
  • Do not touch the inner parts of the machine.
  • If you cannot pull the paper out, try the following.
- Turn the machine off and turn it back on.
The paper may be ejected automatically.
- Pull out the paper output tray.
It becomes easy to pull out the paper.


5. Close the rear cover.
Close the rear cover then slide it to the right.
Slide the rear cover so that the mark on the rear cover aligns with the mark on the machine.


6. Reload the paper, then press the OK button.
If you turned off the machine, all print jobs in the queue are canceled. Reprint if necessary.
REFERENCE
  • When reloading the paper, confirm that you are using the paper suited for printing and are loading it correctly.Align the paper guides with the edges of the paper when you load paper.
  • We recommend you use paper other than A5 sized one to print documents with photos or graphics; otherwise, the printout may curl and cause paper exit jams.


If you cannot remove the paper or the paper tears inside the machine, or if the paper jam error continues after removing the paper, service is required.

For support and service options, sign into (or create) your Canon Account from the link below.
My Canon Account
 

 Note

  • A video showing how to remove jammed paper inside the Rear Cover can be found here.
 

Paper Is Jammed inside the Rear Cover As the Machine Pulled in the Printed Paper

If the paper is jammed inside the rear cover as the machine pulled in the printed paper, remove the paper following the procedure below.

IMPORTANT
  • If the printed paper piles up on the paper output slot, the machine may pull it in and the paper is jammed inside the machine. Remove the printed paper from the paper output tray before it amounts to 75 sheets.
  • The power cannot be turned off while the machine is sending or receiving a fax, or when the received fax or the unsent fax are stored in the machine's memory.Make sure that the machine has completed sending or receiving all the faxes before unplugging the power cord.If you unplug the power cord, all the faxes stored in the machine's memory are deleted.
REFERENCE
  • If you need to turn off the machine to remove jammed paper during printing, press the Stop button to cancel print jobs before turning off the machine.


1. Rotate the machine so that the rear side of the machine faces toward you.


2. If the protective material for the rear cover remains attached, remove it.


3. Open the rear cover.
Slide the rear cover to the left then open it.


4. Pull out the paper slowly.


REFERENCE
  • Do not touch the inner parts of the machine.
  • If you cannot pull the paper out, try the following.
- Turn the machine off and turn it back on.
The paper may be ejected automatically.
- Pull out the paper output tray.
It becomes easy to pull out the paper.
Sometimes a misaligned or dislodged paper path guide may cause paper jams or other issues.
See Checking the Paper Path Guide


5. Close the rear cover.
Close the rear cover then slide it to the right.
Slide the rear cover so that the mark on the rear cover aligns with the mark on the machine.


6. Reload the paper, then press the OK button.
If you turned off the machine, all print jobs in the queue are canceled. Reprint if necessary.
REFERENCE
  • When reloading the paper, confirm that you are using the paper suited for printing and are loading it correctly.Align the paper guides with the edges of the paper when you load paper.


If you cannot remove the paper or the paper tears inside the machine, or if the paper jam error continues after removing the paper, service is required.

For support and service options, sign into (or create) your Canon Account from the link below.
My Canon Account


 Note

  • A video showing how to remove jammed paper inside the Rear Cover can be found here.
 

Paper Is Jammed inside the Rear Cover When Performing Automatic Duplex Printing

If the paper is jammed inside the rear cover when performing automatic duplex printing, remove the paper following the procedure below.

IMPORTANT
  • The power cannot be turned off while the machine is sending or receiving a fax, or when the received fax or the unsent fax are stored in the machine's memory.Make sure that the machine has completed sending or receiving all the faxes before unplugging the power cord.If you unplug the power cord, all the faxes stored in the machine's memory are deleted.
REFERENCE
  • If you need to turn off the machine to remove jammed paper during printing, press the Stop button to cancel print jobs before turning off the machine.


1. Rotate the machine so that the rear side of the machine faces toward you.


2. If the protective material for the rear cover remains attached, remove it.


3. Open the rear cover.
Slide the rear cover to the left then open it.


4. Pull out the paper slowly.


REFERENCE
  • Do not touch the inner parts of the machine.
  • If you cannot pull the paper out, try the following.
- Turn the machine off and turn it back on.
The paper may be ejected automatically.
- Pull out the paper output tray.
It becomes easy to pull out the paper.


5. Close the rear cover.
Close the rear cover then slide it to the right.
Slide the rear cover so that the mark on the rear cover aligns with the mark on the machine.


6. Reload the paper, then press the OK button.
If you turned off the machine, all print jobs in the queue are canceled. Reprint if necessary.
REFERENCE
  • When reloading the paper, confirm that you are using the paper suited for printing and are loading it correctly.Align the paper guides with the edges of the paper when you load paper.


If you cannot remove the paper or the paper tears inside the machine, or if the paper jam error continues after removing the paper, service is required.

For support and service options, sign into (or create) your Canon Account from the link below.
My Canon Account


 Note

  • A video showing how to remove jammed paper inside the Rear Cover can be found here.

Document Is Jammed in the ADF (Auto Document Feeder)

Remove the document following the procedure below.

IMPORTANT
  • The power cannot be turned off while the machine is sending or receiving a fax, or when the received fax or the unsent fax are stored in the machine's memory.Make sure if the machine completed sending or receiving all the faxes before unplugging the power cord.If you unplug the power cord, all the faxes stored in the machine's memory are deleted.


  • If the original remains in the ADF by pressing the Stop button while the machine is scanning the document:
If you press the Stop button during scanning then the document remained in the ADF, the message about the paper remained in the ADF appears on the LCD. Press the OK button so that the remaining document is automatically fed out.
  • If the original is jammed in the ADF:
Remove the document following the procedure below.
1. If printing is in progress, press the Stop button.
2. Turn off the machine.
3. If a multi-page document is loaded, remove any pages other than the jammed page from the ADF, then open the document feeder cover.


4. Pull out the jammed document from the ADF.


5. Close the document feeder cover, then turn on the machine.
When rescanning the document after clearing the error, rescan it from the first page.
If you cannot remove the document or the document tears inside the machine, or if the document jam error continues after removing the document, service is required.

For support and service options, sign into (or create) your Canon Account from the link below.
My Canon Account
REFERENCE
  • The document may not feed properly depending on the media type, or your environment, such as when the temperature and humidity are either too high or too low.
In this case, reduce the number of document pages to approximately half of the loading capacity.
If the document still jams, use the platen glass instead.


  • If the original is jammed in the ADF (from the paper feed side):
If the document is jammed in the document output slot, close the document tray as shown in the figure below and pull out the document.


When rescanning the document after clearing the error, rescan it from the first page.
If you cannot remove the document or the document tears inside the machine, or if the document jam error continues after removing the document, service is required.

For support and service options, sign into (or create) your Canon Account from the link below.
My Canon Account
 

Cases other than above:

Make sure of the following:
Check 1: Are there any foreign objects around the paper output slot?
Check 2: Is the rear cover closed properly?
Check 3: Is the paper curled?
Load the paper after correcting its curl.


SIMS Doc Id

8202138900

Rate this Article
Was this article helpful?
Yes, This document is helpful
No, This document needs a clearer explanation
 
Please provide your comments