With a commercially available Eye-Fi card already set up, you can automatically transfer captured imaged to a personal computer or upload them to an online service via a wireless LAN.
The image transfer is a function of the Eye-Fi card. For instructions on how to set up and use the Eye-Fi card or to troubleshoot any image teansfer problems, refer to the Eye-Fi card's instruction manual or inquire the card's manufacturer.
Note:
The camera is not guaranteed to support Eye-Fi card functions (including wireless transfer). In case of an issue with an Eye-Fi card, please check with the card manufacturer. Also note that approval is required to use Eye-Fi cards in many countries or regions. Without approval, use of the card is not permitted. If it is unclear whether the card has been approved for use in your area, please check with the card manufacturer.
|
| |
1. Insert an Eye-Fi card. |
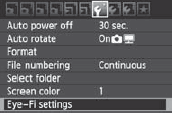 |
2. Select [Eye-Fi settings].
- Under the [
 ] tab, select [Eye-Fi settings], then press < ] tab, select [Eye-Fi settings], then press < >. >.
- This menu is displayed only when an Eye-Fi card has been inserted into the camera.
|
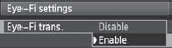 |
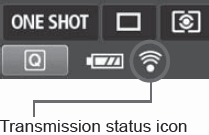
3. Enable the Eye-Fi transmission.
- Press <>, set [Eye-Fi trans.] to [Enable], then press <>.
- If you set [Disable], automatic transmission will not occur even with the Eye-Fi card inserted.
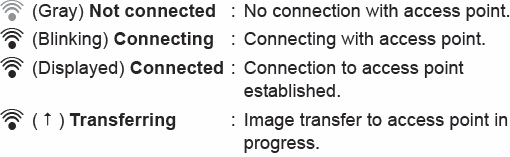
(Transmission status icon  ) )
|
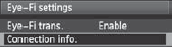 |
4. Display the connection information.
- Select [Connection info.], then pres <>.
|
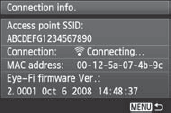 |
5. Check the [Acces point SSID:].
- Check that an access point is displayed for [Access point SSID:].
- You can also check the Eye-Fi card's MAC address and firmware version.
- Press the <MENU> button three times to exit the menu.
|
 |
6. Take the picture.
- The picture is transferred and the <
 > icon switched from gray (not connected) to one of the icons below. > icon switched from gray (not connected) to one of the icons below.
- For transferred images,
 is displayed in the shooting information display. is displayed in the shooting information display.
|