|
i475D
|
i550
|
i560 Series
|
i850 Series
|
|
i860 Series
|
i900D
|
i950 Series
|
i960 Series
|
|
i9100
|
i9900
|
PIXMA iP4300
|
PIXMA iP4500
|
|
PIXMA iP4600
|
PIXMA iP4700
|
PIXMA iP4820
|
PIXMA iP5000
|
|
PIXMA iP5200
|
PIXMA iP5200R
|
PIXMA iP6000D
|
PIXMA iP6210D
|
|
PIXMA iP6220D
|
PIXMA iP6310D
|
PIXMA iP6600D
|
PIXMA iP6700D
|
|
PIXMA iP8500
|
PIXMA iP90
|
PIXMA iP90v
|
PIXMA iP1500
|
|
PIXMA iP1600
|
PIXMA iP1700
|
PIXMA iP1800
|
PIXMA iP2000
|
|
PIXMA iP2600
|
PIXMA iP2700
|
PIXMA iP2702
|
PIXMA iP3000
|
|
PIXMA iP3300
|
PIXMA iP3500
|
PIXMA iP3600
|
PIXMA iP4000
|
|
PIXMA iP4000R
|
PIXMA iP4200
|
PIXMA MP130
|
PIXMA MP150
|
|
PIXMA MP160
|
PIXMA MP170
|
PIXMA MP180
|
PIXMA MP190
|
|
PIXMA MP210
|
PIXMA MP240
|
PIXMA MP250
|
PIXMA MP270
|
|
PIXMA MP280
|
PIXMA MP280 w/ PP-201
|
PIXMA MP450
|
PIXMA MP460
|
|
PIXMA MP470
|
PIXMA MP480
|
PIXMA MP490
|
PIXMA MP495
|
|
PIXMA MP499
|
PIXMA MP500
|
PIXMA MP510
|
PIXMA MP520
|
|
PIXMA MP530
|
PIXMA MP560
|
PIXMA MP600
|
PIXMA MP610
|
|
PIXMA MP620
|
PIXMA MP620B
|
PIXMA MP640
|
PIXMA MP640R
|
|
PIXMA MP750
|
PIXMA MP760
|
PIXMA MP780
|
PIXMA MP800
|
|
PIXMA MP800R
|
PIXMA MP810
|
PIXMA MP830
|
PIXMA MP950
|
|
PIXMA MP960
|
PIXMA MP970
|
PIXMA MP980
|
PIXMA MP990
|
|
PIXMA mini320
|
PIXMA MG8220
|
PIXMA MG8120
|
PIXMA MG6220
|
|
PIXMA MG6120
|
PIXMA MG5220
|
|
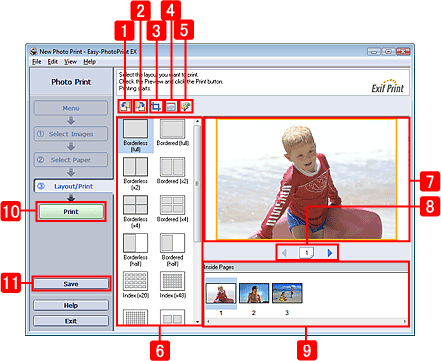
Selecting the layout and printing with Easy-PhotoPrint EX
| Article ID: ART123227 |
| |
Date published: 05/12/2015 |
| |
Date last updated: 08/17/2015 |
Description
Selecting the layout and printing with Easy-PhotoPrint EX
Solution
 |
 |
|
 Correct/Enhance Images Window Correct/Enhance Images Window
You can specify corrections and enhancements for images in this window.
To display the Correct/Enhance Images window, click the  (Correct/Enhance Images) button on the Select Images or Edit screen, or on the Layout/Print screen for Photo Print. (Correct/Enhance Images) button on the Select Images or Edit screen, or on the Layout/Print screen for Photo Print.
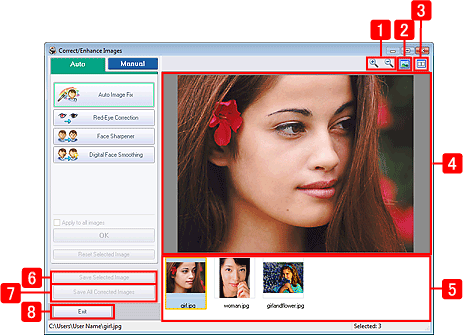
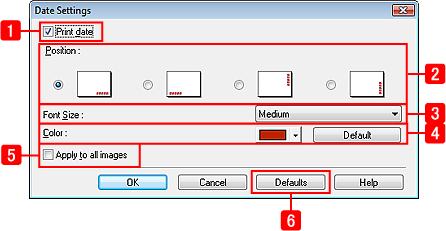
| 1 |
 (Zoom In/Zoom Out) button (Zoom In/Zoom Out) button |
Displays the enlarged or reduced preview of the page. |
| 2 |
 (Full Screen) button (Full Screen) button |
Displays the whole image in the preview window. |
| 3 |
 (Compare) button (Compare) button |
You can display the Compare Images dialog box, to compare the images before and after the correction side by side.
 Compare Images Dialog Box Compare Images Dialog Box |
| 4 |
Preview |
Displays the images selected from the List. |
| 5 |
List |
Displays a list of reduced images when multiple images are selected on the Select Images screen.
The list is not displayed if only one image is selected or if corrections/enhancements are performed from the Layout/Print screen or Edit screen.
A  mark appears next to the thumbnails of the images that are corrected/enhanced. mark appears next to the thumbnails of the images that are corrected/enhanced. |
| 6 |
Save Selected Image button |
Saves only the images selected in the list. |
| 7 |
Save All Corrected Images button |
Saves all images displayed in the list. |
| 8 |
Exit button |
Applies the corrections to the image and closes the Correct/Enhance Images window. |
Auto tab

Select to correct automatically.
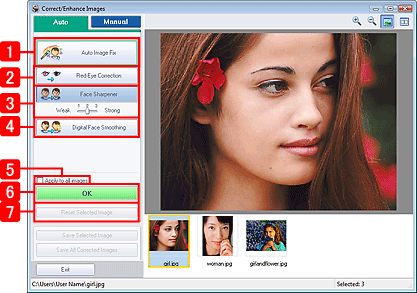
| 1 |
Auto Image Fix button |
Applies automatic corrections suitable for photo images.
 Caution Caution
The Auto Image Fix function is not available for Photo Print. Photo Print allows you to automatically apply suitable corrections to all photos when printing. Select this option for Image on the Advanced tab in the Preferences dialog box.
|
| 2 |
Red-Eye Correction button |
Select to correct red-eyes. |
| 3 |
Face Sharpener button |
Select to bring out-of-focus subjects into focus.
You can adjust the correction level using the slider. |
| 4 |
Digital Face Smoothing button |
Select to correct facial lines and skin tone.
You can adjust the correction level using the slider. |
| 5 |
Apply to all images |
Automatically corrects all the images displayed in the list. |
| 6 |
OK button |
Performs the selected correction on selected images or on all images, as appropriate. |
| 7 |
Reset Selected Image button |
Cancels all corrections, enhancements, and adjustments applied to the selected image. |
Manual tab
Select to correct manually.
Use Adjust to adjust brightness and contrast, or to sharpen the overall image.
Use Correct/Enhance to apply effects to selected areas.
 Adjust Adjust
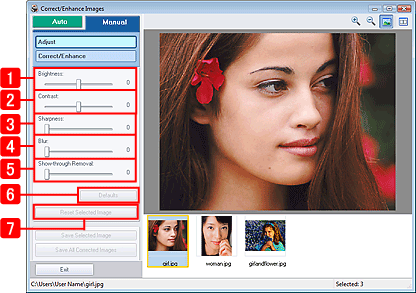
| 1 |
Brightness |
Adjusts the brightness of the overall image.
Move the slider to the left to darken and right to brighten the image. |
| 2 |
Contrast |
Adjusts the contrast of the image. If the image is flat due to lack of contrast, you can adjust the level of contrast.
Move the slider to the left to decrease the contrast of the image, and to the right to increase the contrast of the image. |
| 3 |
Sharpness |
Enhances the outline of the subjects to increase sharpness. If the photo is out of focus or text is blurred, you can adjust the level of sharpness.
Move the slider to the right to sharpen the image. |
| 4 |
Blur |
Blurs the outline of the subjects to soften the image.
Move the slider to the right to soften the image. |
| 5 |
Show-through Removal |
Removes show-through of text from the reverse side or of the base color. Use this to prevent text on the reverse side of thin document or the base color of the document from appearing on the image.
Move the slider to the right to increase the show-through removal effect. |
| 6 |
Defaults button |
Resets all adjustments (brightness, contrast, blur, and show-through removal). |
| 7 |
Reset Selected Image button |
Cancels all corrections, enhancements, and adjustments applied to the selected image. |
Correct/Enhance
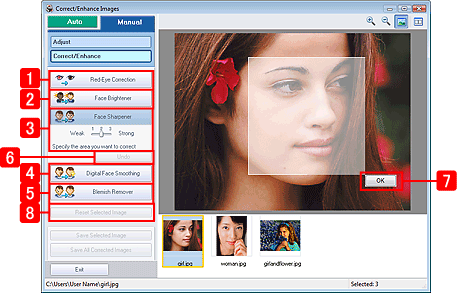
| 1 |
Red-Eye Correction button |
Select to correct red-eyes.
You can specify the area for correction. You can adjust the correction level using the slider. |
| 2 |
Face Brightener button |
Select to correct the whole image to brighten a dark area.
You can adjust the correction level using the slider. |
| 3 |
Face Sharpener button |
Select to bring out-of-focus subjects into focus.
You can specify the area for correction. You can adjust the correction level using the slider. |
| 4 |
Digital Face Smoothing button |
Select to correct facial lines and skin tone.
You can specify the area for correction. You can adjust the correction level using the slider. |
| 5 |
Blemish Remover button |
Makes the blemishes on a person's face less conspicuous when printed.
You can specify the area of blemishes that you want to reduce. |
| 6 |
Undo button |
Cancels the latest correction/enhancement. |
| 7 |
OK button |
Performs the selected correction to the specified area. |
| 8 |
Reset Selected Image button |
Cancels all corrections, enhancements, and adjustments applied to the selected image. |
|
|
|
TOP
|
|
|
|

 (Rotate Left) button (*1)
 (Rotate Right) button (*1)
 (Crop Image) button
 (Date Settings) button (*1)
 (Back to Previous Page) button
 (Move to Next Page) button