Install the delivery feeder unit correctly
The delivery feeder unit may not be installed correctly. Follow the procedure below to install the delivery feeder unit correctly. If the error code persists after the delivery feeder unit is installed correctly, contact Canon Customer Care Center.
note:
- You have to remove the delivery feeder unit and re-install the delivery feeder unit correctly.
- When you remove the delivery feeder unit, you have to turn the main power switch OFF.
- Sending or receiving documents cannot be done when the main power switch is OFF or the power cord is disconnected.
- If the main power switch is turned OFF, all jobs waiting in the print queue will be erased.
- Documents received into memory and documents stored for delayed send will be retained for approximately 60 minutes after the power cord has been disconnected.
1. Turn OFF the main power switch and disconnect the power cord.
note:
Make sure that the Processing/Data Indicator is turned off and check the display to confirm that a job is not being processed.
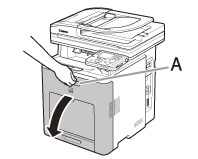
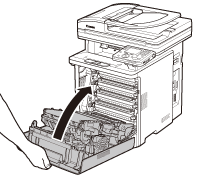
2. Open the front cover.
If you are using the stack bypass tray, close it before opening the front cover. Open the front cover gently holding the handle (A).
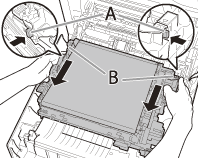
3. Push the levers (A) on sides of the delivery feeder unit and remove the delivery feeder unit gently, holding it by the tabs (B).
note:
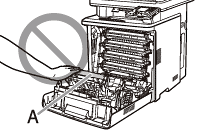
Do not place any object on or touch the transfer belt (A) of the delivery feeder unit. The transfer belt (A) of the delivery feeder unit is supplied with a function that cleans itself, therefore, do not clean the belt even when the toner is on it. If the delivery feeder unit is broken or transfer belt (A) is damaged, this may result in misfeeds or deterioration in print quality.
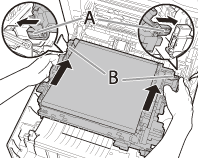
4. Install the delivery feeder unit so that the protrusions (A) of the delivery feeder unit fit into the guides (B) and click into place.
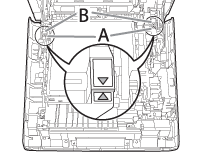
5. Confirm that the triangle marks (A) on the delivery feeder unit are aligned with the triangle marks (B) on the machine.
6. Close the front cover
Close the front cover gently holding the handle.
7. Reconnect the power cord and turn on the main power switch.
