Preferences Dialog (Preview tab)
You can pre-set the functions that are automatically carried out during a preview or scan, such as the Auto Crop or Auto Tone function, in the Preferences dialog.
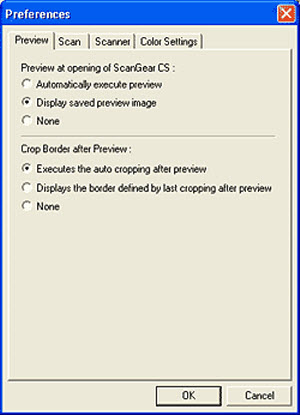
Preview at opening of ScanGear CS
This category sets whether or not a preview scan is performed when ScanGear CS is started.
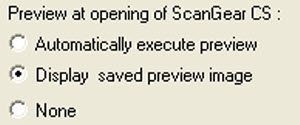
Click one of the following options. When ScanGear CS is first installed, the
Display Saved Preview Image option is selected by default.
| Automatically Execute Preview |
This option automatically performs a preview scan when ScanGear CS is started. |
| Display Saved Preview Image |
This option saves the preview image when ScanGear CS is closed and opens it in the Preview Area when the program is started again |
| None |
This option does not display the previous preview image when ScanGear CS is started. |
 When the Display Saved Preview Image option is selected, the settings of the Color tab and the Toolbar rotation, mirror, invert, and rulers buttons are all saved with the image.
Cropping Border after Preview
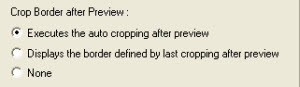
This category sets whether or not the image is cropped when an image is previewed.
|
Executes the auto cropping after preview
|
This option automatically crops the image to the size of the document when ScanGear CS is started.
|
|
Displays the border defined by last cropping after preview
|
This option saves the cropping frame when ScanGear CS is closed and displays it in the Preview Area when the program is started again.
|
|
None
|
This option does not display the previous cropping frame when ScanGear CS is started.
|
 |
 |
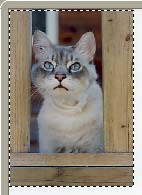
| Auto Cropping Enabled |
Auto Cropping Disabled |
 This function is only enabled when Platen is chosen in the Select source category.
The Auto Crop function crops an image of multiple items on the document glass of the scanner as if they were a single item. In contrast, the Multi-Crop function detects each individual item and crops them accordingly.
When ScanGear CS is first installed, the Executes the auto cropping after preview option is selected by default.
If your product issue was not resolved after following the steps above, or if you require additional help, please create or log in to your Canon Account to see your technical support options.
Or if you still need help, visit our Canon Community by clicking the button below to get answers:

____________________________________________________________________________________________
