If you will be printing wirelessly from your computer, you will want to delete the printer instance created when you connected the USB cable to perform the firmware update. Follow the instructions below for Windows or Mac OS X.
Macintosh
- Open the applicable "Printers" window.
- System Preferences -> Print & Fax
- System Preferences -> Print & Scan (Lion)
- Delete the USB Printer's icon. The one you want to delete will have a digit added after the name.
To delete, highlight the printer in the list, click the minus(-) sign, then confirm the deletion. See example below.
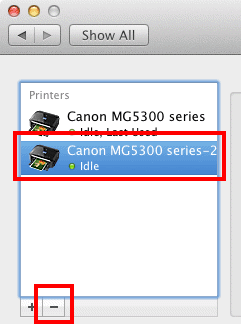

*Name varies by model. 'MG5300 series' used in example.
Windows
- Open the applicable "Printers" window.
- If you are using Windows 7, select the Start menu -> Devices and Printers.
- If you are using Windows Vista, select the Start menu -> Control Panel -> Hardware and Sound -> Printers.
- If you are using Windows XP, select the start menu -> Control Panel -> Printers and Other Hardware -> Printers and Faxes.
- Delete the Printer's icon. The one you want to delete will have a check mark. See example, below.

To delete, right-click the icon and select Delete or Remove Device . Confirm the deletion.
