86A2-011
Printing on Preprinted Paper with a Logo
How to print on paper on which a logo is printed is described here.
Perform step 1 to step 3.
Computer screens or illustrations used in this section are for MF1333C, unless otherwise noted. Depending on the model and operation system you are using, what is described in this section may appear differently.
Step 1 Loading preprinted paper
Load paper with careful attention to the side of the paper on which you want to print. How the paper faces (down or up) differs when you print on a single side or both sides.
Printing on a single side
Load the preprinted paper with the logo side (on which the document is printed) facing up.
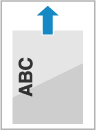
To print on paper with a logo in portrait orientation,

Print result
Loading orientation
To print on paper with a logo in landscape orientation,
Print result
Loading orientation
Printing on both sides
Load the preprinted paper with the logo side (on which the first page of the document is printed) facing down.
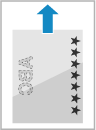
To print on paper with a logo in portrait orientation,
Print result
Loading orientation
To print on paper with a logo in landscape orientation,
Print result
Loading orientation
Step 2 Specifying the paper size and the paper type
Preprinted paper loaded in the paper drawer
1
Select
in the Home screen.2
Select the paper drawer.
3
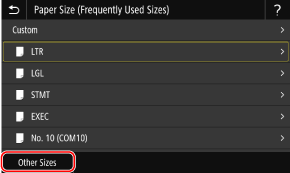
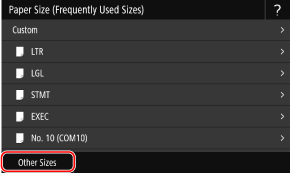
Select the paper size.
If you loaded A5-size paper, select
.If the paper size of the loaded paper is not displayed, select .
If custom-size paper is loaded,
1
Select .
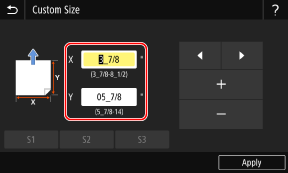
2
Select or , and enter the length of each side.
3
4
Select the paper type.
Preprinted paper loaded in the multi-purpose tray
When preprinted paper is loaded in the multi-purpose tray, a screen to select the paper size appears on the display. Follow the steps below to specify the settings.
1
Select the paper size.
If you loaded A5-size paper, select
.If the paper size of the loaded paper is not displayed, select .
If custom-size paper is loaded,
1
Select .
2
Select or , and enter the length of each side.
3
2
Select the paper type.
Step 3 Printing from a computer
How to print varies depending on the operating system of the computer you are using. Use the method appropriate for your operating system to print.
Printing from a Windows computer
This section uses Windows 10 as an example.
1
Select [Print] in the application menu.
2
Select the machine in the print window, and click [Preferences], [Printer properties], or [Properties].
3
In the [Basic Settings] tab, specify the paper size, the printed orientation, and printed sides.
1
Specify the paper size of the loaded paper in [Page Size] and [Output Size].
2
Select [1-sided Printing] or [2-sided Printing] in [1-sided/2-sided/Booklet Printing].
3
Select [Portrait] or [Landscape] in [Orientation] according to the orientation of the original.
4
In the [Paper Source] tab, select the paper source where the preprinted paper is loaded in [Paper Source].
5
Click [OK].
6
Click [Print] or [OK] in the print window.
Printing from a Mac computer
This section uses macOS 10.15 as an example. The screens may differ depending on the versions of the operating system.
1
Select [Print] in the [File] menu of the application.
2
Select the machine in [Printer].
If no print options are displayed, click [Show Details] at the bottom of the dialog box.
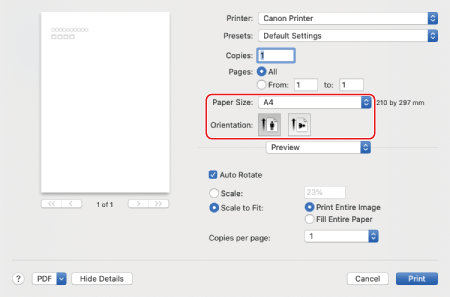
3
Select the paper size of the loaded preprinted paper in [Paper Size], and select portrait or landscape in [Orientation] according to the orientation of the original document.
4
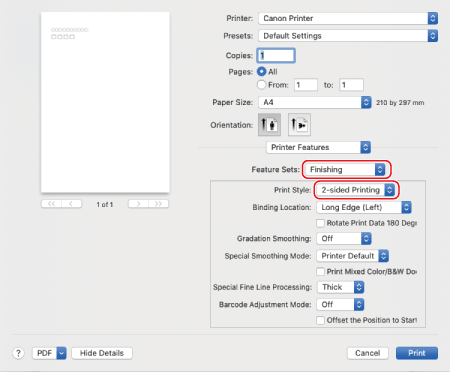
From the print options pop-up menu, select [Printer Features].
5
Select [Finishing] in [Feature Sets], and then select [1-sided Printing] or [2-sided Printing] in [Print Style].
6
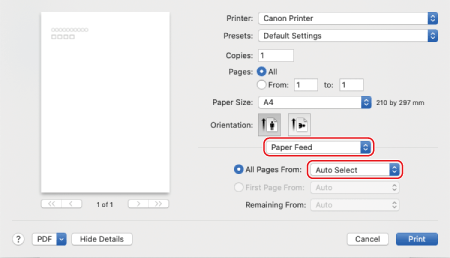
Select [Paper Feed] from the print options pop-up menu, and then select the paper source where the preprinted paper is loaded from the [All Pages From] pop-up menu.
7
Click [Print].