Set up IJ Network Scanner Selector EX to scan images into a computer over a network using MP Navigator EX.

Note
If IJ Network Scanner Selector EX is not running, from the Go menu of Finder, select Applications, then double-click the Canon Utilities folder, IJ Network Scanner Selector EX folder, then Canon IJ Network Scanner Selector EX icon.
Menu
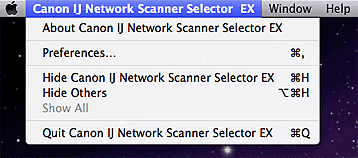
About Canon IJ Network Scanner Selector EX
Displays the version information.
Preferences...
Click to open the Preferences dialog and select whether to enable scanning over a network using the operation panel of the machine.
Select the Enables scanning from the operation panel checkbox to scan over a network using the operation panel of the machine.
Hide Canon IJ Network Scanner Selector EX
Hides the settings screen.
To display the settings screen again, click  in the Dock.
Hide Others
Hides all running applications other than IJ Network Scanner Selector EX.
Show All
Displays the applications that were hidden with Hide Others.
Quit Canon IJ Network Scanner Selector EX
Exit IJ Network Scanner Selector EX.
Scan-from-PC Settings Screen
The machine must be selected with IJ Network Scanner Selector EX before scanning over a network.
From the Go menu of Finder, select Applications, then double-click the Canon Utilities folder, IJ Network Scanner Selector EX folder, then Canon IJ Network Scanner Selector EX icon to display the Scan-from-PC Settings screen.
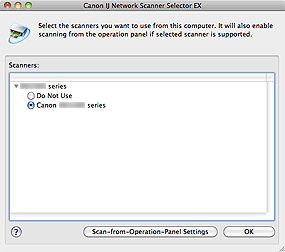
Scanners
The Bonjour service names or MAC addresses of the scanners that can be used over the network are displayed.
You can select one scanner per model. For details, refer to the help file of IJ Network Scanner Selector EX.
 Important:
 If you have disabled Bonjour after selecting the machine by Bonjour service name, reopen the Scan-from-PC Settings screen and select the MAC address of the machine from Scanners.
If you have changed the Bonjour service name after selecting the machine by Bonjour service name, reopen the Scan-from-PC Settings screen and select the new Bonjour service name from Scanners.
 (Help)
Opens the help file of IJ Network Scanner Selector EX.
Scan-from-Operation-Panel Settings
The Scan-from-Operation-Panel Settings screen appears. You can select the scanners from which you want to scan using the operation panel.
Note
This setting is not available on machines that use a single character LED display since you cannot scan over a network using the operation panel. These machines include the MP495, MP499 and MG3120. Below is an example of a single-character LED display.

Scan-from-Operation-Panel Settings Screen
Displays when you click Scan-from-Operation-Panel Settings in the Scan-from-PC Settings screen.
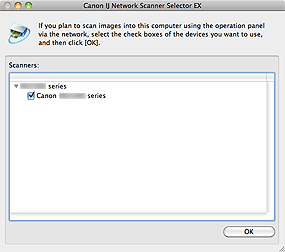
Scanners
The Bonjour service names or MAC addresses of the scanners that can be used over the network are displayed.
You can select up to three scanners. For details, refer to the help file of IJ Network Scanner Selector EX.
 Important:
 If you have disabled Bonjour after selecting the machine by Bonjour service name, reopen the Scan-from-PC Settings screen and select the MAC address of the machine from Scanners.
If you have changed the Bonjour service name after selecting the machine by Bonjour service name, reopen the Scan-from-PC Settings screen and select the new Bonjour service name from Scanners.
Note:
If the Bonjour service name or MAC address of the machine is displayed in gray or not displayed, or cannot be selected, check the following conditions and click OK to close the screen, then reopen it and select the machine.
- ScanGear (scanner driver) is installed
- Network settings of the machine is completed after installing ScanGear
- Network communication between the machine and computer is enabled
You do not need to use this software when scanning via USB. If you do not want to start IJ Network Scanner Selector EX upon login, see "Uninstalling IJ Network Tool/About IJ Network Scanner Selector EX." You can scan via USB even if it is running.
