
Front / rear / inside / operation panel view (MP800)
| Article ID: ART155702 | | | Date published: 06/09/2015 | | | Date last updated: 08/17/2015 |
Description
Solution

|
< 1 > |
Document Cover |
: |
Open this cover when loading a document on the Platen Glass. |
|
< 2 > |
Paper Support |
: |
Supports paper loaded in the auto sheet feeder. Pull it out before loading paper. |
|
< 3 > |
Paper Feed Slot Cover |
: |
Open to load paper in the auto sheet feeder. |
|
< 4 > |
Paper Guide |
: |
When loading paper, pinch the knob and slide to the left edge of the paper. |
|
< 5 > |
Auto Sheet Feeder |
: |
Various paper can be loaded easily. |
|
< 6 > |
Cover Guide |
: |
Align the right side of the paper to this guide. |
|
< 7 > |
Open Button |
: |
Press this button to open the Paper Output Tray. |
|
< 8 > |
Paper Output Tray |
: |
Pull down the paper output tray and pull out the extension completely |
|
< 9 > |
Direct Print Port |
: |
Used when printing directly from a digital camera or a digital video camera compatible |
|
< 10 > |
IrDA Port |
: |
Receives photo data sent from a mobile phone through infrared communication. |
|
< 11 > |
Card Slot Cover |
: |
Open to insert a memory card. |
|
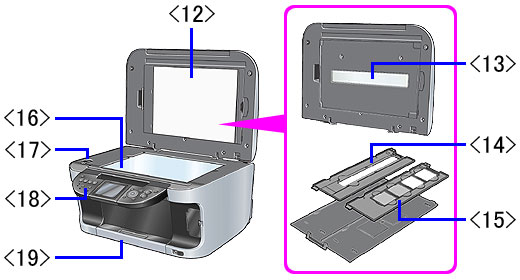
< 12 > |
FAU (Film Adapter Unit) Protective Sheet |
: |
Protects the FAU Lamp and the platen glass. The film guides are stored at the rear. Remove only when scanning film. |
|
< 13 > |
FAU lamp |
: |
Lights up the film original when scanning films. |
|
< 14 > |
Film Guide (for a film strip) |
: |
Mount a film strip here. |
|
< 15 > |
Film Guide (for slides) |
|
Mount slides here. |
|
< 16 > |
Platen Glass |
: |
Used to load a document to be processed. |
|
< 17 > |
Scanner Lock Switch |
: |
Locks the fluorescent lamp that is located underneath the Platen Glass (scanning lamp), to be used when transporting the machine. Make sure to unlock it before turning the machine on. |
|
< 18 > |
Operation Panel |
: |
Used to change the settings or operate the machine. |
|
< 19 > |
Cassette |
: |
Load regulary-used paper here and insert this into the machine. |

|
< 1 > |
Print Head Lock Lever |
: |
Used to fix the Print Head. Do not lift this unless installing / removing the print head. |
|
< 2 > |
Ink Tank Lamp |
: |
Lights or flashes red to indicate the status of the ink tank. |
|
< 3 > |
Print Head Holder |
: |
Used to install a Print Head |
|
< 4 > |
Inner Cover |
: |
Open this cover when installing / removing the ink tanks / the print head. |
|
< 5 > |
Scanning Unit (Printer Cover) |
: |
This is the unit used to scan documents. Open this to replace the ink tanks or remove jammed paper |
|
< 6 > |
Card Slot |
: |
Set the memory card here. |
|
< 7 > |
Access Lamp |
: |
Lights when a memory card is inserted into the Card Slot. This lamp flashes while the |
Note:
Ink Tank Lamp
You can check the status of each ink tank according to how its lamp lights.
- On: The machine is ready to print.
- Slow flashing (at about a three-second interval): Ink is low. Prepare a new ink tank.
- Fast flashing (at about a one-second interval): Ink tank is empty, or the machine is not ready to print due to an error.
- Off: An error has occurred and the machine is not ready to print.

|
< 1 > |
USB Connector |
: |
This is the connector used to connect the machine to a computer using a USB cable. |
|
< 2 > |
Rear Cover |
: |
Open when clearing jammed paper. |
|
< 3 > |
Power Connector |
: |
This is the connector used to connect the provided power cord |

|
< 1 > |
ON/OFF button |
: |
Turns the machine ON and OFF. |
|
< 2 > |
COPY button |
: |
Switches the machine to Copy mode. |
|
< 3 > |
SCAN button |
: |
Switches the machine to Scan mode. This button is used when the machine is connected |
|
< 4 > |
PHOTO/FILM button |
: |
Switches the machine to Photo/film mode. |
|
< 5 > |
MEMORY CARD button |
: |
Switches the machine to Memory Card mode. |
|
< 6 > |
LCD |
: |
Displays messages, menu selections, and the operation status. |
|
< 7 > |
Menu button |
: |
Used to display menus. |
|
< 8 > |
OK button |
: |
Finalizes your selection for the menu or setting item. |
|
< 9 > |
Settings button |
: |
Use to configure settings including the page size, media type, and print quality. |
|
< 10 > |
Black button |
: |
Starts black & white copying, or photo scanning. |
|
< 11 > |
Stop/Reset button |
: |
Cancels operations. If this button is pressed during printing, the machine stops printing. |
|
< 12 > |
Auto Sheet Feeder lamp |
: |
Lit when the Auto Sheet Feeder is selected. |
|
< 13 > |
Cassette lamp |
: |
Lit when the Cassette is selected. |
|
< 14 > |
Alarm lamp |
: |
Lights / flashes orange, when an error occurs. |
|
< 15 > |
Feed Switch button |
: |
Selects the paper source. Press this toggle switch to change the paper source between |
|
< 16 > |
Search button |
: |
Looks up target photos in the memory card using the shooting date as the search key. |
|
< 17 > |
Photo Index Sheet button |
: |
Switches to Photo Index Sheet mode. |
|
< 18 > |
Back button |
: |
Allows you to return to the previous screen. |
|
< 19 > |
Up / down / left / right cursor buttons |
: |
Scroll through menu selections, and increase or decrease the number of copies. |
|
< 20 > |
Trimming button |
: |
Use to crop the photo that is displayed. |
|
< 21 > |
Color button |
: |
Starts color copying, photo printing, or scanning. |