
Set the Ink Intensity (Mac OS X) MX360
| Article ID: ART110638 | | | Date published: 05/11/2015 | | | Date last updated: 08/17/2015 |
Description
Solution
Set the Ink Intensity (Mac OS X)
If the color of print results is different from the picture(s) on the display, it can be adjusted by changing the value of the color balance and intensity.
- Images are automatically corrected through Driver Matching in color printing; thus, if they are not satisfying, try adjusting Color Balance and Intensity manually with Driver Matching first in the Manual Color Adjustment window.
- If you check Grayscale Printing, the items you can set are different from the ones in color printing.
Note: The Intensity setting controls the amount of ink placed on the paper. The higher the intensity the darker (more ink) the printed image will be. If the Intensity setting is set too high, the printed page may become too wet and curl or streak. Follow the instructions below to adjust the ink intensity settings manually.
Ink Intensity Settings: Color Correction, Color Balance, Intensity, Contrast and Brightness settings can all be changed manually.
- Confirm that the cable is connected and the printer is powered on.
- Select 'Print' from the File menu to open the Print dialog.
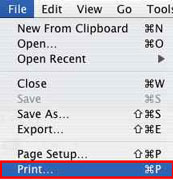
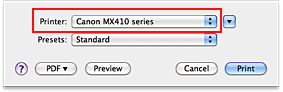
- In the Printer pop-up menu, select the printer you are using.
- In the pop-up menu, select 'Color Options'.
Mac OS X v.10.6.x or Mac OS X v.10.5.x:
Mac OS X v.10.4.11: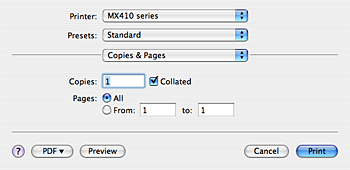
-
Adjust the color.
Change the settings of Color Correction, Color Balance, Brightness, Intensity, and Contrast to adjust the color as you like. In the Preview image, you can check the color.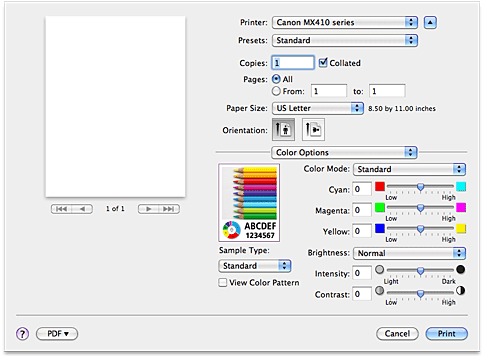
- Color Correction:
With Mac OS X v.10.4.11, click the pop-up menu and select a color correction method.
In the Color Correction pop-up menu, select Driver Matching, Color Sync or None. Note:
Note:
With Mac OS X v.10.6.x or Mac OS X v.10.5.x, you can use Color Matching in the Print dialog to select the color correction method. - Color Balance (Cyan, Magenta, Yellow):
If necessary, adjust the strength of each color. To strengthen a color, drag the slider to the right. To weaken a color, drag the slider to the left.
You can also directly enter a value linked to the slider. Enter a value in the range from -50 to 50.
Adjusting the color balance will result in variations in the balance among the volumes of the individual color inks and hence in the hues of the document as a whole.
Use the printer driver only when adjusting the color balance slightly. To change the color balance significantly, use the application software. - Brightness:
Select the brightness of printed images.
You cannot change the levels of pure white and black. You can change the contrast of the colors between white and black. - Intensity:
Select this method to adjust the overall density of your print.
To increase the overall intensity, drag the slider to the right. To decrease the overall intensity, drag the slider to the left.
You can also directly enter a value linked to the slider. Enter a value in the range from -50 to 50. - Contrast:
The Contrast function changes the differences between light and dark in images during printing.
To make the differences between the light and dark portions of images greater and more distinct, increase the contrast. On the other hand, to make the differences between the light and dark portions of images smaller and less distinct, reduce the contrast.
You can also directly enter a value linked to the slider. Enter a value in the range from -50 to 50.
- Color Correction:
- When all the adjustments are completed, click 'Print' to perform printing.
Ink Intensity Settings: Color Correction, Color Balance, Intensity, Contrast, and Brightness settings can all be changed manually.
Click to return to the top of the page.
Color Correction:
You can specify the color correction method suited to the type of document to be printed.
Normally, the printer driver adjusts the colors by using Canon Digital Photo Color so that data is printed with color tints that most people prefer. This method is suitable for printing sRGB data.
The procedure for specifying color correction is as follows:
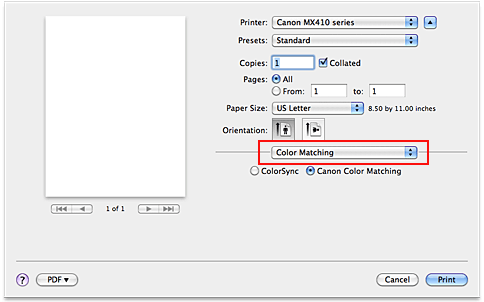
If you are using Mac OS X v.10.6.x or Mac OS X v.10.5.x
When you want to print by using the color space (Adobe RGB or sRGB) of the image data effectively or by specifying a printing ICC profile from your application software, select ColorSync. When you want to print by having the printer driver correct the colors, select Canon Color Matching (Vendor Matching).
- Select Color Matching from the pop-up menu of the Print Dialog.
-
Select color correction.
Select the item below that matches your purpose.
- ColorSync
Perform color correction using ColorSync. - Canon Color Matching (Vendor Matching)
With Canon Digital Photo Color, you can print sRGB data with color tints that most people prefer.
- ColorSync
-
Click Print.
When you execute print, the document data is printed with the specified color correction. Important:
- Depending on the application software, when a printing ICC profile is specified from that application software, Canon Color Matching (Vendor Matching) cannot be selected because ColorSync is selected automatically.
- The Quality & Media setting is necessary even when ColorSync or Canon Color Matching (Vendor Matching) is selected.
- Depending on the application software, when a printing ICC profile is specified from that application software, Canon Color Matching (Vendor Matching) cannot be selected because ColorSync is selected automatically.
If you are using Mac OS X v.10.4.11
When you want to print by using the color space (Adobe RGB or sRGB) of the image data effectively, select ColorSync. If you want to use an application software to specify a printing ICC profile, select None.
- Select Color Options from the pop-up menu of the Print Dialog.
-
Select color correction.
From the Color Correction menu, select the item below that matches your purpose.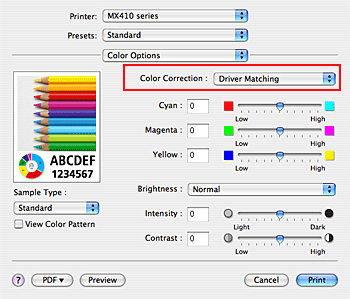
- Driver Matching
By using Canon Digital Photo Color, you can print sRGB data with color tints that most people prefer. - ColorSync
Perform color correction using ColorSync. - None
The printer driver does not perform color correction. Select this value when you are specifying an individually created printing ICC profile in an application software to print data.
- Driver Matching
-
Click Print.
When you execute print, the document data is printed with the specified color correction. Important:
- Quality & Media must also be set even when ColorSync or None is selected for Color Correction.
Click to return to step 5 of the instructions above.
Click to return to the top of the page.
You can adjust the color tints when printing.
Since this function adjusts color balance of the output by changing the ink ratios of each color, it changes the total color balance of the document. Use the application software when you want to change the color balance significantly. Use the printer driver only when you want to adjust the color balance slightly.
The following sample shows the case when color balance is used to intensify cyan and to diminish yellow so that the overall colors are more uniform.
|
|
|
|
No adjustment |
Adjust color balance |

The procedure for adjusting color balance is as follows:
- Select Color Options from the pop-up menu of the Print Dialog.
-
Adjust color balance.
There are individual sliders for Cyan, Magenta, and Yellow. Each color becomes stronger when the corresponding slider is moved to the right, and becomes weaker when the corresponding slider is moved to the left. For example, when cyan becomes weaker, the color red becomes stronger.
You can also directly enter a value linked to the slider. Enter a value in the range from -50 to 50. The current settings are displayed in the settings preview on the left side of the printer driver.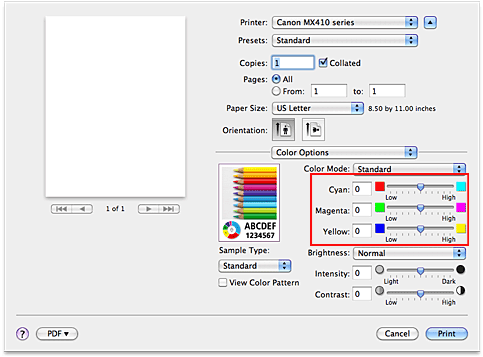 Important:
- Adjust the slider gradually.
- Adjust the slider gradually.
-
Click Print.
When you execute print, the document is printed with the adjusted color balance. Important:
- When the Grayscale Printing check box is checked for Quality & Media, the color balance (Cyan, Magenta, Yellow) appear grayed out and are unavailable.
- If you are using Mac OS X v.10.6.x or Mac OS X v.10.5.x and you select ColorSync for Color Matching, then the color balance (Cyan, Magenta, Yellow) appear grayed out and is unavailable.
If you are using Mac OS X v.10.4.11 and you select ColorSync or None for Color Correction, then the color balance (Cyan, Magenta, Yellow) appear grayed out and is unavailable.
- When the Grayscale Printing check box is checked for Quality & Media, the color balance (Cyan, Magenta, Yellow) appear grayed out and are unavailable.
Click to return to step 5 of the instructions above.
Click to return to the top of the page.
Select the option favorable for the print results. (See the instructions above to change the settings.)
You can change the brightness of the overall image data during printing.
This function does not change pure white or pure black but it changes the brightness of the intermediate colors.
The following sample shows the print result when the brightness setting is changed.
|
|
|
|
|
Light is selected |
Normal is selected |
Dark is selected |


The procedure for adjusting brightness is as follows:
- Select Color Options from the pop-up menu of the Print Dialog.
- Specify the brightness.
Select Light, Normal, or Dark for Brightness. The current settings are displayed in the settings preview on the left side of the printer driver.
-
Click Print.
When you execute print, the data is printed at the specified brightness. Important:
- If you are using Mac OS X v.10.6.x or Mac OS X v.10.5.x and you select ColorSync for Color Matching, then the Brightness appear grayed out and is unavailable.
If you are using Mac OS X v.10.4.11 and you select ColorSync or None for Color Correction, then Brightness appear grayed out and is unavailable.
- If you are using Mac OS X v.10.6.x or Mac OS X v.10.5.x and you select ColorSync for Color Matching, then the Brightness appear grayed out and is unavailable.
Click to return to step 5 of the instructions above.
Click to return to the top of the page.
You can dilute (brighten) or intensify (darken) the colors of the overall image data during printing.
The following sample shows the case when the intensity is increased so that all colors become more intense when the image data is printed.
|
|
|
|
No adjustment |
Higher Intensity |


The procedure for adjusting intensity is as follows:
- Select Color Options from the pop-up menu of the Print Dialog.
-
Adjust intensity.
Moving the Intensity slider to the right intensifies (darkens) the colors. Moving the slider to the left dilutes (brightens) the colors.
You can also directly enter a value linked to the slider. Enter a value in the range from -50 to 50. The current settings are displayed in the settings preview on the left side of the printer driver. Important:
- Adjust the slider gradually.
- Adjust the slider gradually.
-
Click Print.
When you execute print, the image data is printed with the adjusted intensity. Important:
- If you are using Mac OS X v.10.6.x or Mac OS X v.10.5.x and you select ColorSync for Color Matching, then the Intensity appear grayed out and is unavailable.
If you are using Mac OS X v.10.4.11 and you select ColorSync or None for Color Correction, then Intensity appear grayed out and is unavailable.
- If you are using Mac OS X v.10.6.x or Mac OS X v.10.5.x and you select ColorSync for Color Matching, then the Intensity appear grayed out and is unavailable.
Click to return to step 5 of the instructions above.
Click to return to the top of the page.
You can adjust the image contrast during printing.
To make the differences between the light and dark portions of images greater and more distinct, increase the contrast. On the other hand, to make the differences between the light and dark portions of images smaller and less distinct, reduce the contrast.
|
|
|
|
No adjustment |
Adjust the contrast |

The procedure for adjusting contrast is as follows:
- Select Color Options from the pop-up menu of the Print Dialog.
-
Adjust the contrast.
Moving the Contrast slider to the right increases the contrast, and moving it to the left decreases the contrast.
You can also directly enter a value linked to the slider. Enter a value in the range from -50 to 50. The current settings are displayed in the settings preview on the left side of the printer driver. Important:
- Adjust the slider gradually.
- Adjust the slider gradually.
-
Click Print.
When you execute print, the image is printed with the adjusted contrast. Important:
- If you are using Mac OS X v.10.6.x or Mac OS X v.10.5.x and you select ColorSync for Color Matching, then the Contrast appear grayed out and is unavailable.
If you are using Mac OS X v.10.4.11 and you select ColorSync or None for Color Correction, then Contrast appear grayed out and is unavailable.
- If you are using Mac OS X v.10.6.x or Mac OS X v.10.5.x and you select ColorSync for Color Matching, then the Contrast appear grayed out and is unavailable.
Click to return to step 5 of the instructions above.
Click to return to the top of the page.