
IJ Scan Utility Document Settings - Mac
| Article ID: ART168883 | | | Date published: 11/09/2017 | | | Date last updated: 11/09/2017 |
Description
Solution
Click Document Scan on the  (Scanning from a Computer) tab to display the Settings (Document Scan) dialog.
In the Settings (Document Scan) dialog, you can make advanced scan settings to scan items as documents.
 Important
-
When the Settings dialog is displayed from the Scan screen of My Image Garden, the setting items for Application Settings do not appear.
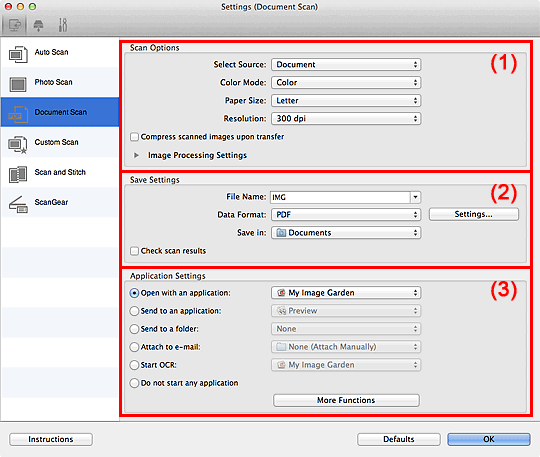
(1) Scan Options Area
-
Select Source
Select the type of item to be scanned.
Scanning documents: Document
Scanning magazines: Magazine
-
Color Mode
Select how to scan the item.
Important-
To select Black and White, deselect the Compress scanned images upon transfer checkbox, then set an option other than JPEG/Exif in Data Format of Save Settings.
-
-
Paper Size
Select the size of the item to be scanned.
When you select Custom, a screen in which you can specify the item size appears. Select a Unit, then enter the Width and Height, and then click OK.
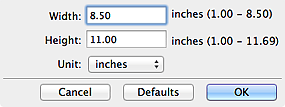
 Note
Note-
Click Defaults to restore the specified settings to the default settings.
-
-
Resolution
Select the resolution of the item to be scanned.
The higher the resolution (value), the more detail in your image.
For more information, click here.
-
Compress scanned images upon transfer
Compresses scanned images when transferring them to a computer. This is useful when your scanner or printer and computer are connected with a slow interface such as USB1.1 or a network.
-
Image Processing Settings
Click
 (Right Arrow) to set the following.
Note-
When Color Mode is Black and White, only Reduce gutter shadow, Correct slanted text document and Detect the orientation of text document and rotate image appear.
-
Apply Auto Document Fix
Select this checkbox to sharpen text in a document or magazine for better readability.
Important-
Available only when the Compress scanned images upon transfer checkbox is not selected.
-
The color tone may differ from the source image due to corrections. In that case, deselect the checkbox and scan.
Note-
Scanning takes longer than usual when you enable this function.
-
-
Sharpen outline
Emphasizes the outline of the subjects to sharpen the image.
-
Reduce show-through
Sharpens text in an item or reduces show-through in newspapers, etc.
-
Reduce moire
Reduces moire patterns.
Printed materials are displayed as a collection of fine dots. "Moire" is a phenomenon where uneven gradation or a stripe pattern appears when such photos or pictures printed with fine dots are scanned.
Note-
Scanning takes longer than usual when you enable Reduce moire.
-
-
Reduce gutter shadow
Reduces gutter shadows that appear between pages when scanning open booklets.
Important-
Available only when the Compress scanned images upon transfer checkbox is not selected.
Note-
Use ScanGear (scanner driver)'s Advanced Mode tab to correct gutter shadows when scanning non-standard size items or specified areas.
-
-
Correct slanted text document
Detects the scanned text and corrects the angle (within -0.1 to -10 degrees or +0.1 to +10 degrees) of the document.
Important-
The following types of documents may not be corrected properly since the text cannot be detected correctly.
- Documents in which the text lines are inclined more than 10 degrees or the angles vary by line
- Documents containing both vertical and horizontal text
- Documents with extremely large or small fonts
- Documents with small amount of text
- Documents containing figures/images
- Hand-written text
- Documents containing both vertical and horizontal lines (tables)
Note-
Scanning takes longer than usual when you enable Correct slanted text document.
-
-
Detect the orientation of text document and rotate image
Automatically rotates the image to the correct orientation by detecting the orientation of text in the scanned document.
Important-
Only text documents written in languages that can be selected from Document Language in the Settings (General Settings) dialog are supported.
-
The orientation may not be detected for the following types of settings or documents since the text cannot be detected correctly.
- Resolution is outside the range of 300 dpi to 600 dpi
- Font size is outside the range of 8 points to 48 points
- Documents containing special fonts, effects, italics, or hand-written text
- Documents with patterned backgrounds
In that case, select the Check scan results checkbox and rotate the image in the Save Settings dialog.
-
-
(2) Save Settings Area
-
File Name
Enter the file name of the image to be saved. The date and 4 digits are appended to the set file name in the "_20XX0101_0001" format.
-
Data Format
Select the data format in which to save the scanned images.
You can select JPEG/Exif, TIFF, PNG, PDF, or PDF (Multiple Pages).
Important-
When Start OCR is selected in Application Settings, you cannot select PDF or PDF (Multiple Pages).
-
-
Settings...
Click to display the Data Format Settings dialog in which you can set the quality of the images to be saved, keyword search of PDF files and their compression type, and the data format in which to save images scanned with Auto Scan.
-
Save in
Displays the folder in which to save the scanned images. To change the folder, specify the destination folder in the dialog displayed by selecting Add... from the pop-up menu.
The default save folder is the Documents folder.
Important-
When the Settings dialog is displayed from My Image Garden, this option does not appear.
-
-
Check scan results
Displays the Save Settings dialog after scanning.
Important-
After scanning from My Image Garden, the Save Settings dialog does not appear.
-
(3) Application Settings Area
-
Open with an application
Select this when you want to enhance or correct the scanned images.
You can specify the application from the pop-up menu.
-
Send to an application
Select this when you want to use the scanned images as they are in an application that allows you to browse or organize images.
You can specify the application from the pop-up menu.
-
Send to a folder
Select this when you also want to save the scanned images to a folder other than the one specified in Save in.
You can specify the folder from the pop-up menu.
-
Attach to e-mail
Select this when you want to send e-mails with the scanned images attached.
You can specify the e-mail client you want to start from the pop-up menu.
-
Start OCR
Select this when you want to convert text in the image into text data using specified OCR software.
You can specify the application from the pop-up menu.
-
Do not start any application
Saves to the folder specified in Save in.
Note-
Specify the application or folder in the dialog displayed by selecting Add... from the pop-up menu.
-
Instructions
Opens this guide.
-
Defaults
You can restore the settings in the displayed screen to the default settings.