Sending Documents as E-mails Directly from the Machine (MF729Cdw/MF726Cdw/MF628Cw/MF624Cw)
| Article ID: ART167342 |
| |
Date published: 02/16/2017 |
| |
Date last updated: 02/16/2017 |
Description
You can specify multiple destinations, including Cc/Bcc destinations, just like you can when sending normal e-mails.
Solution
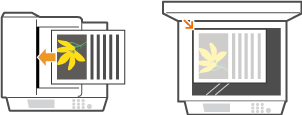
1. Place the document(s).
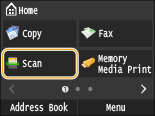
 2. Press
  and tap <Scan>.
- When the logon screen appears, use the numeric keys to enter the user name and password. Then select the authentication server and press
 .
.
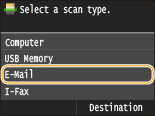
3. Tap <E-Mail>.
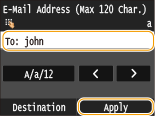
 4. Enter the destination using the numeric keys, and tap <Apply>.
- Tapping <A/a/12> toggles the input modes.
- If you enter the wrong characters, press
 . (Press to delete each character one by one; press and hold to delete all the input characters at once.)
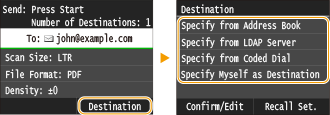
 5. Specify multiple destinations, including Cc/Bcc destinations, as necessary.
- Tap <Destination>, and select the method for specifying destinations.
- If you tap <Specify from LDAP Server> or <Specify Myself as Destination>, the destination is selected as the <To> destination.
- To specify destinations for <Cc> and <Bcc>, you need to use the <Specify from Address Book> or <Specify from Coded Dial>.
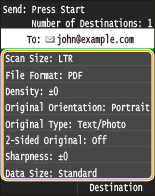
 6. Specify the scanning settings as necessary.
- The file name of a scanned document is automatically assigned based on the following format: communication management number (four digits)_sent date and time_document number (three digits).file extension.
- Example of file names: If a one-page document is converted into a PDF file and sent on October 17, 2015 at 07:00:05 P.M. 0045_151017190005_001.pdf
- You cannot specify file names yourself.
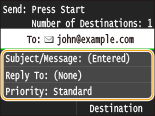
7. Specify the subject, body, reply-to address, and priority for the e-mail as necessary.
- The subject and the priority are set to "Attached Image" and "Standard" respectively by default.
- The body is not set by default. Enter it as necessary. Without the body text, only scanned documents are sent.
- The reply-to address is not set by default. If you want to display the reply-to address differently from that of the machine, specify the address from among those registered in the Address Book.
 8. Press
  to start sending.
- Scanning starts.
- When the SMTP authentication screen appears, use the numeric keys to enter the user name and password and then tap <Apply>.
- If you want to cancel sending, tap <Cancel> > <Yes>.
