
Adjust the Print Head Position - LX-D5500 / LX-P5510
| Article ID: ART182955 | | | Date published: 06/08/2023 | | | Date last updated: 06/13/2023 |
Description
Learn how to adjust the print head position of the LX-D5500 / LX-P5510.
Solution
Select an option below for more information.
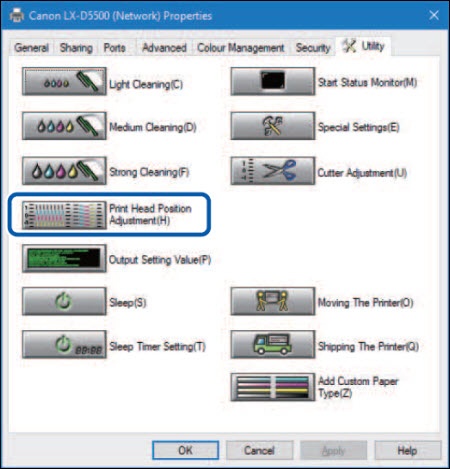
Adjust the print head position if a color shift is found.
To adjust the print head position, print adjustment pattern and enter adjustment values while looking at the printed adjustment pattern.
 Important
- When adjusting the print head make sure to use the actual paper you will use for printing.
- Adjustment patterns change depending on the size of the paper being set to printer, although the adjustment method is the same.
- The print head position cannot be adjusted while printing is in progress or if an error has occurred.
- Administrative privileges over this printer are required to configure the printer settings.
If a user without administrative privileges proceeds with configuration of settings, the following message will appear, "You do not have rights to printer management. Please contact your system administrator."
|
|
|
|
|
|
|
|
The Print Head Position Adjustment dialog box appears. |
|
|
|
|
|
|
|
|
|
|
|
|
|
A confirmation message appears. |
|
|
|
|
|
|
|
An adjustment pattern is printed. |
|
|
|
|
|
|
|
|
|
|
|
|
A confirmation message appears. |
|
|
|
|
|
|
|
|
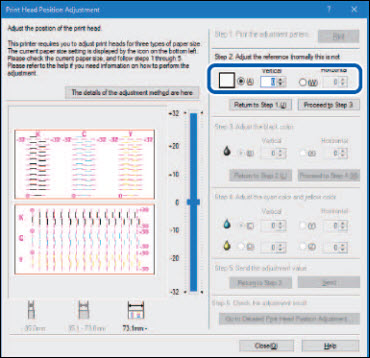
Adjusting the Reference Position |
|
If the black frame is shifted upward, specify a negative (-) value. If the black frame is shifted downward, specify a positive (+) value. Click the radio button (A) and then specify the adjustment value. |
|
If the black frame is shifted leftward, specify a positive (+) value. If the black frame is shifted rightward, specify a negative (-) value. Click the radio button (W) and then specify the adjustment value. |
|
|
|
|
|
|
|
|
|
|
|
|
|
|
|
|
|
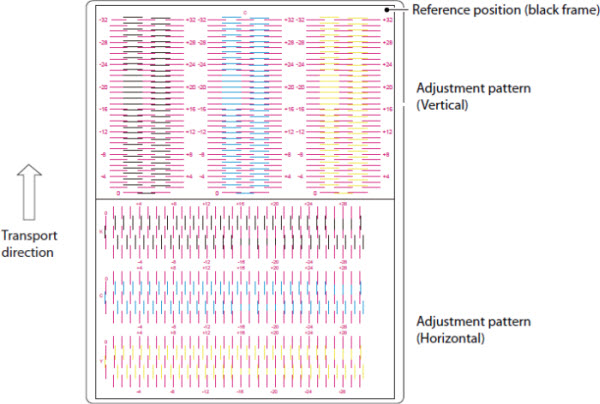
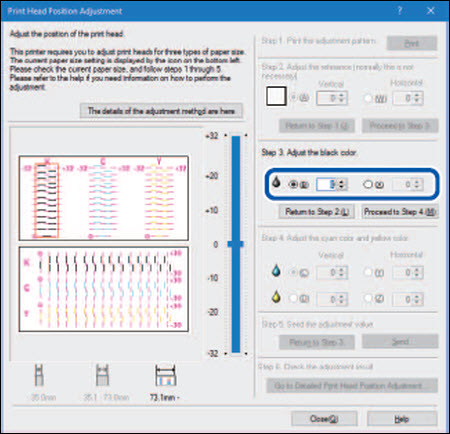
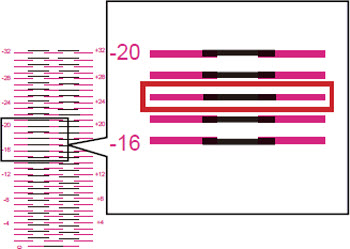
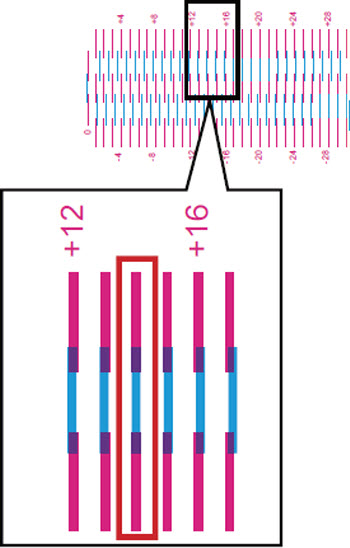
The adjustment value is found on the magenta and black lines which appear to be connected most smoothly (without steps). For example, in the pattern shown on the right, the adjustment value is -18. Click the radio button (B) and then specify the vertical adjustment value. |
|
The adjustment value is found on the magenta and black lines which appear to be connected most smoothly (without steps). For example, in the pattern shown on the right, the adjustment value is +14. Click the radio button (X) and then specify the horizontal adjustment value. |
|
|
|
|
|
|
|
|
|
|
|
|
|
|
|
|
|
|
|
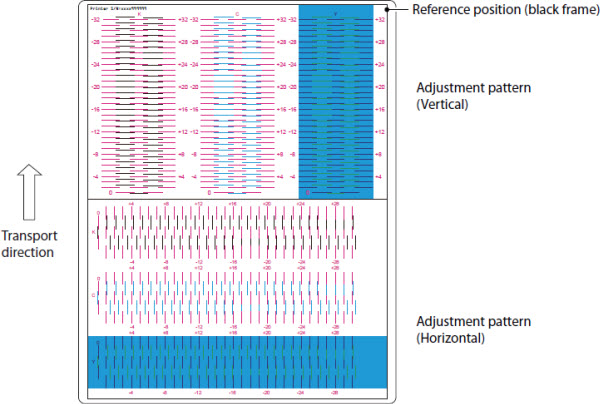
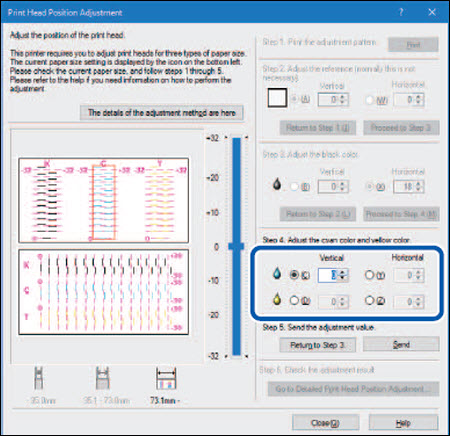
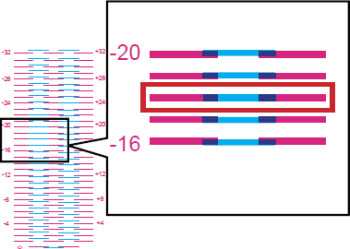
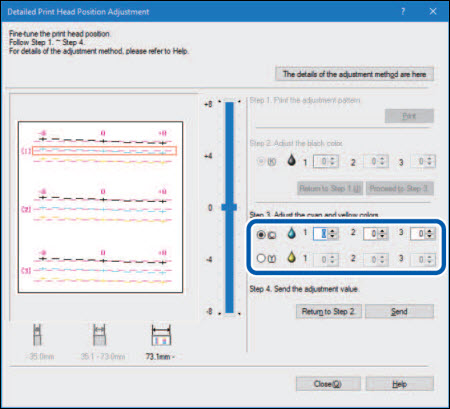
With regard to cyan and yellow, the adjustment value is found on the magenta and cyan (or yellow) lines which appear to be connected most smoothly (without steps). For example, in the pattern shown on the right, the cyan adjustment value is -18. Click the radio button (C) and then specify the vertical adjustment value. Adjust yellow (D) in the same manner. |
|
With regard to cyan and yellow, the adjustment value is found on the magenta and cyan (or yellow) lines which appear to be connected most smoothly (without steps). For example, in the pattern shown on the right, the adjustment value is +14. Click the radio button (Y) and then specify the horizontal adjustment value. Adjust yellow (Z) in the same manner. |
|
|
|
|
|
|
|
|
|
|
A confirmation message appears. |
|
|
|
|
|
|
|
The adjustment value is transmitted to the printer to adjust the head positions. |
|
|
|
|
|
|
|
|
|
|
|
|
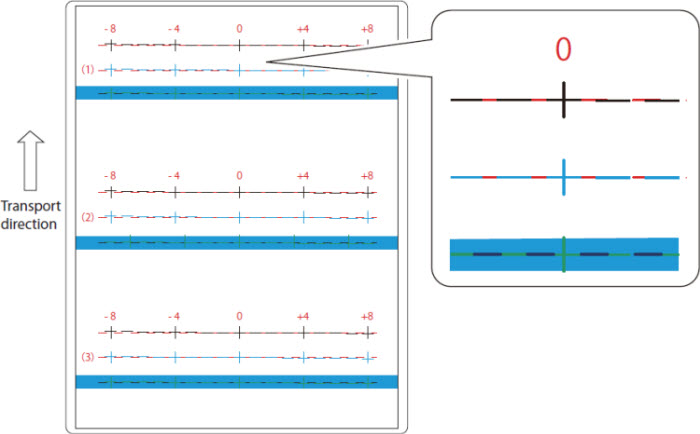
Make sure the lines of each color are smoothly connected at "0" on the adjustment pattern. If the lines appear to be out of alignment (stepped), readjustment is required. To perform detailed adjustment, click Step 6 [Go to Detailed Printhead Position Adjustment]. |
|
|
|
|
|
|
|
|
|
|
A confirmation message appears. |
|
|
|
|
|
|
 Clicking [The details of the adjustment method are here] in the Print Head Position Adjustment dialog box will display the help screen showing the print head adjustment method.
![[The details of the adjustment method are here] circled](https://support.usa.canon.com/library/CANON/CITS_TECH_SUPPORT/Printers/LX-P5510/Maintenance/details_of_adjustment_method_circled.jpg)
![[Print] circled](https://support.usa.canon.com/library/CANON/CITS_TECH_SUPPORT/Printers/LX-P5510/Maintenance/click_print_PH_position_adj.jpg)
![[Yes] circled](https://support.usa.canon.com/library/CANON/CITS_TECH_SUPPORT/Printers/LX-P5510/Maintenance/PH_adj_confirm.jpg)
![[Yes] circled](https://support.usa.canon.com/library/CANON/CITS_TECH_SUPPORT/Printers/LX-D5500/Maintenance/PH_adj_pattern_print_confirmation.jpg)
![[Proceed to Step 3] circled](https://support.usa.canon.com/library/CANON/CITS_TECH_SUPPORT/Printers/LX-P5510/Maintenance/PH_adj_proceed_step_3_circled.jpg)

![[Proceed to Step 4] circled](https://support.usa.canon.com/library/CANON/CITS_TECH_SUPPORT/Printers/LX-P5510/Maintenance/PH_adj_proceed_step_4_circled.jpg)
![[Send] circled](https://support.usa.canon.com/library/CANON/CITS_TECH_SUPPORT/Printers/LX-P5510/Maintenance/adj_PH_send_circled.jpg)
![[Yes] circled](https://support.usa.canon.com/library/CANON/CITS_TECH_SUPPORT/Printers/LX-P5510/Maintenance/send_settings_to_printer_yes.jpg)
![[OK] circled](https://support.usa.canon.com/library/CANON/CITS_TECH_SUPPORT/Printers/LX-P5510/Maintenance/PH_adj_completed.jpg)
![[Print] circled](https://support.usa.canon.com/library/CANON/CITS_TECH_SUPPORT/Printers/LX-P5510/Maintenance/click_print_PH_position_adj_to_confirm.jpg)
![[Go to Detailed Printhead Position Adjustment] circled](https://support.usa.canon.com/library/CANON/CITS_TECH_SUPPORT/Printers/LX-P5510/Maintenance/PH_adj_step_6_circled.jpg)
![[Close] circled](https://support.usa.canon.com/library/CANON/CITS_TECH_SUPPORT/Printers/LX-P5510/Maintenance/PH_adj_click_close.jpg)
![[Yes] circled](https://support.usa.canon.com/library/CANON/CITS_TECH_SUPPORT/Printers/LX-P5510/Maintenance/PH_adj_complete_click_yes.jpg)
These adjustment procedures are intended for maintenance personnel who have completed regular Printhead Position Adjustment] but seek more detailed adjustment.
|
|
|
|
Detailed Printhead Position Adjustment dialog box appears. |
|
|
|
|
|
|
|
|
A confirmation message appears. |
|
|
|
|
Printing of adjustment pattern starts. |
Detailed printhead position adjustment pattern |
|
|
|
|
|
|
|
|
|
|
|
|
|
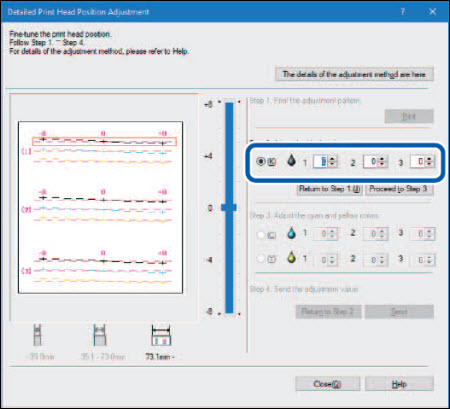
Check (1), (2) and (3) in adjustment pattern [K] (Black) and read and enter the value at the point of their intersection with the Magenta line. |
|
|
|
|
|
|
|
|
|
|
|
|
|
|
A confirmation message appears. |
|
|
|
|
The adjustment value is transmitted to the printer to adjust the head positions. |
|
|
|
|
|
|
|
Make sure the lines of each color are smoothly connected at "0" on the adjustment pattern. If the lines appear to be out of alignment (stepped), readjustment is required. |
|
|
|
|
A confirmation message appears. |
|
|
|
![[Go to Detailed Printhead Position Adjustment] circled](https://support.usa.canon.com/library/CANON/CITS_TECH_SUPPORT/Printers/LX-P5510/Maintenance/Detailed%20PH%20Adjust/PH_adj_step_6_circled.jpg)
![[The details of the adjustment method are here]](https://support.usa.canon.com/library/CANON/CITS_TECH_SUPPORT/Printers/LX-P5510/Maintenance/Detailed%20PH%20Adjust/details_of_adj_method_here_circled.jpg)
![[Print] circled](https://support.usa.canon.com/library/CANON/CITS_TECH_SUPPORT/Printers/LX-P5510/Maintenance/Detailed%20PH%20Adjust/detailed_PH_adj_click_print_to_start.jpg)
![[Yes] circled](https://support.usa.canon.com/library/CANON/CITS_TECH_SUPPORT/Printers/LX-P5510/Maintenance/Detailed%20PH%20Adjust/make_sure_printer_not_operating_yes_to_proceed.jpg)

![[Yes] circled](https://support.usa.canon.com/library/CANON/CITS_TECH_SUPPORT/Printers/LX-P5510/Maintenance/Detailed%20PH%20Adjust/has_pattern_printed_correctly_yes_circled.jpg)
![[Proceed to Step 3] circled](https://support.usa.canon.com/library/CANON/CITS_TECH_SUPPORT/Printers/LX-P5510/Maintenance/Detailed%20PH%20Adjust/proceed_to_step_3_circled.jpg)
![[Send] circled](https://support.usa.canon.com/library/CANON/CITS_TECH_SUPPORT/Printers/LX-P5510/Maintenance/Detailed%20PH%20Adjust/send_adj_value_send_circled.jpg)
![[Yes] circled](https://support.usa.canon.com/library/CANON/CITS_TECH_SUPPORT/Printers/LX-P5510/Maintenance/Detailed%20PH%20Adjust/send_settings_click_yes_to_proceed.jpg)
![[OK] circled](https://support.usa.canon.com/library/CANON/CITS_TECH_SUPPORT/Printers/LX-P5510/Maintenance/Detailed%20PH%20Adjust/PH_adj_complete.jpg)
![[Print] circled](https://support.usa.canon.com/library/CANON/CITS_TECH_SUPPORT/Printers/LX-P5510/Maintenance/Detailed%20PH%20Adjust/click_print_to_confirm_values.jpg)
![[Close] circled](https://support.usa.canon.com/library/CANON/CITS_TECH_SUPPORT/Printers/LX-P5510/Maintenance/Detailed%20PH%20Adjust/click_close.jpg)
![[Yes] circled](https://support.usa.canon.com/library/CANON/CITS_TECH_SUPPORT/Printers/LX-P5510/Maintenance/Detailed%20PH%20Adjust/finished_click_yes.jpg)
This section shows how to print information about the current settings of the printer.
Select the printer or a file (*.txt) as the output destination.
The setting information cannot be printed if an error has occurred or while the printer is printing.
Close the status monitor if it is running.
If this function is run on a shared printer, make sure the status monitor has not been launched on the client when working on a server, or has not been launched on the server when working on the client. The process may not be completed correctly if the Status Monitor is running.
|
|
|
|
|
|
|
A confirmation message appears. |
|
|
|
|
The setting values have printed. |
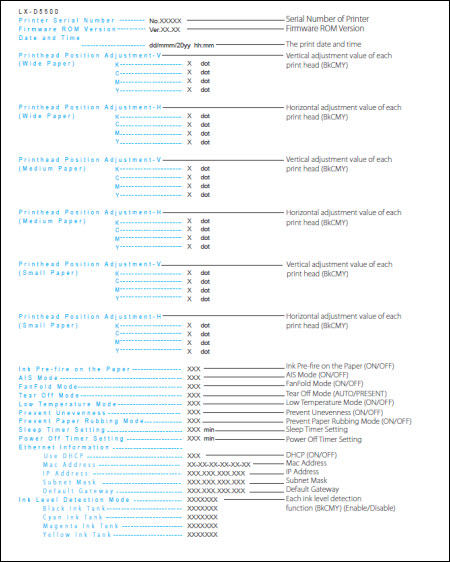
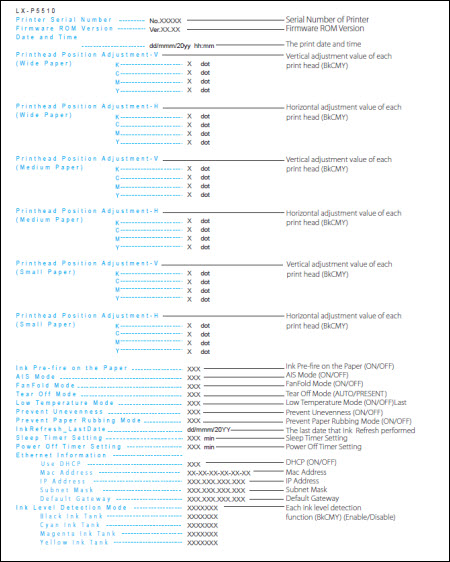
How to Read the Printed Setting Values |
|
|
|
|
|
|
![[Output Setting Value] circled](https://support.usa.canon.com/library/CANON/CITS_TECH_SUPPORT/Printers/LX-P5510/Maintenance/click_output_setting_value.jpg)
![[Output to Printer], [Output to File], and [Proceed] circled](https://support.usa.canon.com/library/CANON/CITS_TECH_SUPPORT/Printers/LX-P5510/Maintenance/select_output_option.jpg)
If your product issue was not resolved after following the steps above, or if you require additional help, please create or log in to your Canon Account to see your technical support options.
Or if you still need help, visit our Canon Community by clicking the button below to get answers:

____________________________________________________________________________________________