
Using the wireless controller WL-D81 Optura Xi
| Article ID: ART155846 | | | Date published: 06/09/2015 | | | Date last updated: 08/17/2015 |
Description
Solution
Using the wireless controller WL-D81 Optura Xi
By pointing the wireless controller at the camcorder's remote sensor when you press the buttons, you can control many functions of the camcorder. For the wireless remote to be functional, make sure that the WL. REMOTE setting in the SYSTEM menu is set to ON.
Returning to a Pre-marked Position
Hiding / Showing the Displays on the TV Screen
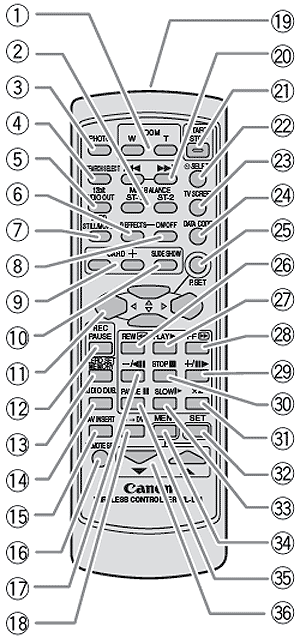
| 1. Zoom buttons | 19. Transmitter |
| 2. MIX BALANCE button | 20. Search buttons |
| 3. PHOTO button | 21. START/STOP button |
| 4. SEARCH SELECT button | 22. |
| 5. 12bit AUDIO OUT button | 23. TV SCREEN button |
| 6. D. EFFECTS (Digital effects) button | 24. DATA CODE button |
| 7. CARD STILL/MOVIE button | 25. P.SET (Print set) button |
| 8. Digital effects ON/OFF button | 26. REW |
| 9. CARD +/- buttons | 27. PLAY |
| 10. SLIDE SHOW button | 28. FF |
| 11. Direction buttons | 29. |
| 12. REC PAUSE button | 30. STOP |
| 13. ZERO SET MEMORY button | 31. x2 button |
| 14. AUDIO DUB. button | 32. SET button |
| 15. AV INSERT button | 33. |
| 16. REMOTE SET button | 34. MENU button |
| 17. |
35. PAUSE |
| 18. AV |
36. Select buttons |
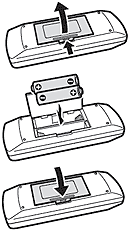
Inserting the Battery
The wireless controller operates with a lithium button battery CR2025.
|
 |
Zooming
The camcorder automatically switches between optical zooming and digital zooming. Image resolution is slightly lower with the digital zoom.The Optura Xi is equipped with a 11x optical zoom (9x when recording to a memory card) and can zoom up to 220x using the digital zoom (36x when recording to a memory card).
- Press <W> to zoom out (wideangle).
- Press <T> to zoom in (telephoto).
|
You can set the digital zoom to max out at either 44x or 220x using the following procedure:
- Press the <MENU> button to open the menu.
- Turn the selector dial to select [CAMERA SET UP] and press the selector dial.
- Select [D.ZOOM] and press the selector dial.
- Select a setting option.
- Press the <MENU> button to close the menu.
|
When you use the LCD screen for playback, the camcorder plays back the sound via built-in speaker. The built-in speaker is monaural. Use headphones for stereo sound or when using the viewfinder for playback.
| If the playback picture is distorted, clean the video heads using a Canon Head Cleaning Cassette or a commercially available digital video head-cleaning cassette. |
- Set the camcorder to PLAY (VCR) mode.
- Set the POWER switch to PLAY (VCR) and the TAPE/CARD switch to .
. - Open the LCD panel.
- You can also close the LCD panel with the screen facing outward. - Press the
 button to rewind the tape.
 - Press the
 button to begin playback.
 - Press the
 button to stop playback.
|
Special Playback Modes
![]() (Playback Pause)
(Playback Pause)
To pause playback, press the ![]() button during normal playback. Press the button again to resume playback. The camcorder goes into stop mode after 5 minutes in playback pause mode.
button during normal playback. Press the button again to resume playback. The camcorder goes into stop mode after 5 minutes in playback pause mode.
![]() (Fast Forward Playback) /
(Fast Forward Playback) / ![]() (Rewind Playback)
(Rewind Playback)
Plays back the tape at 9.5 times normal speed (forward or reverse). Press and hold the button during normal playback or fast forward.
![]() (Reverse Playback)
(Reverse Playback)
Press the button on the wireless controller during normal playback. Press the ![]() (play) button to return to normal playback.
(play) button to return to normal playback.
![]() (Frame Advance) /
(Frame Advance) / ![]() (Frame Reverse)
(Frame Reverse)
Plays back frame-by-frame. Press the button on the wireless controller repeatedly during playback pause. Press and hold it to play back continuous frame advance/frame reverse.
![]() (Slow Forward)/(Slow Reverse)
(Slow Forward)/(Slow Reverse)
Plays back at about 1/3 normal speed. Press the button on the wireless controller during normal or reverse playback. Press the ![]() (play) button to return to normal playback.
(play) button to return to normal playback.
x2 (Forward x2 Playback)/(Reverse x2 Playback)
Plays back at 2 times normal speed. Press the button on the wireless controller during normal or reverse playback. Press the ![]() (play) button to return to normal playback.
(play) button to return to normal playback.
|
Returning to a Pre-marked Position
If you wish to return to a particular scene later, mark the point with the zero set memory and the tape will stop at that point when you rewind/fast forward the tape. This function is operated with the wireless controller.

|
 " appears.
|
Photo/Date Search
You can search for a still image recorded anywhere on the tape with the photo search function, or locate the change of the date/time zone with the date search function.
- Set the camera to PLAY (VCR) mode and the TAPE/CARD switch to .
- Press the <SEARCH SELECT> button on the remote to choose between photo search and date search.
- "PHOTO SEARCH" or "DATE SEARCH" appears. - Press the
 or
or  button to begin searching.
- Press the button to search forward and the button to search backward.
- Press more than once to search for further still images or date changes (up to 10 times).
- Press the or button to change the search direction.
- Press the (stop) button stop searching.
|
Audio Dubbing
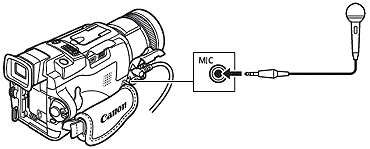
You can add sound from audio devices (AUDIO IN) or with the built-in or an external microphone (MIC. IN).
|
Connecting an Audio Device
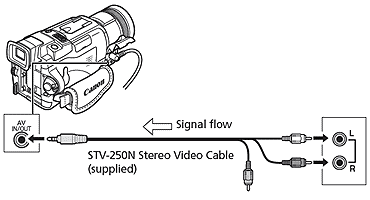
|
Using a Microphone
|
Dubbing
-
Set the camcorder to PLAY (VCR) mode and load a recorded cassette.
- Set the POWER dial to PLAY (VCR) and the TAPE/CARD to. -
Press the <MENU> button,select [AUDIO SET UP], and press the Selector dial.
-
Select [AUDIO DUB.], and press the Selector dial.
-
Set it to [AUDIO IN] or [MIC. IN], and press the Selector dial.
-
Press the <MENU> button to close the menu.
-
Locate the scene you wish audio dubbing to start.
-
Press the <PAUSE
 > a button on the wireless controller.
 -
Press the <AUDIO DUB> button on the wireless controller.
- "AUDIO DUB." and " " appear.
- If the optional DM-50 microphone is attached, "C" (Connection) appears. -
Press the <PAUSE
> button on the wireless controller to begin dubbing.
- Audio device: Begin playback.
- Microphone: Direct your voice to the microphone. -
Press the <STOP
> button on the wireless controller to stop dubbing.
- Audio device: Stop playback.
|
Hiding / Showing the Displays on the TV Screen
When you connect a TV for recording/playback, you can either hide or show the displays on the TV screen.
-
Press the <TV SCREEN> button on the wireless controller.
-
When the POWER switch is set to CAMERA: The displays disappear from the TV screen and appear when you press the button again.
-
When the POWER switch is set to PLAY (VCR): The displays appear on the connected TV screen and disappear when you press the button again. The setting resets to the OFF setting when you turn the camcorder off.
-
When the TV screen displays are hidden, the displays still appear on the LCD screen. If you turn on the data code, displays other than the data code will disappear from the LCD screen.
-
You can also change the setting in the menu during recording:
-
Open the menu and select [DISPLAY SET UP]. Select [TV SCREEN], set it to [OFF] and close the menu.