➤
Home
Articles
FAQs
Ask a Question
Search
Models related to this article
imagePROGRAF TA-30
imagePROGRAF TA-20
Home
Articles
Articles Detail
How to replace the cutter blade on a TA-20 / TA-30 printer
Article ID: ART180644
|
Date published: 03/09/2022
|
Date last updated: 02/16/2024
Description
Follow the steps below to replace the cutter blade on a TA-Series printer.
Solution
The cutter blade cannot be replaced if there is paper in the moving range of the cutter. Remove the paper before changing the cutter blade.
Tap
(Setup) >
Maintenance
on the HOME screen.
The
Maintenance
screen appears.
Tap
Replace cutter blade unit
.
A confirmation message appears.
Tap
Yes
.
The carriage moves and after it stops moving, instructions for the cutter blade replacement procedure appear on the touch screen.
If the cutter blade is dirty, use a damp cloth that you have wrung out completely to wipe it clean.
Do not use tissue paper, paper towels, rough-textured cloth, or similar materials for cleaning so as not to scratch the surface.
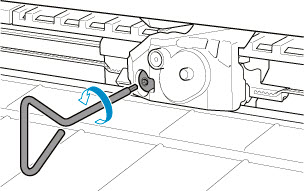
Turn the hex screw with the hex wrench until loose.
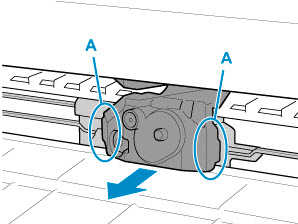
Remove the cutter blade while holding <A>.
Never touch any part other than <A>. This may stain your hands or cause injury. Additionally, this may damage the printer.
Do not disassemble the cutter blade. Touching the blade may cause injury.
Dispose of the used cutter blade in accordance with local regulations.
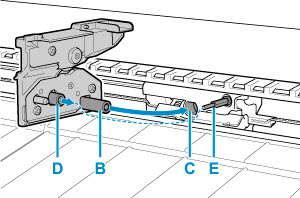
Install the new cutter blade while aligning <B> to <C> and <D> to <E>.
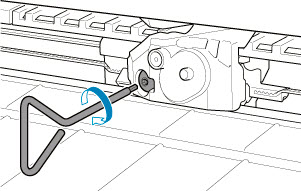
Turn the hex screw until it is securely fixed.
After the cutter blade is secured, check that the cutter blade does not come off. If the cutter blade comes off, this may damage the printer..
Tap
Done
.
Tap
Yes
.
Rate this Article
Was this article helpful?
Yes, This document is helpful
No, This document needs a clearer explanation
Please provide your comments
Rate Article


 (Setup) > Maintenance on the HOME screen.