Printing the Nozzle Check Pattern
Print the nozzle check pattern to determine whether the ink ejects properly from the print head nozzles.
 Note Note If the remaining ink level is low, the nozzle check pattern will not be printed correctly. Replace the FINE Cartridge whose ink is low. If the remaining ink level is low, the nozzle check pattern will not be printed correctly. Replace the FINE Cartridge whose ink is low.
|
You need to prepare: a sheet of A4 or Letter-sized plain paper
1. Make sure that the power is turned on, and load a sheet of A4 or Letter-sized plain paper in the Rear Tray.
2. Open the Paper Output Tray gently, and open the Output Tray Extension.
3. Print the nozzle check pattern.
(1) Press the  (Maintenance) button repeatedly until A appears.
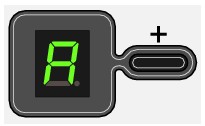
(2) Press the Black or Color button.
The nozzle check pattern will be printed.
4. Examine the nozzle check pattern.
 Page top
Examining the Nozzle Check Pattern
Examine the nozzle check pattern, and clean the Print Head if necessary.
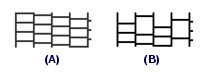
Check if there are no missing lines in the pattern (1) or no white streaks in the pattern(2).

(1) Check if lines are missing in this pattern.
If yes, the cleaning is required. See Cleaning the Print Head. (B) Bad (Lines are missing)
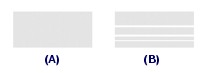
(2) Check if white streaks are present in this pattern.
If yes, the cleaning is required. See Cleaning the Print Head. (A) Good
(B) Bad (White streaks are present)
Page top
Cleaning the Print Head
Clean the Print Head if lines are missing or if white streaks are present in the printed nozzle check pattern. Cleaning unclogs the nozzles and restores the print head condition. Cleaning the Print Head consumes ink, so clean the Print Head only when necessary.
Make sure that the power is turned on.
Clean the Print Head.
(1) Press the  (Maintenance) button repeatedly until H appears.

(2) Press the Black or Color button.
The machine starts cleaning the Print Head.
Do not perform any other operations until the machine completes the cleaning of the Print Head. This takes about 1 to 2 minutes.
Check the print head condition.
When the cleaning is completed, the LED returns to the standby mode.
To check the print head condition, print the nozzle check pattern.
Note If the problem is not resolved after cleaning the Print Head twice, clean the Print Head deeply.
|
Page top
Cleaning the Print Head Deeply
If print quality does not improve by the standard cleaning of the Print Head, clean the Print Head deeply. Cleaning the Print Head deeply consumes more ink than the standard cleaning of the Print Head, so clean the Print Head deeply only when necessary.
Make sure that the power is turned on.
Clean the Print Head deeply.
(1) Press the  (Maintenance) button repeatedly until y appears.
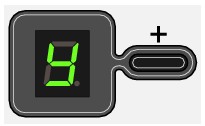
(2) Press the Black or Color button.
The machine starts cleaning the Print Head deeply.
Do not perform any other operations until the machine completes the deep cleaning of the Print Head. This takes about 2 minutes.
Check the print head condition.
When the deep cleaning is completed, the LED returns to the standby mode.
To check the print head condition, print the nozzle check pattern.
If the problem is not resolved, clean the Print Head deeply again.
If the problem is still not resolved, ink may have run out. Replace the FINE Cartridge with a new one.
Page top