|
|
Printing using the Photo Index Sheet MX870
| Article ID: ART109848 |
| |
Date published: 05/11/2015 |
| |
Date last updated: 08/17/2015 |
Description
Photo Index Sheet is a Letter-sized plain paper on which thumbnail images of photos saved on a memory card are printed.
Solution
Printing Using the Photo Index Sheet
Photo Index Sheet is an A4 or Letter-sized plain paper on which thumbnail images of photos saved on a memory card are printed. Print out a Photo Index Sheet, mark the images that you want to print, scan the sheet in, and the machine then prints the selected images. You can also specify other settings, such as the paper size and the media type, by using this sheet; you do not have to perform settings by using the Operation Panel on the machine.
A4 or Letter-sized plain paper
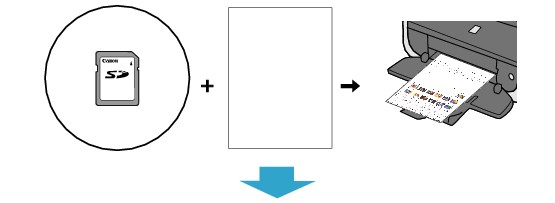
Photo Index Sheet Marking

Scanning/Printing

- Make sure that the machine is turned on.
- Load Letter-sized plain paper in the Cassette.

- Press the CARD (A) button.

-
Insert a memory card into the Card Slot.
If document files are saved on the memory card besides photo files, select Print photos in the displayed screen, then press the OK button.

 Important: Important:
- You cannot insert the memory card and the USB flash drive at the same time.
- Do not remove the memory card until printing the Photo Index Sheet(s) is complete.
- Photos may not be printed properly if you add or delete photos on a memory card after the Photo Index Sheet is printed. Do not overwrite the memory card until scanning the Photo Index Sheet is complete.
- Press the left Function button (under Menu) when the list of photos is displayed on the LCD.
The card menu is displayed.

- Select
 Special photo print, then press the OK button. Special photo print, then press the OK button.
- Select
 Photo Index Sheet, then press the OK button. Photo Index Sheet, then press the OK button.
- Make sure that
 Photo Index Sheet print is selected, then press the OK button. Photo Index Sheet print is selected, then press the OK button.
- Select a range of images included in the Photo Index Sheet, then press the OK button.
The following ranges can be selected.
Print all photos:
Prints all images.
Set number of copies:
Prints the specified number of images from the newest one.
Select one of the items: Last 30 photos/Last 60 photos/Last 90 photos/Last 120 photos
Select date:
Prints images by specifying the shooting date range. Specify the start and end of the date.
 Note: Note:
It may take a while to display the Search screen depending on the number of photos saved on the memory card.
- Press the Color button.
The Photo Index Sheet(s) will be printed.
Note:
If 31 or more images are selected, two or more Photo Index Sheets will be printed.
-
Fill in the appropriate circles in the Photo Index Sheet.
Fill in the appropriate circles ( ) with a dark pencil or a black ink pen to select the photos to print and their print options. ) with a dark pencil or a black ink pen to select the photos to print and their print options.
- Good

- Bad

(a) Check mark
(b) Line only
(c) Too light

- Select the page size and other printing formats.
- Select "Date"/"Auto Photo Fix OFF" as necessary.
- Fill in this circle to print a copy of all photographs.
* If you fill in this circle, any other circles you filled in for the number of copies to print for each photograph will be disregarded, and one copy each of all photographs will be printed.
- Select the number of copies (fill in a circle under each photograph to print).
- Confirm and follow the described printing procedure.
- Fill in this circle to print the same Photo Index Sheet again.
* If you fill in this circle, all other filled settings will be disregarded.
-
Be careful not to make the bar code dirty.
If the bar code is dirty or has wrinkles, the machine may not scan the Photo Index Sheet properly.
Important:
- Be sure to fill in a circle for every setting item except options.
- If there are two or more Photo Index Sheets, fill in marks on each sheet.
- If the filled circles on the Photo Index Sheet are not dark or vast enough, the machine may not scan the Photo Index Sheet properly.
- Load paper to print photos.
Make sure that the page size and media type of the loaded paper match those specified on the Photo Index Sheet.
Note:
When printing images using the Photo Index Sheet, you can select 4" x 6" (101.6 x 152.4 mm), 5" x 7" (127 x 177.8 mm), 8.5" x 11" (Letter), or A4 for the page size.
- Make sure that
 Scan sheet and print is selected, then press the OK button. Scan sheet and print is selected, then press the OK button.
-
Place the Photo Index Sheet face-down on the Platen Glass, then press the Color button.
When placing the Photo Index Sheet, place the front side down, align the upper left corner of it with the alignment mark as shown in the figure below, then close the Document Cover.

The Photo Index Sheet is scanned and the specified photos will be printed.
Remove the Photo Index Sheet on the Platen Glass after printing is complete.
Important:
- You cannot use the ADF to scan the Photo Index Sheet.
-
If Failed to scan Photo Index Sheet is displayed on the LCD, press the OK button and confirm the following:
- The Platen Glass and the Photo Index Sheet are not dirty.
- The Photo Index Sheet is placed in the correct position with its front side facing down.
- You have filled in all the necessary circles on the sheet.
- Only one option is selected for items that do not accept two or more selections.
- Do not remove the memory card while printing is in progress.
Note:
- To cancel printing, press the Stop button.
- To continue to print photographs using subsequent Photo Index Sheets, repeat the procedure from step 13.
- If the memory card has been removed and then reinserted before printing with the Photo Index Sheet, it may take some time before printing starts.
|
