|
|
Use a Wi-Fi adapter (W-E1) to send images from your camera to a smartphone or tablet - EOS 7D Mark II
| Article ID: ART169044 |
| |
Date published: 11/28/2017 |
| |
Date last updated: 11/30/2017 |
Description
Learn how to wirelessly save images from your EOS 7D Mark II camera to an iOS or Android device. Wi-Fi adapter W-E1 required (sold separately).
Solution
Prerequisites
- Connect the Wi-Fi adapter W-E1 to your camera.
- Connect both the smart device and the Wi-Fi adapter to the same network.
- Install Canon Camera Connect on a device running Android or iOS. Canon Camera Connect is available from Google Play or the App Store. The app also allows you to use remote shoot and location information.
- The camera must have a Compact Flash card installed for storing images before wireless transfer.
- Wireless security, transmission range, and transfer speed vary by environment.
Check camera firmware
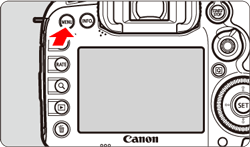
- Turn on the camera.
- Press menu and navigate to [
 : :  firmware ver.] If the version is 1.1.0 or later, you can use W-E1. If the firmware is lower, get the latest firmware. firmware ver.] If the version is 1.1.0 or later, you can use W-E1. If the firmware is lower, get the latest firmware.
- With valid firmware, turn off the camera
- Insert the W-E1 into the SD card slot of the camera. Make sure there is a compact flash (CF) card also installed.
- Turn on the camera.
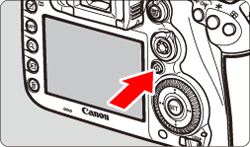
- Press the <MENU> button to display the menu screen.
- Press <
 > button and select the [ > button and select the [  ] tab. ] tab.
 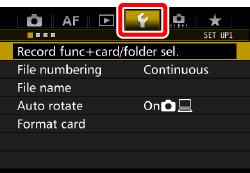
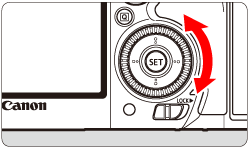
- Turn the <
 > dial to select the [ > dial to select the [  ] tab. ] tab.
 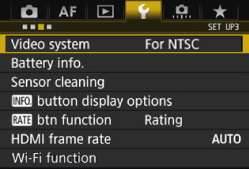
- Turn the <
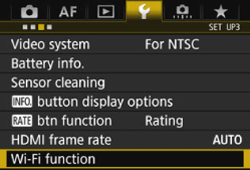
 > dial to select [Wi-Fi function], then press < > dial to select [Wi-Fi function], then press <  >. >.
- When selecting this setting for the first time, a screen to register a nickname is displayed. This nickname appears on the other device when you are connecting them. If you have already set a nickname skip to the next step. Otherwise, select [OK], enter up to 10 characters, press <MENU>, turn the rotary dial to select [OK], and press <set>.
- The [Wi-Fi function] screen appears and basic camera settings are complete.
Connect the camera to a smartphone or tablet
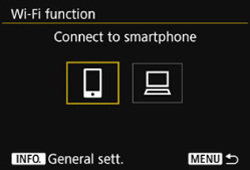
- Turn the < > dial, select [
 ] (Connect to smartphone) and press < >. ] (Connect to smartphone) and press < >.
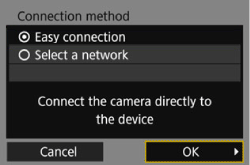
- Turn the < > dial, select [Easy connection] and press < >.
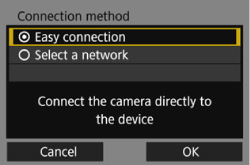
- Turn the < > dial, select [OK] and press < 0 >.
- In the smartphone's Wi-Fi menu, connect to the SSID and enter the encryption key displayed on the LCD monitor of the camera.
- When the [Waiting to connect] screen is displayed on the LCD monitor, start Canon Camera Connect on the smartphone.
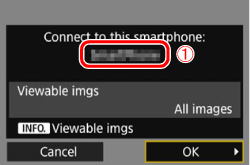
- Select and tap on the camera to connect to from [Cameras] on Canon Camera Connect.
- When a connection is established, the camera displays a confirmation screen. Select [OK] and press < >.
- The camera LCD monitor displays a message about a connection being established and then turns off. The camera buttons are also disabled. Control is now moved to Canon Camera Connect.
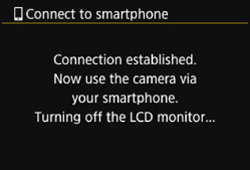
- The main window of Canon Camera Connect is displayed on the smartphone.
View and save images with the smart device
- Touch [Images on camera] in Canon Camera Connect.
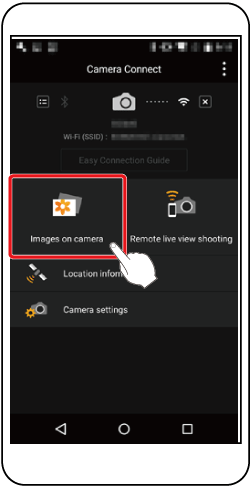
- A list of the images on the camera appears in [Camera Connect]. Tap [Select].
- After the screen refreshes, choose the images you want, and then touch [
 ]. The selected images are then saved to the smartphone. To select all images at once, press the [ ]. The selected images are then saved to the smartphone. To select all images at once, press the [  ] icon, and then touch [ ]. ] icon, and then touch [ ].
- After the images are saved, touch [
 ], and then touch [ ], and then touch [  ] to return to the menu screen. ] to return to the menu screen.
- To end the connection, touch the [
 ] icon, and then touch [YES]. ] icon, and then touch [YES].
|
