| Solution |
You can assign often-used functions to camera buttons or dials according to your preferences.
Customizing Controls 1. Set the camera's power switch to < ON >.
2. Set the lens's focus mode switch to < AF >.

3. Press the <MENU> button to display the menu.
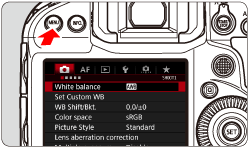
4. Under the [  ] tab, select [Custom Controls], then press <  >.
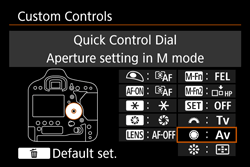
5. Turn the <  > dial to select a camera control, then press <  >.
- The name of the camera control and the assignable functions will be displayed.
- The diagram on the left will show the location of the selected button or dial.
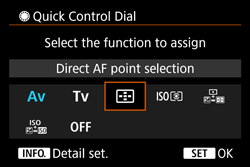
6. Turn the < > dial to select a function, then press < >.
- If the
 icon appears on the screen's bottom left, you can press the < INFO. > button and set other related options. icon appears on the screen's bottom left, you can press the < INFO. > button and set other related options.
7. When the setting change is complete, the screen for step 5 will reappear.
The camera control will be changed to the item set in step 6.
âPress the < MENU > button to exit.
NOTE
With the screen in step 5 displayed, you can press the [  ] button to revert the Custom Control settings to their defaults. Note that the [ : Custom Controls ] settings will not be canceled even if you select [  : Clear all Custom Func. (C.Fn) ].
Assignable Functions to Camera Controls
| Function |

|

|

|

|

|

|

|

|

|

|

|
| AF |

| Metering and AF start |

|
*1 |
*1 |
|
|
|
|
|
|
|
|

| AF stop |
|
|
|
|
|
|
|
|
|
|
|

| Switch to registered AF function |
|
|
|
*2 |
*2 |
|
*2 |
|
|
|
|

| ONE SHOT
 AI SERVO
 |
|
*3 |
*3 |
*3 |
*3 |
|
*3 |
|
|
|
|

| Switch to registered AF point |
|
|
|
*3 |
*3 |
|
*3 |
|
|
|
|

| AF point direct selection |
|
|
|
|
|
|
|
|
|
*4 |
*5 |

| Select AF point

|
|
|
|
|
|
|
|
|
|
*6 |
|

| Pause Movie Servo AF |
|
|
|
|
|
|
|
|
|
|
|
| Exposure |

| Metering start |
|
|
|
|
|
|
|
|
|
|
|

| AE lock |
|
|
|
|
|
|
|
|
|
|
|
|
| AE lock (while button pressed) |
|
|
|
|
|
|
|
|
|
|
|

| AE lock (hold) |
|
|
|
|
|
|
|
|
|
|
|

| AE lock, AF stop |
|
|
|
|
|
|
|
|
|
|
|

| FE lock |
|
|
|
|
|
|
|
|
|
|
|

| ISO speed |
|
|
|
|
|
|
|
|
|
|
|

| Set ISO Speed (hold button, turn
) |
|
|
|
|
|
|
|
|
|
|
|

| ISO speed (
during metering) |
|
|
|
|
|
|
|
|
|
|
|

| Set ISO,

|
|
|
|
|
|
|
|
|
|
|
|

| Exposure compensation (hold button, turn
) |
|
|
|
|
|
|
|
|
|
|
|

| Shutter speed setting in M mode |
|
|
|
|
|
|
|
|
|
|
|

| Aperture setting in M mode |
|
|
|
|
|
|
|
|
|
|
|
| Function |
|
|
|
|
|
|
|
|
|
|
|
| Images |

| Image size selection |
|
|
|
|
|
|
|
|
|
|
|

| One-touch image quality setting |
|
|
|
*7 |
|
*7 |
*7 |
|
|
|
|

| One-touch image quality (hold) |
|
|
|
*7 |
|
*7 |
*7 |
|
|
|
|

| Record function+card/folder selection |
|
|
|
|
|
|
|
|
|
|
|

| Picture Style |
|
|
|
|
|
|
|
|
|
|
|

| White balance selection |
|
|
|
|
|
|
|
|
|
|
|
| Operation |

| Depth-of-field preview |
|
|
|
|
|
|
|
|
|
|
|

| IS start |
|
|
|
|
|
|
|
|
|
|
|

| Menu display |
|
|
|
|
|
|
|
|
|
|
|

| Register/recall shooting function |
|
*8 |
*8 |
|
|
|
|
|
|
|
|

| Unlock while button pressed |
|
|
|
|
|
|
|
|
|
|
|

| Start movie recording (when
 set)
set) |
|
|
|
|
|
|
|
|
|
|
|

| Switch to Custom shooting mode |
|
|
|
|
|
|
|
|
|
|
|

| Image replay |
|
|
|
|
|
|
|
|
|
|
|

| Magnify/Reduce (press SET, turn
) |
|
|
|
|
|
|
|
|
|
|
|

| Magnify/Reduce button |
|
|
|
|
|
|
|
|
|
|
|

| Playback button |
|
|
|
|
|
|
|
|
|
|
|

| Info button |
|
|
|
|
|
|
|
|
|
|
|

| Erase button |
|
|
|
|
|
|
|
|
|
|
|

| Protect button |
|
|
|
|
|
|
|
|
|
|
|

| Cycle between the set functions |
|
|
|
|
|
*9 |
|
|
|
|
|

| Flash function settings |
|
|
|
|
|
|
|
|
|
|
|

| No function (disabled) |
|
|
|
|
|
|
|
|
|
|
|
*1: When assigned to the < AF-ON > or <
> button, pressing the < INFO. > button while the setting screen is displayed will enable you to set the detailed AF settings. When shooting, pressing the < AF-ON > or <
> button will perform AF as it was set.
*2: With the setting screen displayed, press the < INFO. > button to display the detailed settings screen. Turn the <
> or <
 > dial to select the parameter to be registered, then press <
> to add a checkmark [
> dial to select the parameter to be registered, then press <
> to add a checkmark [
 ]. When you select a parameter, then press <
>, you can adjust the parameter setting. By pressing the <
> button, you can revert the settings to their defaults.
]. When you select a parameter, then press <
>, you can adjust the parameter setting. By pressing the <
> button, you can revert the settings to their defaults.
*3: With the setting screen displayed, when you press the < INFO. > button, you can select [Switch only when btn is held] or [Switch each time btn is pressed].
*4: With the Quick Control Dial setting screen displayed, you can press the < INFO. > button, then set the direction for switching the AF point for when the <
> dial is turned. The [Direction: AF point switching] settings for [Horizontal] and [Vertical] will work for Single-point Spot AF, Single-point AF, Man. select.: AF point expansion, and Expand AF area: Surround. The [Direction: Zone AF frame switch] settings for [Cycle through the zones], [Horizontal], and [Vertical] will work with Zone AF.
*5: On the Multi-controller setting screen, press the < INFO. > button and you can select the AF point ([ Switch to center AF point ] or [ Switch to registered AF point ]) the camera switches to when you press the center of <
>.
*6: With the setting screen displayed, you can press the < INFO. > button, then set the direction for switching the AF point for when the <
> dial is turned. The [Direction: AF point switching] settings for [Horizontal] and [Vertical] will work for Single-point Spot AF, Single-point AF, Man. select.: AF point expansion, and Expand AF area: Surround. The [Direction: Zone AF frame switch] settings for [Cycle through the zones], [Horizontal], and [Vertical] will work with Zone AF.
*7: With the setting screen displayed, by pressing the < INFO. > button, you can set the image size for this function.
*8: With the setting screen displayed, press the < INFO. > button to display the detailed settings screen. Turn the <
> or <
> dial to select the function to be registered, then press <
> to add a checkmark [
]. When you select a function, then press <
>, you can adjust the setting. By pressing the <
> button, you can revert the settings to their defaults. By selecting [Register current settings], the camera's current settings will be registered.
*9: With the setting screen displayed, press the < INFO. > button to display the detailed settings screen. You can select the functions to switch. Turn the <
> dial to select the desired function, then press <
> to add a checkmark [
]. Then select [OK] to register the setting.
NOTE
stands for the [ AF stop button ] provided on super telephoto lenses equipped with Image Stabilizer.
|