
Change the machine settings (MX700)
| Article ID: ART122720 | | | Date published: 05/12/2015 | | | Date last updated: 08/17/2015 |
Description
Solution
Device Settings |
This section describes the procedure to change the settings in the Device settings screen, taking the steps to specify Extended copy amount as an example.
1. Make sure that the machine is turned on.
2. Display the Device settings screen.
(1) Press the Menu button.
(2) Press the
or
button to select Maintenance/settings, then press the OK button.
The Maintenance/settings screen is displayed.
(3) Press the
The Device settings screen is displayed.
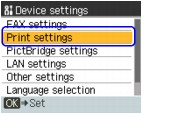
3. Select the menu.
(1) Press the
or
button to select the setting item, then press the OK button.
The setting screen for the selected item is displayed.
(2) Press the
4. Change the settings.
(1) Press the
Fax Settings , Print Settings , LAN Settings , Other Settings

 FAX Settings
 User settings
 Date/time setting
Sets the current date and time.
Date display
Sets the format of dates displayed on the LCD and printed on sent faxes.
Three date formats are available; YYYY/MM/DD, MM/DD/YYYY, and DD/MM/YYYY.
Summer time setting
Enables/disables the summer time setting. (This setting may not be available depending on the country or region of purchase.)
Unit name/TEL registr.
Registers the sender information (your name and fax/telephone number) printed on sent faxes.
TTI position
Selects the position to print the sender information (outside or inside the image area).
After selecting the print position, select FAX to print "FAX" or TEL to print "TEL" before your telephone number.
Offhook alarm
Sets whether to set off an alarm when the handset is off hook.
Volume control
Adjusts the volume of the dialing sound.
RX ring volume
Adjusts the ring volume when the machine receives a fax.
Line monitor volume
Adjusts the line monitor volume.
RX ring level
Adjusts the level of the ringing sound the machine makes when it receives a fax (Normal or High).
Telephone line type
Specifies the type of telephone line connected to the machine (Rotary pulse or Touch tone).
Note
This setting may not be available depending on the country or region of purchase.
Activity report
Sets whether to print the Activity report automatically after every 20 transactions.
TX settings
ECM TX
Enables/disables ECM sending.
Pause time
Sets the length of time paused for each press of the Redial/Pause button.
Auto redial
Enables/disables automatic redialing.
Redial times
Specifies the maximum number of redial attempts.
Redial interval
Specifies the length of time the machine waits between redial attempts.
TX start speed
Selects the fax sending speed.
Color TX
When faxing color documents using the ADF, selects whether to perform automatic black & white conversion if the recipient's fax machine does not support color faxing.
TX report
Sets whether to print a transmission report after each transmission.
Attach TX image
When Print error only or Print for each TX is selected, sets whether to print the first page of the document below the transmission report.
Dial tone detect
If you select ON, the machine transmits the fax after confirming the dial tone. This function may not be supported depending on the country or region of purchase.
RX settings
Auto print received
Sets whether the machine automatically prints the fax it received. When set to OFF, received faxes are stored in memory.
Print when out of ink
Sets whether to continue printing received faxes when the remaining ink is low.
ECM RX
Enables/disables ECM reception.
FAX priority mode
Specifies the detailed settings when the receive mode is set to FAX priority mode.
Ring start time
Specifies the length of time to allow the machine to judge whether an incoming call is fax or a voice call.
Telephone ring time
Specifies, in seconds, the time the machine rings for a voice call.
Default action
Sets whether to receive the fax after the specified ring time has elapsed.
DRPD: Set FAX ring pat.
Sets the distinctive ring pattern of a call that the machine assumes as a fax call. If you subscribe to a DRPD service, set this to match the pattern assigned by your telephone company.
This setting is only available in US and Canada.
Incoming ring
Ring count
Specifies the number of times the external device rings with an incoming call when the receive mode is set to FAX only mode or FAX priority mode.
Manual/auto switch
Sets, when the receive mode is set to TEL priority mode, whether to automatically receive faxes after the external device rang a specified length of time.
RX start time
Specifies the length of time until automatic reception is started when ON is selected.
Remote RX
Enables/disables remote reception.
Remote RX ID
Specifies the remote reception ID when ON is selected.
RX image reduction
Enables/disables automatic reduction of incoming faxes so that they fit in the selected paper.
Image reduction direction
Selects the image reduction direction when ON is selected.
RX start speed
Selects the fax reception speed.
RX report
Sets whether to print a reception report after each reception.
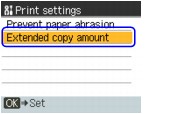
Print Settings
Prevent paper abrasion
Use this setting only if the print surface becomes smudged.
Important
Be sure to set this back to OFF after printing since it may result in lower print quality.
Extended copy amount
Selects the amount of image that extends off the paper when printing in Borderless (full).
This setting can be applied only when Copy mode is selected.
If printouts contain margins even though you are printing in Borderless, specifying Large for this setting may help solve the problem.
PictBridge Settings
For details, refer to "Printing Photographs Directly from a Compliant Device" in the Quick Start Guide.
Top of Page LAN Settings
Reset LAN settings
Initializes the network setting information of this machine.
Note that initialization erases all connection settings with computers, disabling printing from computers. After initializing the network settings, connect the machine and your computer with a USB cable and set up the machine again. Make sure this is what you want to do before performing this command.
Display LAN details
Displays the network setting information of this machine on the LCD.
The following setting information is displayed.
Item
Value
Connection
Active/Inactive
IP address
XXX. XXX. X. XXX
Subnet mask
XXX. XXX. XXX. XXX
Default gateway
X. X. X. X
MAC address
XX:XX:XX:XX:XX:XX
MAC address filtering
ON/OFF
IP address filtering
ON/OFF
(X can be any number from 0 to 9 or a letter from A to F)
Other Settings
Read/write attribute
Selects whether to allow data to be written onto memory cards from a computer connected via USB or over a wired LAN.
Volume control
Selects the volume.
Keypad volume
Selects the beep volume when pressing the buttons on the Operation Panel.
Alarm volume
Selects the alarm volume.
Country select
Selects the country where you are using the machine. This setting may not be available depending on the country or region of purchase.
Adjust contrast
Use this to adjust the contrast of the LCD if it is too low or too high.
Slide show setting
Specifies the image display quality of the slide show.
When Image quality: Std is selected, images are displayed at about 5-second intervals. When Image quality: High is selected, images are displayed at different time intervals according to their resolutions.
Quiet mode
Enable this function on the machine if you want to reduce the operating noise, such as when printing at night.
Enabling this function reduces the noises generated while:
Copying,
Printing from a memory card,
Printing in fax mode, and
Printing from a PictBridge compliant device.
Furthermore, certain noise, such as when the machine is preparing for printing, is not reduced.
The noises generated while scanning or printing from the computer can also be reduced. To reduce these noises, you need to configure the settings on the computer.
For the noises while scanning, refer to the Scanning Guide on-screen manual.
For the noises while printing from the computer, refer to the PC Printing Guide on-screen manual.
Language Selection
Changes the language for LCD messages and menus.
Reset Setting
Reverts all settings you made to the machine since purchase back to default. However, some data may not be erased, depending on the current usage state of your machine.
Top of Page