
Setting the white balance to correct color using the PowerShot D10.
| Article ID: ART127867 | | | Date published: 05/12/2015 | | | Date last updated: 11/16/2015 |
Solution
There are cases where an image with the same subject (object or person) becomes bluish when captured under fluorescent lighting, and reddish when captured under incandescent lighting.
fluorescent and incandescent lighting have "color temperatures", and this phenomenon occurs due to the differences in color temperature.
Attention:
|
 ), you cannot specify the [White Balance] settings.
 ) or [B/W] (
 ) is selected for My Colors.
Captured with the [Auto] ( ) setting under fluorescent lighting.

Captured with the [Auto] () setting under incandescent lighting.

Digital cameras are equipped with color-correction functions to reproduce colors that are faithful to those of the subject. This function is called "white balance".
The [White Balance] is automatically applied in the [Auto] () setting, but there are cases where a natural color tone may not be achieved under the lighting conditions in which the above image was taken.
If the natural tone cannot be achieved, try to employ the following methods.
Shooting with the white balance preset in a camera (preset white balance)This camera is equipped with the [White Balance] settings that are suitable to various shooting conditions.
See the following procedures to select an optimal white balance that is suitable to the actual shooting conditions.
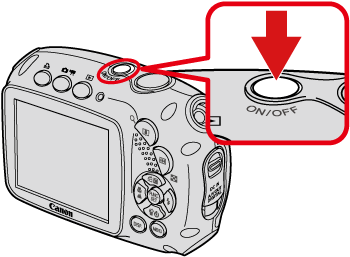
1. Press the <Power> button on the camera.
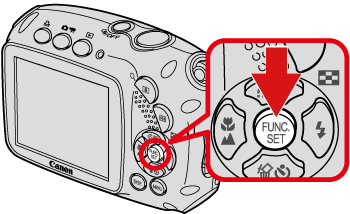
2. Press the <FUNC./SET> ( ) button.
3. The following screen appears.
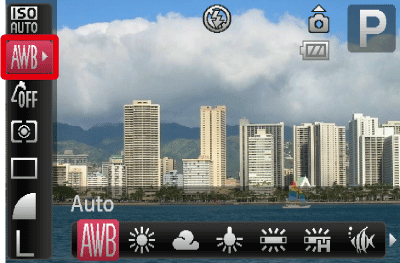
Operate the <directional buttons> up or down to select [Auto] ( ).
).
4. Select an optimal [White Balance] that is suitable to the shooting conditions.

Operate the <directional buttons> left or right to select the [White Balance] mode that you want to change to. (In this case, [Fluorescent] ( ) is selected.)
After making the selection, press the <FUNC./SET> () button.
5. Point the camera at the subject and take a picture.
When you set the [White Balance], a natural color tone can be reproduced as shown in the following image.
Captured with the [Auto] () setting under fluorescent lighting.

Captured with the [Fluorescent] () setting under fluorescent lighting.

See the chart below to select the [White Balance] depending on the shooting conditions.
| Icon | [White Balance] | Shooting condition |
|
Auto | Automatically sets the optimal white balance for the shooting conditions. |
 |
Day Light | Fine weather conditions, outdoor shooting |
 |
Cloudy | Cloudy, shady, twilight conditions |
 |
Tungsten | Tungsten, bulb-type (3-wavelength) fluorescent lighting |
|
Fluorescent | Warm-white fluorescent, cool-white fluorescent, warm-white-type (3-wavelength) fluorescent lighting |
 |
Fluorescent H | Daylight fluorescent, daylight-type (3-wavelength) fluorescent lighting |
 |
Underwater | Sets the optimum white balance for taking pictures underwater. Reduces blue tones to produce natural, vibrant hues |
 |
Custom | Manually sets a custom white balance. |
In shooting conditions that have a mix of various light sources of either natural and indoor lighting, or fluorescent and incandescent lighting, there are some cases where colors cannot be completely corrected even with the [White Balance] preset.
In such cases, take a custom white balance reading in advance so that you can set that particular color as the standard white for shooting.
This will allow you to make color corrections that cannot be performed when using the auto white balance or preset white balance.
This section introduces the method to use a piece of white paper to obtain white balance data.
1. Press the <Power> button on the camera.
2. Press the <FUNC./SET> () button.
3. The following screen appears.
Operate the <directional buttons> up or down to select [Auto] ().
4. Operate the <directional buttons> left or right to select [Custom] ().

5. Point the camera at the white piece of paper or cloth that has the same light source as that of the shooting location.

Fill the screen with a plain, white subject. Press the <DISP.> ( ) button to obtain white balance data.
After you have obtained the white balance data, press the <FUNC./SET> () button.
Note:
|
6. Point the camera at the subject and take a picture.
When you set the custom white balance before shooting, it is possible to reproduce a natural color tone under any light sources as shown in the following image.
Captured with the [Auto] () setting under fluorescent lighting.
Captured with the [Fluorescent] () setting under fluorescent lighting.
Captured with the [Custom] () setting under fluorescent lighting.

|
Note:
* Flash: It is recommended to set [Flash] to [On] ( |
 ) or [Off] (
 ). In [Auto] (
 ), if the flash fires when reading the white balance data, make sure that you also use the flash during shooting.