Preparing to Print
The direct printing procedure can be performed entirely with the camera while you look at the LCD monitor.
Connecting the Camera to a Printer
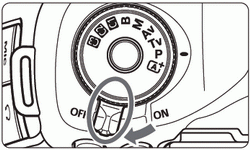 | 1 Set the camera’s power switch to <OFF>. 2 Set up the printer. |
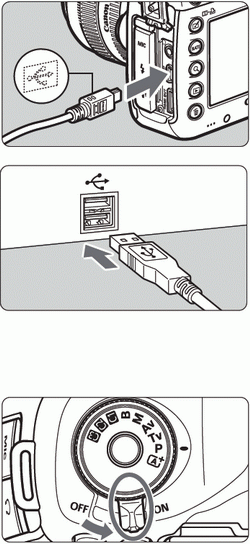 | 3 Connecting the camera to the printer. Use the interface cable provided with the camera. Connect the cable to the camera’s <DIGITAL> terminal with the cable plug’s < > icon facing the front of the camera. > icon facing the front of the camera. To connect to the printer, refer to the printer’s instruction manual.
4 Turn on the printer. |
| |
5 Set the camera’s power switch to <ON>. |
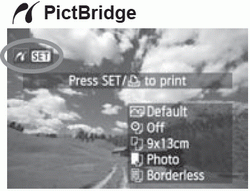 | 6 Play back the image. Press the < > button. > button.
|
Movies cannot be printed.
The camera cannot be used with printers compatible only with CP Direct or Bubble Jet Direct.
Do not use any interface cable other than the one provided.
If there is a long beeping sound in step 5, it indicates a problem with the printer. Resolve the problem displayed by the error message
Printing is not possible in the HDR mode.
You can also print RAW images taken with this camera.
If you use a battery pack to power the camera, make sure it is fully charged. With a fully-charged battery, printing up to approx. 4 hours is possible.
Before disconnecting the cable, first turn off the camera and printer. Hold the plug (not the cord) to pull out the cable.
For direct printing, using AC Adapter Kit ACK-E6 (sold separately) to power the camera is recommended
