Specifying an IP address from the scanner's control panel
Specifying an IP address from the Web menu
If not using a DHCP server, set the following network information for the scanner:
- DHCP
- IP address
- Subnet Mask
- Default Gateway
Selecting [Off] for [DHCP] moves the setting screen for network information such as the IP address.
The LAN setting screens are displayed in the following order.


- if the entered IP address is "0.0.0.0", "255.255.255.255", "127.xxx.xxx.xxx", or "169.254.xxx.xxx", a warning screen is displayed and the entry is rejected.
- If the entered subnet mask is not a contiguous left-justified value, a warning screen is displayed and the entry is rejected.
- If the entered default gateway is "0.0.0.0", "255.255.255.255", "127.xxx.xxx.xxx", "169.254.xxx.xxx", a warning screen is displayed and the entry is rejected.
Top
eb Menu
The Web menu is used to display information about the scanner, to set up the network when connecting to a wired LAN, and to configure various Web services. Scanner settings can be configured using a Web browser.
We recommend the following Web browsers:
- Microsoft Internet Explorer 11 (or higher)
- Microsoft Edge 38 (or higher)
- Firefox 3.0.0 (or higher)
- Chrome 11.0 (or higher)
If you already know the IP address of the scanner (the one assigned via DHCP), open one of the recommended browsers and enter the IP address into the address bar.
If you do not know the DHCP IP address, you can find it by starting the Canon imageFORMULA Driver Settings Too's Setting screen and clicking on the [Network monitor] tab. Select the scanner in the list, and then click on [Properties].

- Enter the administrator password in [Password].
By default, there is no administrator password set on the scanner. So, when opening the Web menu for the first time, do not enter anything and proceed to the next step. if you changed the administrator password previously via the Web menu, enter that password.
To ensure security, we recommend changing the administrator password without leaving it as shipped from the factory (blank).
- Click the [Login] button.
The [Device information] screen appears.
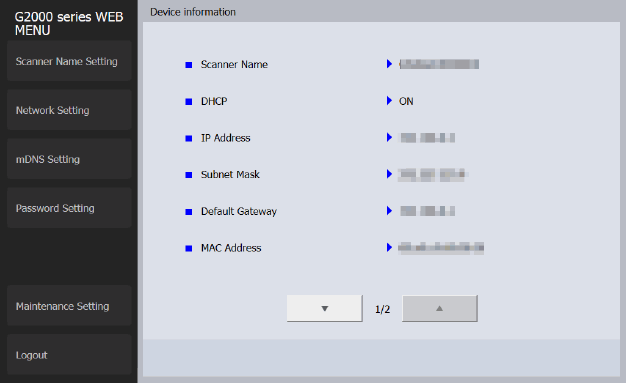
- Click on the [Network Setting] tab on the left side of the screen.

The Network Settings screen appears.
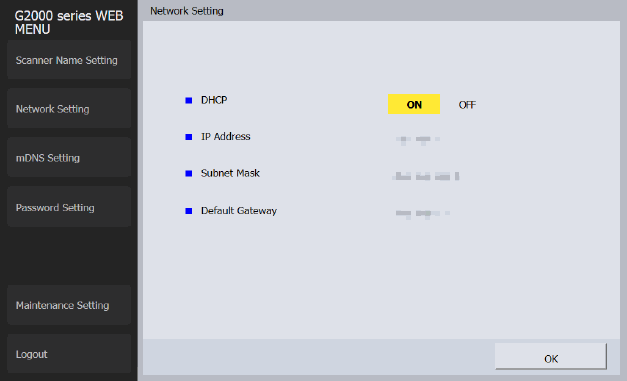
- To change the IP address from DHCP to Static, click on the "OFF" button (next to the "ON" button which is highlighted in yellow).
Once DHCP is set to "OFF", you can edit the following fields:
NOTE: The values must be four decimal numbers separated by dots and expressed in the [xxx.xxx.xxx.xxx] format.
IP Address
Subnet Mask - When set to [0.0.0.0], a subnet mask appropriate for the IP address is automatically set.
Default Gateway
- Once all changes are made, click on the [OK] button.
Top
