Untitled Document
MP Toolbox settings

Example: Scan dialog box
You can adjust the following settings when scanning with the MP Toolbox.
Scanner settings
'Select source': Displays where the document is placed. You can select 'Platen Glass' only.
'Scan mode': Select the scan mode. The scan modes you can select differ depending on the MP Toolbox button you click.
- 'Black and White': Scans a document as a black and white image.
- 'Black and White (OCR)' ('OCR' button only): Scans a document as a black and white image. Select this mode to scan texts crisply, particularly to process it with OCR software. The document is scanned in grayscale and then converted to black and white, therefore takes longer than the 'Black and White' setting.
- 'Grayscale': Scans a document as a grayscale image (similar to a monochrome picture).
- 'Color (Magazine)': Scans a document as a color image with the Descreen function set to On. The Descreen function is designed to reduce as much as possible the distorted pattern (moire) which occasionally occurs when scanning printed materials. The scanning of a document will take longer if you use this function.
- 'Color (Photos)': Scans a document as a color image with the Descreen function set to Off.
-
'Color (Multi-Scan)': For scanning in multiple images placed on the platen glass, and creating a separate image file for each one.
- For the [Mail] button, a new e-mail message with several images attached, or several new mail messages with an image attached will open.
- For the 'Scan-1' and 'Scan-2' buttons, separate files of each image will be created in the linked application.
- If you select 'PDF' in 'Save as type', and then click 'Create multiple PDF' in the PDF settings dialog box, multiple documents will be saved as one PDF.
IMPORTANT: Some applications may not accept multiple images.
- 'Color (Auto crop)': For automatic detection of the document size and color scanning of the document. Even if there are multiple documents on the platen glass, only one file will be created.
'Paper size': Select the size of the document you will scan. If you wish to specify the width and height with a value, select 'Custom' to display the Paper size settings dialog box. Select the 'Unit', enter the 'Width' and 'Height', then click 'OK'.
IMPORTANT: You cannot select a paper size when 'Color (Multi-Scan)' or 'Color (Auto crop)' is selected in 'Scan mode'.
'Upper limit of attached file' ( 'Mail' button only): Select an approximate upper size limit (after compression) for the image you will send. (Depending on the image, some file sizes after compression may be larger than the value set.) For an ordinary mail message, a file size of 150KB is recommended.
IMPORTANT: You cannot set this item when 'PDF' is selected in 'Save as type'.
'Image quality': Select the scan quality (resolution).
- For the 'Mail' button, the choices you can select will depend on your setting in 'Upper limit of attached file'.
- If 'Color (Multi-Scan)' or 'Color (Auto crop)' is selected in 'Scan mode', you will only be able to select '75 dpi', '150 dp' or '300 dpi'.
- The maximum resolution when 'PDF' is selected in 'Save as type' is '400 dpi'.
'Use the scanner driver to make advanced settings': If you select this item and then click 'Start', the ScanGear MP dialog box will appear and you can make advanced settings for scanning. Configure 'Scanner settings' such as 'Scan mode' and 'Paper size' in the ScanGear MP dialog box. If you clear this item, scanning will begin immediately with the settings displayed.
Save scanned image to
'File name': Enter a file name for the scanned image. If you try to save another file with the same name, four digits starting from 0001 will be attached after the file name.
'Save as type'
- 'BMP': Bitmap format
- 'JPEG': JPEG format. Select for grayscale or color images only.
- 'TIFF': TIFF format
- 'PDF': PDF format. You can make advanced settings with the 'PDF settings'.
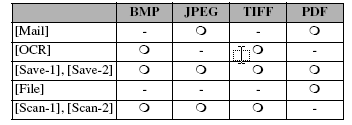
The type of file which can be saved with each button is shown below.
IMPORTANT: If you select 'PDF' in 'Save as type', and select Color/Letter or A4-size / 600 dpi or more in ScanGear MP, a warning message will appear and you will not be able to scan. Reduce the document size and lower the resolution.
'Save to': The place the scanned image will be saved is displayed. To change the folder in which the saved image is to be saved, click 'Browse', select a folder for saving the image, then click 'OK'. The scanned document will be saved in the following location depending on your computer environment.
- If the My Documents folder contains the My Pictures folder, a folder with the scanning date will be created in the My Pictures folder, and your document will be saved in this folder.
- If there is no My Pictures folder, a folder with the scanning date will be created in the My Documents folder, and your document will be saved in this folder.
'Put pictures in a subfolder using today's date': You can either directly save an image in the specified folder or create a folder inside the specified folder with today?s date (e.g. 04/04/2003) and select to save in this folder.
'Link scanned images to': The name of the application to be used by the scanned image will appear. If no name appears or you wish to change the application, click 'Set', select the application you wish to use, then click 'Open'. If for the 'Mail' button the name of the application you wish to use does not appear in the 'Settings for E-mail program' dialog box, select 'None (Attach Manually)'. In this case, the application will not open so you must open the image file in the application and attach the file.
IMPORTANT: The software is compatible with the e-mail software Outlook Express, Microsoft Outlook, EUDORA, and Netscape Messenger. If you do not want to assign an application, click 'Link Deletion'. When asked to confirm, click 'Yes'.
