1. Open [System Preferences] ? click [Print & Fax] or [Print & Scan].
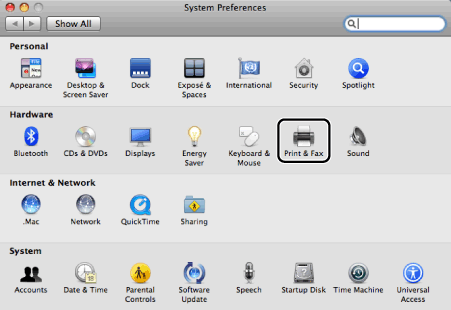
The [Print & Fax] or [Print & Scan] dialog box is displayed.
2. Click the [+] icon.
If you are using OS X Lion, and there are shared printers or Bonjour supported printers on the network, click [+] and select [Add Other Printer or Scanner].
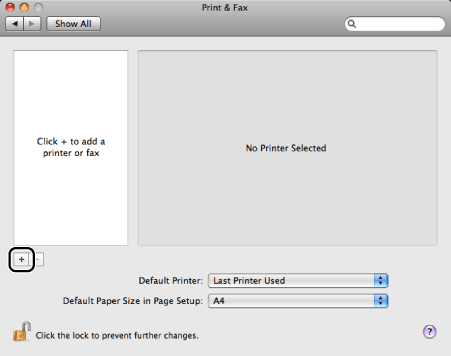
The printer registration dialog box is displayed.
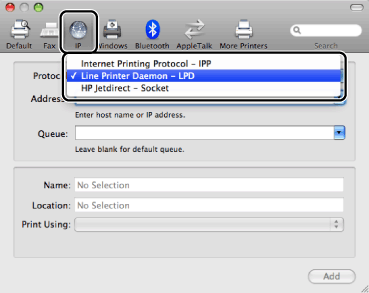
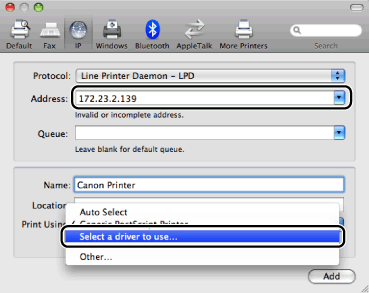
3. Select [IP] or [IP Printer] ? select [Line Printer Daemon - LPD] or [HP Jetdirect - Socket] ([HP Jet Direct - Socket]) from [Protocol].
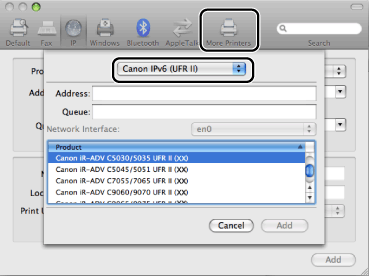
In environments prior to OS X Lion, if the printer you are going to use is connected using IPv6, click [More Printers], then select [Canon IPv6 (UFR II)] or [Canon IPv6(CUPS CMFP)].
NOTE
|
[IPP (Internet Printing Protocol)] is not supported.
|
4. Enter the IP address of the printer you are going to use in [Address] ? select [Select a driver to use] from [Print Using].
If you are using Mac OS X 10.6 or later, enter the IP address of the printer you are going to use ? select [Select Printer Software] from [Print Using].
If the printer you are going to use is connected using IPv6, enter a link-local unicast address or global unicast address for [Address]. If you enter a link-local unicast address, select an interface from [Network Interface] as necessary. 
If you are using OS X Lion, when entering a link-local unicast address, set the network interface as required. In [Address], add "%" to the end of the address, then add the network interface.

IMPORTANT
|
If you are using OS X Lion, although there may be a message saying that you have entered an incorrect address even if you enter the correct address for IPv6, you can still register the printer.
|
NOTE
|
If you are using a printer that is connected using IPv6, you can enter an abbreviated notation unicast address. Also, when entering a global unicast address, you can set a DNS name. This option is only available if a DNS server that supports IPv6 has been specified beforehand in the network settings for the computer you are using.
|
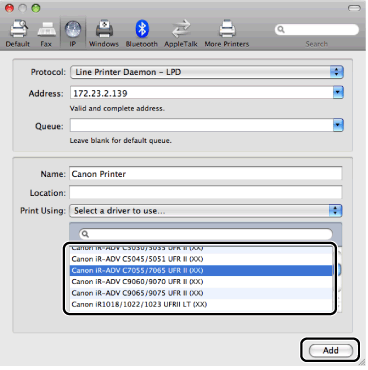
5. Select the printer driver corresponding to the printer you are going to use from the list.
If you are using Mac OS X 10.6 or later, select the printer driver corresponding to the printer model you are going to use in the [Printer Software] dialog box.
NOTE
|
For the printer driver name corresponding to your printer, refer to the Readme file.
|
6. Click [Add]. The option settings dialog box is displayed.
NOTE
|
If you intend to select unidirectional printing, you must configure the options installed in the printer you are using. You can change the option settings after registering the printer.
|
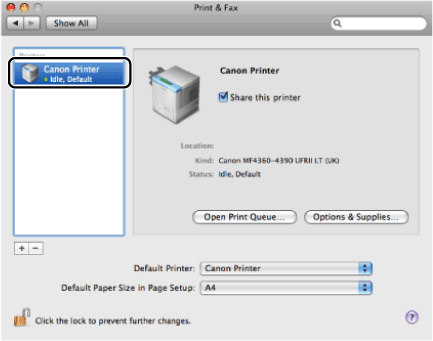
7. Confirm that the printer has been added in the [Print & Fax] or [Print & Scan] dialog box ? close the [Print & Fax] or [Print & Scan] dialog box.
NOTE
|
Confirm that the driver name corresponding to your printer is displayed beside [Kind] on the right-hand side of the [Print & Fax] dialog box. For the printer driver name corresponding to your printer, refer to the Readme file.
|
