With your Wi-Fi® connected SELPHY CP1200, you can easily print from a variety of devices or the compatible app.
Refer to the sections below to learn how to print from each location.
Print from a mobile device
-
Download the Canon PRINT Inkjet/SELPHY app from the App Store (for iOS®) or the Google Play Store (for Android).
-
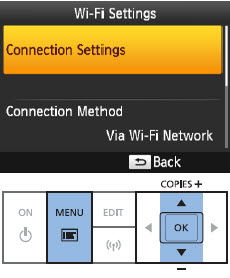
Press the MENU  button on your printer panel.
-
Press the up / down arrow ![UP]() buttons to select Wi-Fi Settings, then press OK.
buttons to select Wi-Fi Settings, then press OK.
-
Press the up / down arrow ![UP]() buttons to select Connection Settings, then press OK.
buttons to select Connection Settings, then press OK.
- Press the up / down arrow
![UP]() buttons to select Direct Connection, then press OK.
buttons to select Direct Connection, then press OK.

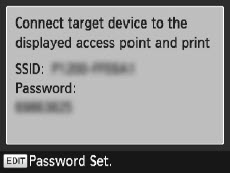
The screen below displays.
-
In your mobile device Wi-Fi settings, select the SSID (network name), then enter the password that displays on the printer.
-
You are ready to start a print task.
 Don't disconnect the device or close the app while this screen displays. Images may not print correctly or completely.
Print via AirPrint
Follow these steps to print from an iOS device using AirPrint.
-
Choose the images, etc. you want to print from your iOS device, then tap Share, and in the menu options, tap Print.
-
In Printer, select Canon SELPHY CP1200.
-
Specify the number of copies, then tap Print.
 While printing, you can press the Home button twice check the status or cancel printing.
Troubleshooting
If you can't print, check the following:
-
Confirm that SELPHY is ON. If SELPHY is on, restart it to see if the problem is resolves.
-
Confirm that SELPHY is connected via Wi-Fi to the same router as the Apple device.
-
Confirm that the paper and ink cassettes are loaded correctly.
-
Remove any inserted memory cards, USB flash drives, or USB cables.
-
Confirm that no error messages display on SELPHY.
-
Reset the Wi-Fi settings and try to connect again.
It may take a few minutes after you turn on SELPHY before Wi-Fi communication is possible. Confirm that SELPHY is connected to the router before you attempt to print.
Print from a Camera
You can print directly from a camera as long as the camera is compatible with DPS over IP (the PictBridge standard for Wi-Fi).
-
Press the MENU button on the printer.
-
Press the up / down arrow ![UP]() buttons to select Wi-Fi Settings, then press OK.
buttons to select Wi-Fi Settings, then press OK.
-
Press the up / down arrow ![UP]() buttons to select Connection Settings, then press OK.
buttons to select Connection Settings, then press OK.
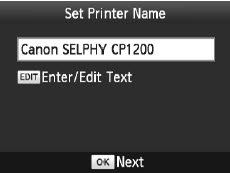
- Check the displayed printer name and press OK. Press the EDIT button to change the printer name.
- Press the buttons to select Direct Connection, then press OK.
The screen below displays.
-
In the camera’s Wi-Fi settings, select the SSID (network name), then enter the password that displays on the printer.
-
Use the camera to select images and print
Don't disconnect the devices while this screen is displays. Images may not be printed correctly or completely
Print from a computer
Follow one of these links to learn how to
print from Windows or
print from a Mac®.
Good to know
-
The printer doesn't enable communication between the devices connected to it.
-
You can also connect the printer to a camera via an existing wireless router as long as the printer and camera are connected to the same router.
-
You can't cancel a print task from SELPHY using the back button. Use the camera to stop printing.
