This section explains how to erase images. IMPORTANT - Be careful when erasing images, because they cannot be recovered. However, protected images cannot be erased.
Erasing Images Individually You can erase unwanted images individually. 1. Press the <Playback> (  ) button to turn on the camera. 2. Press the <  ><  > buttons to choose an image.
 3. Press the <  > button.
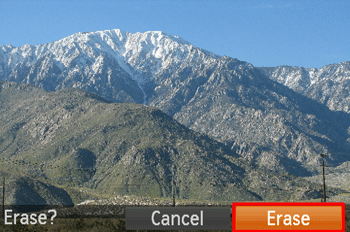
 4. After [Erase?] is displayed, press the < >< > buttons to choose [Erase], and then press the <FUNC./SET> (  ) button. The current image is now erased. NOTE - To cancel erasure, press the <>< > buttons to choose [Cancel], and then press the <FUNC./SET> (
 ) button. ) button.
Erasing images in a batch You can select images and erase them in a batch. IMPORTANT - Be careful when erasing images, because they cannot be recovered. However, protected images cannot be erased.
1. Press the <Playback> ( ) button to turn on the camera. 2. Press the <  > button and choose [Erase] on the [  ] tab.
 3. Press the < ><  > buttons to choose [Select] and press the <FUNC./SET> ( ) button.
 REFERENCE - You can select [All Images] to erase all images at once.
4. Press the < >< > to select the desired images, and then press the <FUNC./SET> ( ) button. [  ] is displayed.
 NOTE To cancel selection, press the < > button again. [ ] is no longer displayed.
5. Repeat step 4 to specify other images. 6. Press the < > button. A confirmation message is displayed. Press the < >< > buttons to choose [OK], and then press the <FUNC./SET> ( ) button.
 |