Perform A Manual Print Head Alignment (Windows) MP970
| Article ID: ART118284 |
| |
Date published: 05/12/2015 |
| |
Date last updated: 08/17/2015 |
Description
Manual print head alignment instructions
Solution
Perform A Manual Print Head Alignment (Windows)
Follow the steps below to perform a Manual Print Head Alignment in Windows:
Note: After confirming that the cable is connected and the printer is powered on, perform the following step.
- Confirm that the print is powered on and open the paper output tray.
- Load three letter sized sheets of plain paper into the rear tray.
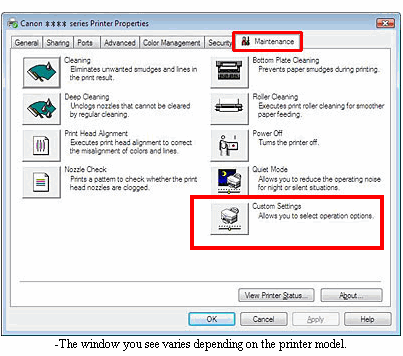
- Open the Printers window.
- For Windows XP Home EditionClick/Select 'Start,' 'Control Panel,' 'Printers and Other Hardware,' and 'Printers and Faxes.'
- For Windows XP Professional Edition Click 'Start' and 'Printers and Faxes.'
- For Windows Vista Click 'Start,' 'Control Panel,' 'Hardware and Sound,' and 'Printers.'
- For Windows 2000Click/Select 'Start,' and 'Settings,' then 'Printers.'
- Right-click the icon of the printer and select 'Properties' in the displayed list.
- Click the 'Maintenance' tab and click 'Custom Settings'.
- Select 'Align heads manually' (make sure the box is checked), and click 'Send'.
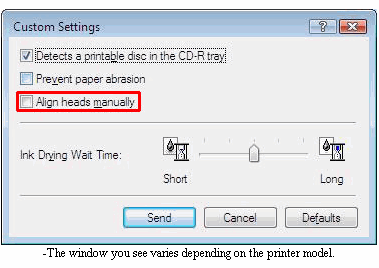
Note: The settings will remain this way until changed again.
- Click 'OK' to send the settings to the printer.
- On the Maintenance tab and click the 'Print Head Alignment' icon.
- The message below is displayed. After confirming the two points below, click 'Print Head Alignment'.
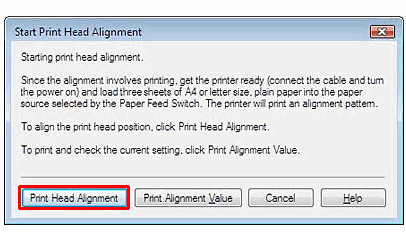
- Click 'OK' to the message that appears.
Note: The power lamp flashes during cleaning operation. Do not perform other operations. After cleaning has finished, the first head alignment pattern will be printed.
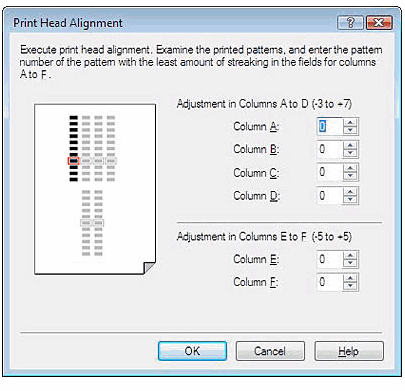
- The pattern will be printed. After printing has finished, click 'Yes' in the message window.

- Refer to the printed sheet, and select the pattern with the fewest visible vertical stripes in Column A.
- Enter the selected pattern's number in the Column A box.
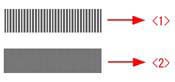
<1> Example of highly visible vertical stripes in the pattern.
<2> Example of the fewest visible vertical stripes in the pattern.
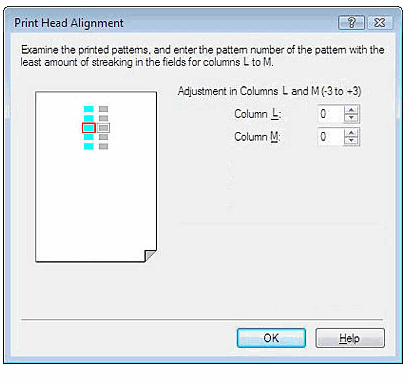
- Similarly, enter the selected numbers in the boxes for column B to F.
- After all numbers have been entered, click 'OK'.
- Click 'OK' after confirming that paper is set in the sheet feeder. Another pattern printing will print.
- Refer to the printed sheet, and enter the numbers on the next screen. Select the pattern with the fewest visible vertical stripes in Columns G through K. If all the patterns seem to be similar, leave the fields at the default setting. Click 'OK'.

- The third pattern prints.
- Refer to the printed sheet, and enter the numbers on the Print Head Alignment window the same way as with the previous patterns.
Note: Manual Print Head Alignment is complete.
