How to print photographs directly from a digital camera
Connecting a PictBridge compliant device such as a digital camera, digital video camera or camera-equipped mobile phone (hereafter, they are collectively called a camera.) to the machine allows you to print recorded images directly without using a computer.
You will find the following logo on your camera or its manual if it is compliant with PictBridge.

How to connect a camera
1. Ensuring that the machine is powered on, pull down the paper output tray.
2. Load paper in the rear tray.
3. Ensure that the camera is turned off.
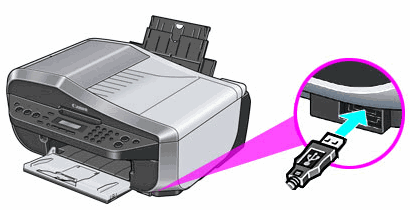
4. Connect the camera to the machine using the USB cable (for connection to a computer) supplied with the camera.
Note : Depending on the camera model/brand, you may have to select a print mode compliant with PictBridge before connecting it to the machine. (For details, refer to the instruction manual supplied with your camera.)
5. Turn on the camera and set it to a replay mode.
Note : Some types of cameras turn on automatically when connected to the machine.
How to print
The following are instructions on Canon cameras. The setting menu below may differ depending on the model or brand of the camera. (For details, refer to the instruction manual supplied with your camera.)
1. Ensure that the following icon appears on the LCD display of the camera when the machine is correctly connected.
Meanwhile, "CAMERA DIRECT." is displayed on the LCD of the machine.
Note : If the icon is not displayed, turn off the camera and disconnect the USB cable. After connecting the USB cable securely, turn on the camera again.

2. Display the images you wish to print using the camera's buttons.
3. Press the <SET> button to display the setting menu.

4. Select 'Paper Settings' or 'Style' and press the <SET> button.
5. Operate the camera to set Paper size, Media type, and Layout (bordered / borderless).
Note : When Default setting is selected in cameras, printing is done according to the machine settings. Machine settings can be changed in PICTBRIDGE SET.
6. Select 'Print' and press the <SET> button. The machine starts printing.
Recommended paper for camera direct printing
Different names may be displayed on your camera depending on its model or brand.
- Paper Size
4" x 6" / 101.6 x 152.4 mm, 5" x 7" / 127.0 x 177.8 mm*1, Credit card, 8" x 10" / 203.2 x 254.0 mm, A4, Letter, Wide*1
- Paper Type
|
Paper Type Setting
|
Loadable Paper*3
|
| Plain Paper*2 |
Super White Paper or other plain paper |
| Photo |
Photo Paper Plus Glossy |
| Glossy Photo Paper |
| Glossy Photo Paper "Everyday Use" |
| Photo Paper Glossy |
| Photo Paper Plus Semi-gloss*4 |
| Photo Stickers*5 |
| Fast Photo |
Photo Paper Pro |
*1 Can be selected only on certain Canon-brand PictBridge compliant devices.
*2 Plain Paper can be selected for Paper type only when Paper size is set to A4 or 8.5" x 11" (Letter). When Paper type is set to Plain Paper, borderless printing will be disabled even when Layout is set to Borderless.
*3 You may not be able to purchase some Canon genuine papers depending on the country or region of purchase.
*4 When printing on Photo Paper Plus Semi-gloss 8" x 10" / 203.2 x 254.0 mm (SG-201),select 20 x 25 cm/8" x 10" for Paper size and Default for Paper type.
*5 Exclusively used to print photo stickers. When printing on sticker paper, select 10 x 15 cm/ 4" x 6" in Paper size and Photo for Paper type. Do not set Layout to Borderless.
