
Setting scan methods for the SCAN button - MX330
| Article ID: ART130370 | | | Date published: 05/12/2015 | | | Date last updated: 08/17/2015 |
Description
Solution
Saving Scanned Data to PC Using the Operation Panel of the Machine
You can save scanned data to PC using the Operation Panel of the Machine.
Before saving scanned data to PC, confirm the following:
-
The necessary software (MP Drivers and MP Navigator EX) are installed.
If the software (MP Drivers and MP Navigator EX) are not yet installed, refer to your setup manual.
-
The machine is connected to a computer correctly.
Do not insert or remove USB cable when scanning images with the machine, or when the computer is in sleep or standby mode.
-
The operation after scanning the original is specified in MP Navigator EX.
MP Navigator EX enables you to specify the response resulting from pressing the Color or Black button on the machine. You can specify the response individually for each event. For details, refer to Selecting a Response to Commands from the Operation Panel Using MP Navigator EX.
-
 Set the Starting application.
If you are using Mac OS X v.10.5.x or Mac OS X v.10.4.x:
This operation is not necessary.
If you are using Mac OS X v.10.3.9:
You need to set MP Navigator EX as the starting application software in Image Capture under Applications of Mac OS X.
Select Applications on the Go menu, then double-click the Image Capture icon. Click Options at the lower left of the scanner window, select MP Navigator EX 2 in Application to launch when the scanner button is pressed:, then click OK. To quit Image Capture, select Quit Image Capture on the Image Capture menu.
 Important
-
If Options is not displayed, select Preferences on the Image Capture menu, click Scanner, and click Use TWAIN software whenever possible to clear the option. Then quit Image Capture and restart it.
-
-
Make sure that the machine is turned on.
-
Load the original document on the Platen Glass or in the ADF.
- Press the SCAN button.
- Use the

 button to select
  PC, then press the OK button.
 -
Use the

 button to select the document type, then press the OK button.
- Auto detect
-
This item is available only when the machine is connected to the computer using a USB cable.
The machine detects the type of the original automatically and the image is saved in the optimized data.
Proceed to step 8. - Document (platen)
-
Scans the original on the Platen Glass applying the optimized settings for scanning a document.
- Photo (platen)
-
Scans the original on the Platen Glass applying the optimized settings for scanning a photo.
- Document (ADF )
-
Scan single-sided original in the ADF applying the optimized settings for scanning a document.
-
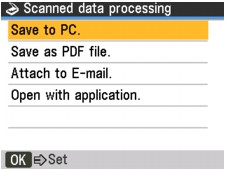
If you have selected a document type other than Auto detect in step 6, use the

 button to select the file format, then press the OK button.
- Save to PC.
-
The original is scanned and saved.
- Save as PDF file.
-
The original is scanned and saved as a PDF file. This item can be selected when Document (platen), Document (ADF simplex), or Document (ADF duplex) has been selected on the Document type screen.
- Attach to E-mail.
-
The original is scanned, and the image is attached to an e-mail using the e-mail application software.
- Open with application.
-
The original is scanned and displayed on the registered application software.
 Note
Note- Options for scan operations can be specified in MP Navigator EX. For details, refer to Selecting a Response to Commands from the Operation Panel Using MP Navigator EX.
- Auto detect
-
Press the Color button for color scanning, or the Black button for black & white scanning.
The settings configured from MP Navigator EX apply when scanning.
Remove the original on the Platen Glass or the Document Output Slot after scanning is complete.
Note- When you select Save as PDF file. as the data format, you can scan documents from the Platen Glass continuously. After scanning is complete, select Continue on the confirmation screen. Load the next document on the Platen Glass, then press the Color button for color scanning, or the Black button for black & white scanning. You can save up to 100 pages of images in one PDF file.
- When you select Save as PDF file. as the data format, you can scan documents from the Platen Glass continuously. After scanning is complete, select Continue on the confirmation screen. Load the next document on the Platen Glass, then press the Color button for color scanning, or the Black button for black & white scanning. You can save up to 100 pages of images in one PDF file.
-
 To specify MP Navigator EX 2.1
If you are using Windows Vista:
The program selection screen may be displayed after pressing the Color or Black button. In this case, select MP Navigator EX Ver2.1 and click OK.
You can set MP Navigator EX to launch whenever pressing the Color or Black button. For details, refer to Selecting a Response to Commands from the Operation Panel Using MP Navigator EX.
If you are using Windows XP:
The program selection screen may be displayed after pressing the Color or Black button for the first time. In this case, specify MP Navigator EX Ver2.1 as the application software to use, select Always use this program for this action, then click OK. From the next time, MP Navigator EX is automatically started.
 Important
- If the position or size of an image is not scanned in correctly depending on the type of the original, change the MP Navigator EX Document Type and Document Size settings to match the original being scanned.
Note- The operation to be performed after scanning the original depends on the scan operation setting you have selected in step 8. For details on how to modify the operation settings, refer to Selecting a Response to Commands from the Operation Panel Using MP Navigator EX.
- If the position or size of an image is not scanned in correctly depending on the type of the original, change the MP Navigator EX Document Type and Document Size settings to match the original being scanned.
-
If You Want to Edit or Print the Scanned Images
MP Navigator EX enables you to edit the scanned images, such as optimizing or trimming.
You can also start application software from MP Navigator EX to edit or print the scanned images.
-
If You Want to Scan Originals with Advanced Settings
ScanGear enables you to scan originals with advanced settings such as the resolution.
Note-
You can use a TWAIN- or WIA- (Windows Vista and Windows XP only) compliant application software and the Control Panel (Windows Vista and Windows XP only) to scan originals with this machine.
-
You can use a TWAIN- or WIA- (Windows Vista and Windows XP only) compliant application software and the Control Panel (Windows Vista and Windows XP only) to scan originals with this machine.
Selecting a Response to Commands from the Operation Panel Using MP Navigator EX
MP Navigator EX enables you to specify the response resulting from pressing the Color Start or Black Start button on the machine. You can specify the response individually for each event.
-
Start MP Navigator EX.
-
Click Preferences.
The Preferences dialog box opens.
 Note
Note- The Preferences dialog box can also be opened by clicking Preferences in the One-click Mode screen.
- The Preferences dialog box can also be opened by clicking Preferences in the One-click Mode screen.
-
On the Scanner Button Settings tab, specify Event and Actions.
 Click OK.
 - The operation will be performed according to the settings when you press the Color Start or Black Start button on the machine.