| Paper Jams
|
| Issue |
 Important Important
- The power cannot be turned off while the printer is sending or receiving a fax, or when the received fax or the unsent fax are stored in the printer's memory. Make sure if the printer completed sending or receiving all the faxes before disconnecting the power cord. If you unplug the power cord, all the faxes stored in the printer's memory are deleted.
 Note Note
- If you need to turn off the printer to remove jammed paper during printing, press the Stop button to cancel print jobs before turning off the printer.
|
| Cause |
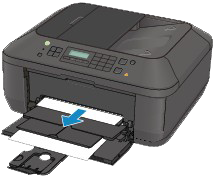
Paper Is Jammed in the Paper Output Slot
|
| Summary |
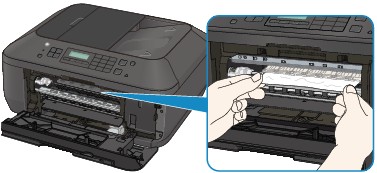
If you can see the jammed paper at the paper output slot, remove the paper following the procedure below.
- Pull the paper out slowly.
Hold the paper with your hands, then pull the paper out slowly not to tear it.
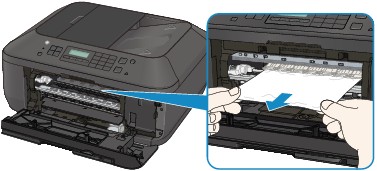
Important
- Do not pull the paper out from the front tray even though you can see the jammed paper at the front tray. Pulling the paper out forcibly from the front tray may damage the printer.
Note
- If you cannot pull the paper out, turn the printer off and turn it back on. The paper may be ejected automatically.If you cannot pull the paper out from the paper output tray, try to pull the paper out from the transport unit.
Refer to Paper Is Jammed inside the printer at the Transport Unit.
- If the paper tears and you cannot remove the jammed paper from the paper output slot, open the paper output cover to remove the paper.
Refer to Paper Is Jammed inside the printer.
|
| See Also |
|
| Cause |
|
| Summary |
- Reload the paper, and press the OK button on the printer.
If you turned off the printer in step 1, all print jobs in the queue are canceled. Reprint if necessary.
Note
- When reloading the paper, confirm that you are using the paper suited for printing and are loading it correctly.
- We recommend you use paper other than A5 sized one to print documents with photos or graphics; otherwise, the printout may curl and cause paper exit jams.
Return to top |
| See Also |
|
| Cause |
|
| Summary |
|
| See Also |
|
| Cause |
Paper Is Jammed inside the printer at the Transport Unit
|
| Summary |
If you can see the jammed paper at the front tray, or you cannot see the paper either at the paper output slot or at the front tray, remove the paper from the transport unit.
Remove the paper following the procedure below.
- Turn the printer off, then unplug the power cord.
- Open the document tray, then open the document cover.
- Stand the printer with the right side facing down.
If you can see the jammed paper at the front tray, stand the printer with the front tray open.
Important
- Stand the printer on a wide and flat surface such as a desk. When you stand the printer, hold it securely and be careful not to hit it on a hard object.
|
| See Also |
|
| Cause |
|
| Summary |
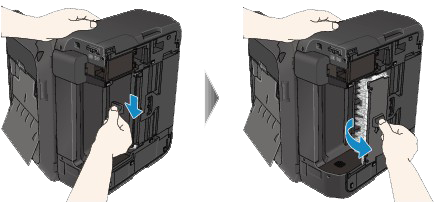
- Push the open lever to open the transport unit.
When you open the transport unit, support the printer with your hand so that it does not fall down.
|
| See Also |
|
| Cause |
|
| Summary |
- Pull out the jammed paper slowly.
When you pull the jammed paper, support the printer with your hand so that it does not fall down.

Note
- If the paper is rolled up and it is difficult to remove, grasp the edges of the paper, then remove the jammed paper.If you cannot remove the jammed paper from the transport unit, close the transport unit, stand the printer upright, then open the paper output cover to remove the paper.
Refer to Paper Is Jammed inside the printer.
|
| See Also |
|
| Cause |
|
| Summary |
- Close the transport unit.

Note
- After you close the transport unit, do not keep the printer standing upright.
|
| See Also |
|
| Cause |
|
| Summary |
- Plug the printer back in and turn the printer back on.
- Reload the paper.
All print jobs in the queue are canceled. Reprint if necessary.
|
| See Also |
|
| Cause |
|
| Summary |
|
| See Also |
|
| Cause |
Paper Is Jammed inside the printer
|
| Summary |
If the jammed paper tears and you cannot remove the paper either from the paper output slot or from the transport unit, or the jammed paper remains inside the printer, remove the paper following the procedure below.
- Turn off the printer, and unplug the power cord of the printer from the power supply.
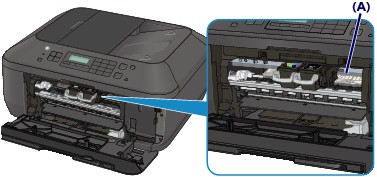
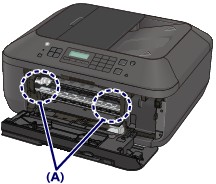
- Open the paper output cover.
Remove the paper on the front tray if any.
Important
- Do not touch the clear film (A). If the paper or your hands touch these parts and blot or scratch them, the printer can be damaged.
|
| See Also |
|
| Cause |
|
| Summary |
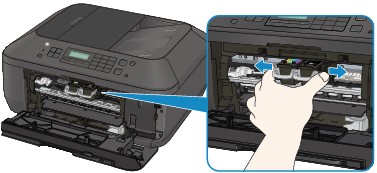
- Make sure that the FINE cartridge holder does not hang over the paper.
If the FINE cartridge holder hangs over the paper, move the FINE cartridge holder to the right edge or the left edge whichever is easier to remove the paper.
When you move the FINE cartridge holder, hold the FINE cartridge holder and slide it slowly to the right edge or the left edge.
- Hold the jammed paper with your hands.
If the edge of paper is jammed near the paper output slot, pull the edge of paper to the position where you can hold it with your hands.
- Pull the paper slowly not to tear it, then pull the paper out.
- Make sure that all the jammed paper is removed.
If the paper is torn, a piece of paper may remain inside the printer. Check the following and remove the piece of paper if it remains.
- Does the piece of paper remain under the FINE cartridge holder?
- Does the little piece of paper remain inside the printer?
- Does the piece of paper remain in the right side or the left side space (A) inside the printer?
- Close the paper output cover, then reload the paper.
All print jobs in the queue are canceled. Reprint if necessary.
Note
- If the message about paper jam is displayed on the computer screen when you resume printing after removing all the jammed paper, a piece of paper may remain inside the printer. In this case, confirm that no piece of paper remains inside the printer.
Return to top |
| See Also |
|
| Cause |
|
| Summary |
|
| See Also |
|
| Cause |
In Other Cases
|
| Summary |
Make sure of the following:
- Check 1: Are there any foreign objects around the paper output slot?
- Check 2: Are there any foreign objects around the front tray?
- Check 3: Is the paper curled?
|
| See Also |
|
| Cause |
Document Jams in the ADF (Auto Document Feeder)
|
| Summary |
Important
- When you turn off the printer to remove the jammed document, make sure of the following.
- The power cannot be turned off while the printer is sending or receiving a fax, or when the received fax or the unsent fax are stored in the printer's memory.
- Make sure if the printer completed sending or receiving all the faxes before disconnecting the power cord.
If you unplug the power cord, all the faxes stored in the printer's memory are deleted.
|
| See Also |
|
| Cause |
|
| Summary |
If the original remains in the ADF by pressing the Stop button while the printer is scanning the document:
If you press the Stop button during scanning then the document remained in the ADF, the message about the paper remained in the ADF appears on the LCD. Press the OK button so that the remaining document is automatically fed out.
|
| See Also |
|
| Cause |
|
| Summary |
If the original is jammed in the ADF:
Remove the document following the procedure below.
|
| See Also |
|
| Cause |
|
| Summary |
- If printing is in progress, press the Stop button.
|
| See Also |
|
| Cause |
|
| Summary |
- Turn off the printer.
|
| See Also |
|
| Cause |
|
| Summary |
- If a multi-page document is loaded, remove any pages other than the jammed page from the ADF, then open the Document Feeder Cover.

|
| See Also |
|
| Cause |
|
| Summary |
- Pull out the jammed document from the ADF.

|
| See Also |
|
| Cause |
|
| Summary |
- Close the Document Feeder Cover, then turn on the printer.
When rescanning the document after clearing the error, rescan it from the first page.
.
Note
- The document may not feed properly depending on the media type, or your environment, such as when the temperature and humidity are either too high or too low. In this case, reduce the number of document pages to approximately half of the loading capacity. If the document still jams, use the Platen Glass instead.
|
| See Also |
|
| Cause |
|
| Summary |
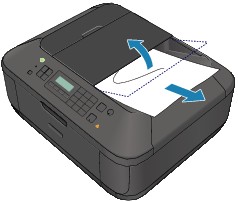
If the original is jammed in the ADF (from the paper feed side):
If the document is jammed in the document output slot, close the document tray as shown in the figure below and pull out the document.
|
| See Also |
|
| Cause |
|
| Summary |
When rescanning the document after clearing the error, rescan it from the first page.
If you cannot remove the document or the document tears inside the printer, or if the document jam error continues after removing the document, the printer will require servicing.
If your product issue was not resolved after following the steps above, or if you require additional help, please create or log in to your Canon Account to see your technical support options.
Or if you still need help, visit our Canon Community by clicking the button below to get answers:

____________________________________________________________________________________________
|
| See Also |
|
