Creating/Editing PDF Files
You can create PDF files by scanning items placed on the platen or ADF (Auto Document Feeder). Add, delete, rearrange pages or make other edits in the created PDF files.
 Important
- You can create or edit up to 100 pages of a PDF file at one time.
- Only PDF files created or edited in IJ Scan Utility or IJ PDF Editor are supported. PDF files created or edited in other applications are not supported.
 Note
Note
-
Place items on platen or ADF.
-
Start IJ Scan Utility.
-
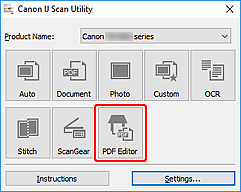
Click PDF Editor.
IJ PDF Editor starts.
-
To specify paper size, resolution, and other settings, click Settings... from the Filemenu, and then set each item in the Settings (Document Scan) dialog box.
Note
- Once settings are made in the Settings dialog box, the same settings can be used for scanning from the next time.
- In the Settings dialog box, specify image processing settings such as slant correction and outline emphasis.
When setting is completed, click OK.
-
Click  (Scan) on Toolbar.
Scanning starts.
Note
-
To open a file saved on the computer, click Open... from the File menu, and then select the file you want to edit.
-
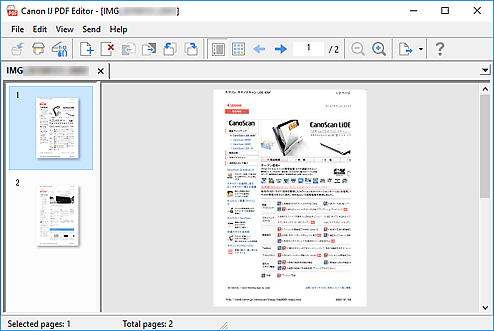
You can switch the view with the Toolbar buttons. For details, see PDF Edit Screen.
-
Add pages as needed.
When scanning and adding more items:
Place items, and then click (Scan) on the Toolbar.
When adding existing images or PDF files:
Click  (Add Page) on the Toolbar. After the Open dialog box appears, select the image(s) or PDF file(s) you want to add, and then click Open.
Note
-
Edit pages as needed.
When changing page order:
Click the page you want to move, and then click  (Page Up) or
  (Page Down) on the Toolbar to change the page order. You can also change the page order by dragging and dropping a page to the target location.
When deleting pages:
Click the page you want to delete, and then click  (Delete Page) on the Toolbar.
Note
-
Select Save As... in File menu.
The Save dialog box appears.
-
Specify save settings.
-
Click Save.
The PDF file is saved.
Note
-
When a password-protected PDF file is edited, the passwords will be deleted. Reset the passwords in the Save dialog box.
-
To overwrite a saved file, click  (Save) on the Toolbar.
TR4520 / TSR4522 Support Page