Adjust the user settings through the web menu.
- Turn the scanner ON.
- Launch the Web browser on the computer.
- Enter the device name or the IP address as the URL to open the Web Menu.
(Ex. http://scanfront220 when the device name is ScanFront220, and http://172.19.xxx.xxx for the IP address).


If [Authentication Method] appears above [User name] on the login screen, users can log in from an account registered on a domain server (Server Authentication), instead of logging in from an account registered on the scanner (Device Authentication).
- Enter a user name and password to log in to the Web Menu.

User names and passwords are case-sensitive. Make sure to enter them correctly.
- From the User Settings screen, you can change the information of a user logged in by Device Authentication.
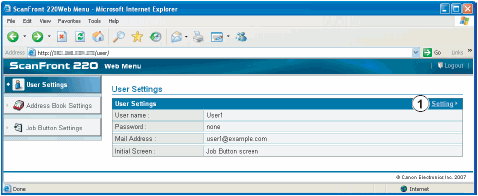
(1) Setting - allows you to edit a user's settings.
 For a user logged in by Server Authentication, you can only select a setting for [Screen after Login].
E-mail address may not be registered for a user logged in by Server Authentication.

User name
Enter a new user name.
Change Password
Select the [Change Password] check box, and then enter the new password and confirmation password.
Mail Address (Not Changeable)
To change the e-mail address, contact the ScanFront administrator.
SMTP/POP Before SMTP Authentication
Appears when [Auth Method] is configured to any setting other than [SMTP] by the administrator in the mail server settings. Enter the [User name] and [Password] that will be used for mail server authentication here.
When entering a [Password], select the [Change Password] check box before entry.
[Change Password] updates the password information saved on the scanner, but does not alter the password registered on the server.
Screen after Login
Select the Home screen or the Job Button screen as the first screen to appear after the user logs in.
Home Screen
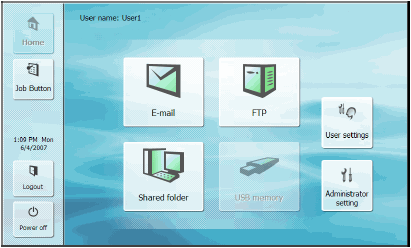
Job Button Screen

The setting for the startup screen after login also affects which screen appears after a scanned image is sent.
If the ScanFront administrator has restricted use of the Home screen, only [Job Button screen] is available for the [Screen after Login] setting.
[OK] button
Updates the user information with the changed settings.
