 Before proceeding with any of the steps below, make sure that the installer program for the Canon drivers or software you're trying to install isn't already running. If the installer is already running, and you attempt to run the installer again while the first instance of the installer is running, the "Can't create output file" error will appear. Check the Taskbar or the Windows Task Manager to ensure that the installer isn't already running. If it is, close the installer, then attempt to install again.
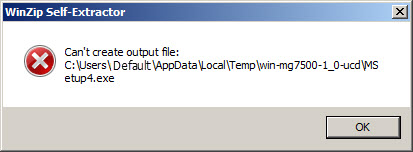
 Troubleshoot the "Can't create output file" when attempting to install downloaded Canon software.
Cause
You may get this error due to a conflict with file extensions.
Remedy
 Try this first: Close all programs and run the downloaded file again.
If the error appears again, follow the steps below that correspond with your Windows operating system.
Windows 10
-
From the Start menu, select Settings.
-
In the Find a Setting box, type File Explorer Options and select its listing in the search results.
-
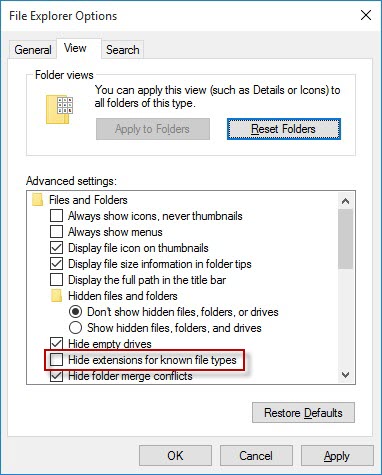
In the File Explorer Options window, select the View tab at the top. Remove the checkmark next to Hide extensions for known file types.
-
Select OK.
-
Locate the file you downloaded from the Canon website. It may be best to save the file on your desktop so it's easy to locate.
-
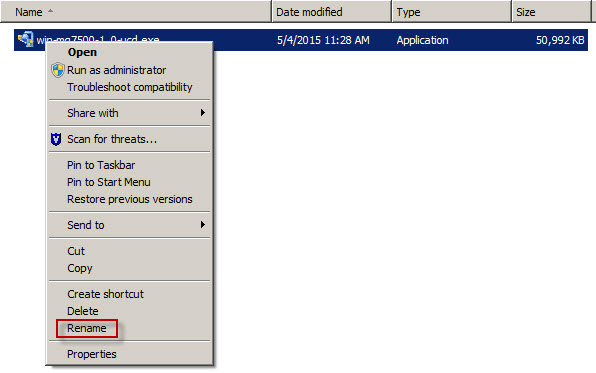
The downloaded file will have a .exe extension. Right-click on the file and select Rename from the pop-up menu.
-
Where you see .exe in the file name, change it to .zip

-
When this prompt appears, select Yes.

-
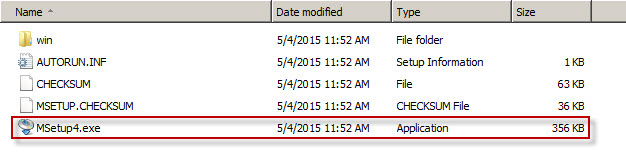
Open the renamed downloaded file. In most instances, there will be a folder inside the .zip file that was opened. Drag this folder out to a location where it can easily be found (such as your desktop).

-
Open the folder and find the setup program (usually MSetup4.exe) and double-click to run it.
-
After running the setup program, right-click on the .zip file that you renamed and change .zip back to .exe
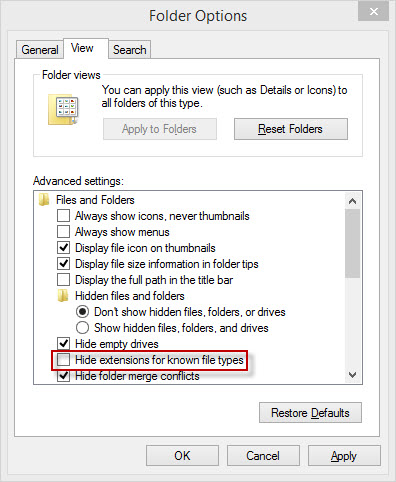
Windows 8 / 8.1
-
Hold down the Windows key and press X to display a menu, then select Control Panel.
-
Open Folder Options. If you don't see the Folder Options icon right away, you can find it by typing Folder Options into the search box at the upper right corner of the Control Panel window.
-
Select the View tab.
-
Remove the check next to Hide extensions for known file types and select OK.
Windows XP / Vista / 7:
-
Open (My) Computer.
-
Select the Tools menu at the top. If Tools does not appear at the top of the window, press the Alt key on your keyboard.
-
Select Folder Options...
-
In the Folder Options window under the View tab, remove the check next to Hide extensions for known file types.
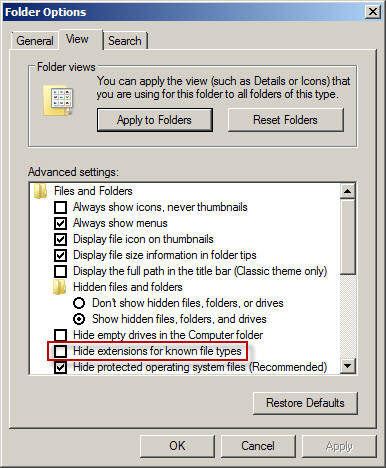
-
Select OK.
