
Copying film / slides on the MP800 / MP800R
| Article ID: ART155730 | | | Date published: 06/09/2015 | | | Date last updated: 08/17/2015 |
Description
Solution
Copying Film / Slides
You can scan 35 mm film into the machine. film strips (six connected frames per strip after regular developing) and slides (one frame per mounted slide) are supported. Various effects can be applied to the images before printing them.
-
Press the <PHOTO/FILM> button.
-
Use the right / left cursor button to select [Print from film] then press the <OK> button.
-
Use the right / left cursor button to select the type of film to scan then press <OK>. The available film options are as follows.
* Color negative film
Standard film for color photos with reversed colors.
* Black & white negative film
Film for black & white photos.
* Color positive film
Film that reproduces the actual colors (Also called reversal film).
* Mount (for slides)
Film mounted 1 frame at a time for use as photos. -
When prompted to open the document cover and remove the FAU protective sheet, press <OK>.
-
You will be instructed to set film in the guide and place the guide on the platen glass (for film strips) or reverse order for film slides, press <OK> at each of the screens.
-
To start scanning, pressing <OK>.
Note: The film is rescanned before printing starts. Do not open the document cover. -
Load paper in portrait orientation in the Auto Sheet Feeder (ASF) or cassette.
-
Print a scanned photo. The following instructions uses Single-photo print as an example.
-
Use the right / left cursor button to select [Single-photo print] then press <OK>.
-
Use the right / left cursor button to display the photo you want to print then press <OK>.
The print confirmation screen is displayed.
< 1 > Check the page size and media type.
Note: Press Settings to check or change the page size, media type, or other settings.
< 2 > Use the up / down cursor button to specify the number of prints. -
If the above confirmation screen does not display, press the right / left arrow to select the appropriate paper size.
-
Press the down arrow to select the appropriate media type.
-
Now, press <OK>.
-
Press <Color> to copy in color, or <Black> to copy in black & white.
The machine starts printing. -
To cancel printing, press <Stop/Reset>.
Mount film in the appropriate film guide then position the film guide on the Platen Glass before scanning.
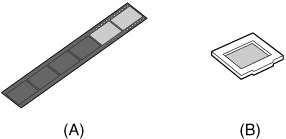
(A): 35mm film strip guide
(B): 35mm film slide guide
-
Open the document cover and remove the FAU protective sheet using hands.
Note:
* Be careful not to drop the FAU protective sheet on the platen glass when removing it.
* Do not return the removed FAU protective sheet in the document cover until printing is completed.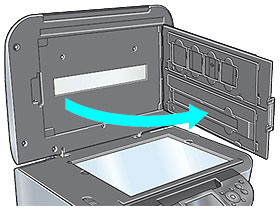
-
Remove either the film strip guide or film slide guide from the rear of the FAU protective sheet.

-
Place the appropriate film strip guide or film slide guide on the platen glass.
-
Open the film holder of the film guide for film strip, gently squeezing the film holder at the tabs.

-
Mount the film in the film guide with the front side (the side showing the correct image) facing down.
Note: Slip the tip of the film under the tabs of the film guide and position the film in the film guide so that the spaces between the frames align with the white line marks of the film guide.
Make sure to mount the upper side of the film toward you when the film guide is set on the platen glass.
-
Close the film holder, gently squeezing the tabs.
Ensure that the film holder fits in. -
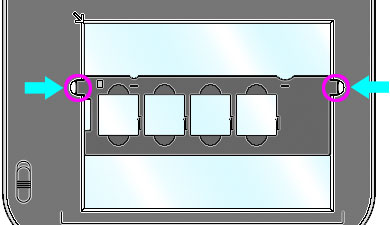
Align the protrusions of the film guide with the indentations on the right and left side of the platen glass.
Note: When placing film strips that are shorter than the film guide, part of an image near the open area may appear pale. In this case, place black paper over the open area to shield it.
-
Slowly close the document cover.
-
Align the protrusions of the film guide for slides with the indentations on the right and left side of the platen glass.
-
Mount the slides in the film guide with the front side (the side showing the correct image) facing down.
Note:
Load the slides in the landscape orientation, making sure they are not loose in the film guide.
Make sure to mount the upper side of the slides toward you.
-
Slowly close the document cover.