
FTP Server Settings Windows (imageCLASS MF7480/MF7470 Only)
| Article ID: ART104485 | | | Date published: 05/11/2015 | | | Date last updated: 08/15/2015 |
Description
FTP Server Settings Windows (imageCLASS MF7480/MF7470 Only)
Solution
FTP Server Settings Windows (imageCLASS MF7480/MF7470 Only)
Windows 2000/XP/Server 2003/Vista
note:- It is recommended that the FTP server be configured by the network administrator.- The use of Windows 2000 Server as an FTP server requires the installation of Microsoft Internet Information Services 5.0 (IIS 5.0). If IIS is not installed in the computer you are using, you will need to install IIS before entering these settings. For installation procedures, see the documentation provided with your operating system.-The use of Windows XP Professional as an FTP server requires the installation of Microsoft Internet Information Services 5.1 (IIS 5.1). If IIS is not installed in the computer you are using, you will need to install IIS before entering these settings. For installation procedures, see the documentation provided with your operating system. Windows XP Home Edition cannot be used as an FTP server.
- The use of Windows Server 2003 as an FTP server requires the installation of Microsoft Internet Information Services 6.0 (IIS 6.0). If IIS is not installed in the computer you are using, you will need to install IIS before entering these settings. For installation procedures, see the documentation provided with your operating system. ?The use of Windows Vista as an FTP server requires the installation of Microsoft Internet Information Services 7.0 (IIS 7.0). If IIS is not installed in the computer you are using, you will need to install IIS before entering these settings. For installation procedures, see the documentation provided with your operating system.- User authentication for access to FTP servers is done by referencing the local account database Windows 2000 Server/XP Professional/Server 2003/Vista that is used as the FTP server. Therefore, it is not possible to use the account of a domain user registered in Windows 2000 Server/XP Professional/Server 2003/Vista to send data directly from the machine to FTP servers in other domains.- This section describes the procedures for using the default home directory under [Default FTP Site]. To use other settings, enter the FTP site and home directory by referring to the documentation for IIS.
1. Log on to Windows as a member of the group with access rights to the directory to be designated as the FTP site directory.
note:Depending on your environment, the access rights settings for a drive or directory may differ. For details, see the Windows documentation.
2. Start IIS.
- For Windows Vista, click [Start] on the Windows task barrightclick [Computer]
- For Windows 2000, click [Start] on the Windows task bar
- For Windows XP, click [start] on the Windows taskbar
- For Windows Server 2003, click [start] on the Windows task bar point to [Administrative Tools]
note:For Windows Vista, click [Continue] to proceed if the [User Account Control] dialog box appears.
3. Enter the FTP site settings.
- Right-click the [Default FTP Site] icon
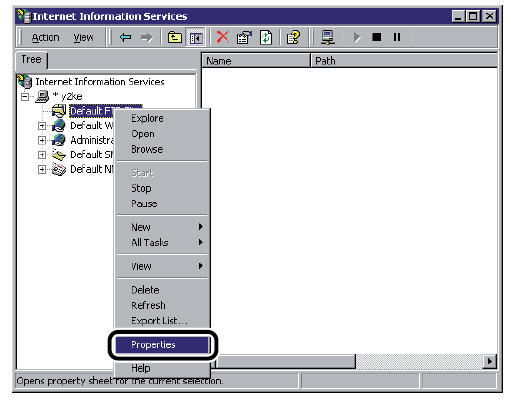
- In Windows Server 2003, the [Default FTP Site] icon is displayed under [FTP Sites].
- In the [Default FTP Site Properties] dialog box, click the [Security Accounts] tab to display the [Security Accounts] sheet.
- If you are using Windows 2000, deselect [Allow Anonymous Connections]. If you are using Windows XP/Server 2003/Vista, deselect [Allow only anonymous connection].
- Click the [Home Directory] tab to display the [Home Directory] sheet
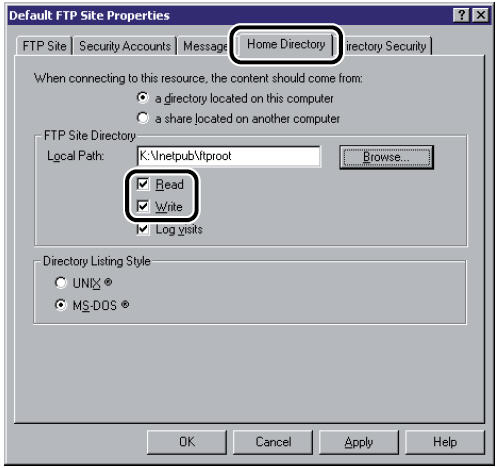
- Click [OK] to close the [Default FTP Site Properties] dialog box.
4. Confirm the computer name.
For Windows Vista:
- Click [Start] on the Windows taskbar
- Click the [Computer Name] tab to display the [Computer Name] sheet
- Right-click the [My Computer] icon on the desktop
- Click the [Network Identification] tab to display the [Network Identification] sheet- Click [Cancel] to close the [System Properties] dialog box.
- On the [Start] menu, right-click [My Computer]
- Click the [Computer Name] tab to display the [Computer Name] sheet- Click [Cancel] to close the dialog box.
5. Open the [Computer Management] window.
- For Windows Vista, click [Start] on the Windows taskbar, rightclick [Computer]
- For Windows 2000, right-click the [My Computer] icon on the desktop
- For Windows XP/Server 2003, click [start] or [Start] on the Windows taskbar
note:For Windows Vista, click [Continue] to proceed if the [User Account Control] dialog box appears.
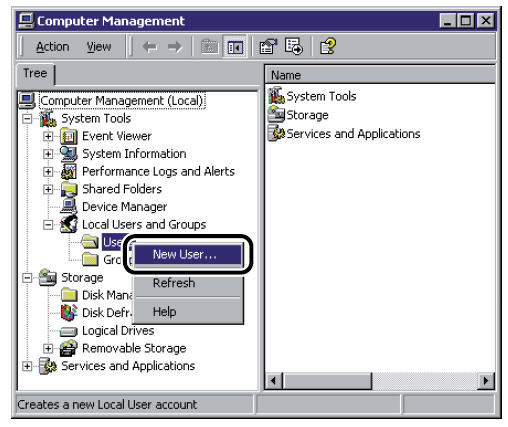
6. Set up the users and passwords for access to the FTP server.
- Under [System Tools], double-click [Local Users and Groups]
- In the [New User] dialog box, enter the user name in [User name]
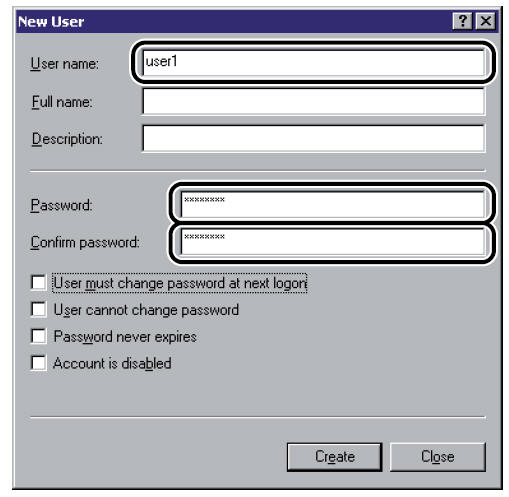
- Enter a user name and a password not longer than 24 alphanumeric characters. If [User must change password at next logon] is selected, any new users added must change their passwords in order to send data from the machine. (You cannot change the password from the control panel.)
- Confirm the settings
- Click [Close] to close the [New User] dialog box.
- Close the [Computer Management] window.
7. Set a destination address using the control panel.
- Server side settings:
[Full Computer Name]: starfish.organization.company.com Create a directory named ?share? in the specified FTP server's home directory "\Inetpub\ftproot", then set "share" as the data destination.
- The machine's destination settings:
The Protocol drop-down list: FTP
[Host Name]: starfish.organization.company.com
[File Path]: share
[User]: User name entered in step 6
[Password]: Password for the above user
SMB Settingsnote:- To use [Full computer name], which was confirmed in step 4, as the host name for [Host Name] as shown in the above example, it is necessary to use a DNS server. (This applies even if the machine and the FTP server are in the same subnet.) If no DNS server is available, the host name setting should be specified using the IP address of the FTP server.- A maximum of 120 alphanumeric characters can be entered for [Host Name] and [File Path].- If Language Switch in Common Settings is set to [On], the Host Name and File Path of the file server destination may not be displayed correctly, so you may not be able to refer to them.
note:You may need to specify the WINS Settings to resolve the NetBIOS name in order to send data to the file server.
1. Press(Additional Functions).
2. Press [System Settings]
If the System Manager ID and System Password have been set, enter the System Manager ID and System Password using(numeric keys), then press
(Log In/Out) to enter the System Settings menu.
The SMB Settings screen appears.
3. Select [On] for <Use SMB Client>.
4. Press [Server].
5. Enter the NetBIOS name of the machine using the keyboard on the touch panel display, then press [OK].
Be sure to enter a unique name that does not exist as a name for another computer or printer on the same network.
6. Press [Workgroup].
7. Enter the name of the workgroup the machine belongs to, using the keyboard on the touch panel display, then press [OK].
If there is no workgroup on your environment, you do not need to enter the workgroup name.
note:- You cannot enter the domain name as the workgroup name.- You cannot enter a character string that includes blanks in [Server] and [Workgroup].
8. Press [Next], then [Comment].
9. Enter a comment about the printer if necessary, then press [OK].
If you display the printer information, the comment you specified here appears.
10. Select [On] or [Off] for <LM Announce>.
[Off]: Does not notify the LAN Manager of its existence on the network.
[On]: Notifies the LAN Manager of its existence on the network.
11. Press [OK].
12. Press [Done] repeatedly until the Additional Functions screen closes.
13. Restart the machine.
Turn off the machine, wait at least 10 seconds, then turn it on.
SIMS Doc Id
0