
Creating, Changing or Deleting Coded Speed and Group Dials using the Speed Dial Utility - MX360
| Article ID: ART110846 | | | Date published: 05/11/2015 | | | Date last updated: 08/17/2015 |
Description
Solution
Registering a Fax/telephone Number Using Speed Dial Utility
Follow the procedure below to register fax/telephone numbers. To delete or change recipients, click the link(s) below
-
Before you register fax/telephone numbers using Speed Dial Utility, make sure that no fax operations are in progress.
*Windows screen shots are used in the following instructions. The Mac screens are similarly arranged
-
Start up Speed Dial Utility.
-
Select the machine from the Printer Name list box, then click Display Printer Settings.
-
Click TEL Number Registration from Setting Item List.
The list of registered fax/telephone numbers is displayed.
-
Select an unoccupied code from the list, then click Edit....
The Individual or Group Selection dialog box is displayed.
-
Click Register individual TEL number or Register group dial, then click Next.
-
If Register individual TEL number is selected:
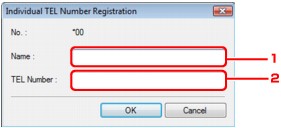
- Enter the name.
- Enter the fax/telephone number.
- Enter the name.
-
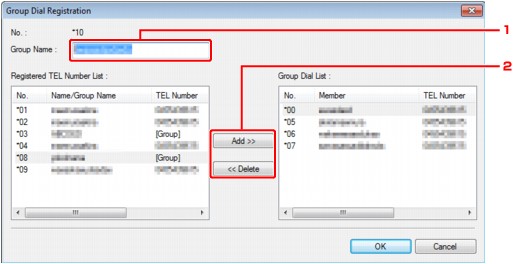
If Register group dial is selected:

- Enter the group name.
-
Select the code you want to add to the group dial, then click Add.
 Note
Note- You can only enter numbers that have already been registered to coded speed dial codes.
- You can only enter numbers that have already been registered to coded speed dial codes.
- Enter the group name.
-
-
Click OK.
To continue registering fax/telephone numbers or a group dial, repeat steps 4 to 6.
-
To save the registered information on the computer.
-
Click Save to PC....
-
Enter the file name on the displayed screen, then click Save.
-
-
To register the registered information to the machine:
-
Click Register to Printer.
-
Confirm the message on the display, then click OK.
The information is registered to the machine.
-
-
Deleting Recipients for Speed Dialing Using Speed Dial Utility
Follow the procedure below to register fax/telephone numbers.
-
Before you delete fax/telephone numbers using Speed Dial Utility, make sure that no fax operations are in progress.
-
Start up Speed Dial Utility.
-
Select the machine from the Printer Name list box, then click Display Printer Settings.
-
Click TEL Number Registration from Setting Item List.
The list of registered fax/telephone numbers is displayed.
-
Select a code to delete from the list, then click Delete.
The selected fax/telephone number is deleted.
To continue deleting fax/telephone numbers, repeat step 4.
Note
To delete all fax/telephone numbers on the list, click Select all, then Delete.-
To save the edited information on the computer.
-
Click Save to PC....
-
Enter the file name on the displayed screen, then click Save.
-
-
To register the edited information to the machine:
-
Click Register to Printer.
- Confirm the message on the display, then click OK.
The information is registered to the machine.
-
-
Changing Recipients for Speed Dialing Using Speed Dial Utility
Follow the procedure below to register fax/telephone numbers.
-
Before you register fax/telephone numbers using Speed Dial Utility, make sure that no fax operations are in progress.
-
Start up Speed Dial Utility.
-
Select the machine from the Printer Name list box, then click Display Printer Settings.
-
Click TEL Number Registration from Setting Item List.
The list of registered fax/telephone numbers is displayed.
-
Select a code to change from the list, then click Edit....
-
If an individual fax/telephone number is selected:
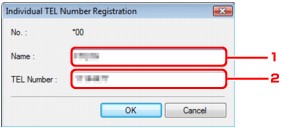
- Enter the new name.
- Enter the new fax/telephone number.
- Enter the new name.
-
If a group dial is selected:
- Enter the new group name.
-
Add or delete a member to/from the group dial.
To add a member:
Select the code to add to the group dial, then click Add.
To delete a member:
Select the code to add to the group dial, then click Delete.
- Enter the new group name.
-
-
Click OK.
To continue changing fax/telephone numbers or a group dials, repeat steps 4 to 5.
-
To save the edited information on the computer.
-
Click Save to PC....
-
Enter the file name on the displayed screen, then click Save.
-
-
To register the edited information to the machine:
-
Click Register to Printer.
The information is registered to the machine.
-
-
Starting Up Speed Dial Utility
Before starting up Speed Dial Utility, confirm the following:
-
The necessary application software (MP Drivers and Speed Dial Utility) is installed.
If the application software (MP Drivers and Speed Dial Utility) is not yet installed, insert the Setup CD-ROM into the computer's disc drive, then perform Custom Install and select MP Drivers and Speed Dial Utility.
-
The machine is connected to a computer correctly.
Make sure that the machine is connected to the computer correctly.
Do not plug in or unplug the USB cable when saving registered information on the computer, or when the computer is in sleep or standby mode.
If you use Speed Dial Utility via a network connection, make sure that all the required settings have been specified.
-
Make sure that the machine is turned on.
-
Open Speed Dial Utility
Windows:Click Start and select All programs (or Programs), Canon Utilities, Speed Dial Utility, and then Speed Dial Utility.
Mac:
Select Applications on the Go menu of Finder
Double-click the Canon Utilities folder.
Double-click the Speed Dial Utility folder.
Double-click Speed Dial Utility.
Speed Dial Utility starts up.
Note:
You can also start up the Speed Dial Utility by clicking  Speed Dial Settings from Help & Settings on Solution Menu EX.